General Questions

Note: e-School provides you the privilege to customize your menu. In case you have customized the menu, you might not locate the menu as documented in these support pages.
Administration Module
Administration Module consists of setting for user role, permission, SLA Settings, Organization Setup, School Setup, Report Format & Others. Under administrative module following settings need to be done:
- Organization Setup
- School Setup
- Set Report Format
- User/Role/Permission
- Notice
- Software Level Alert Settings (SLA)
- Guests and Visitors
- Events
Organization Setup
To set the organization details in software, you have to set following details:
- Organizations Setting
- Main Department
- Department
- Designation
- Product Meta data
Organization Setting
Under organization settings, there are settings such as:
- Company Settings
- Account Settings
- Payroll Settings
- Attendance Settings
- Billing Settings
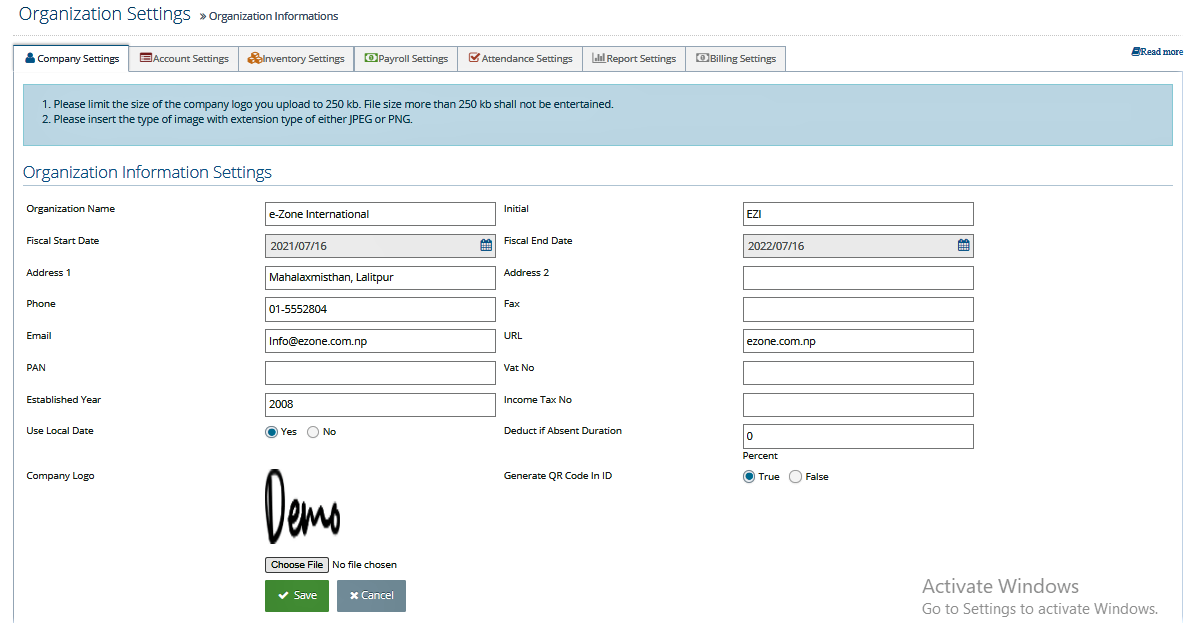
Step I: Company Settings
You can insert company related information as per the company setting form correctly which data will be reflect in every report format.
- Go to Administration
- Under Organization Setup, select Company Settings
- Enter organization details like organization name, address, phone, email, PAN no, etc
- Use Local Date Option “Yes” for local/B.S or “No” for A.D
- Use logo less than 45kb.
- Click Save
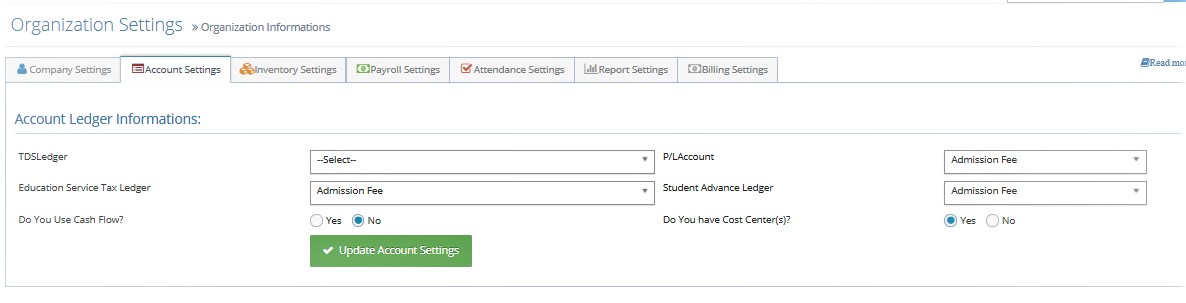
Step II: Account Settings
Here, you can set the ledger name in which accounting effect is made as per the company rules.
- Go to Administration
- Under Organization Setup, select Company Settings
- Select Account Settings
- Enter all the required details
- Click Update Account Settings
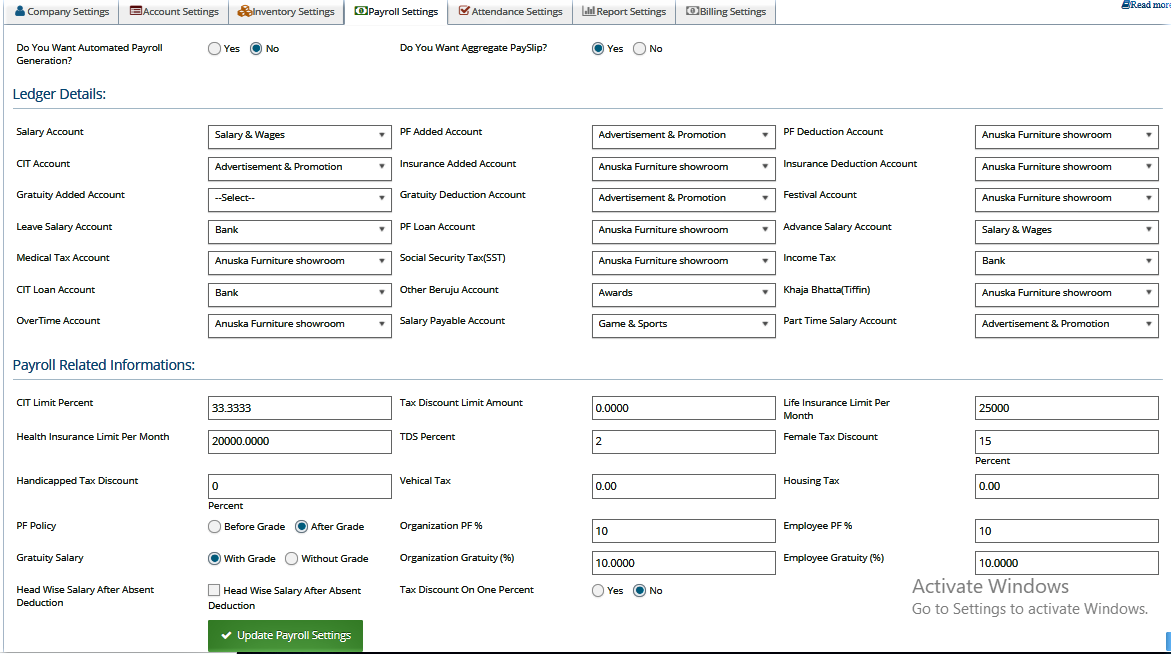
Step II: Payroll Settings
Here, you can set the ledger name in which accounting effect is made as per the company rules.
- Go to Administration
- Under Organization Setup, select Company Settings
- Select Payroll Settings
- Enter all the required details
- Click Update Payroll Settings
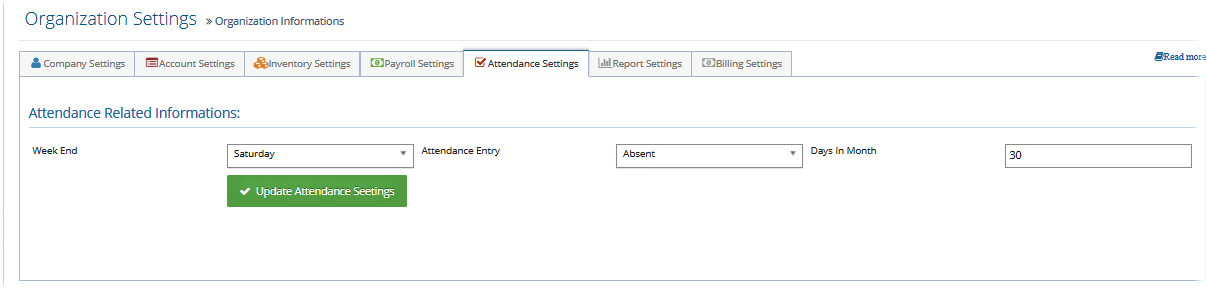
Step IV: Attendance Settings
Here we can set week end day which is affecting in attendance record as per the company rules.
- Go to Administration
- Under Organization Setup, select Company Settings
- Select Attendance Settings
- Enter all the required details
- Click Update Attendance Settings
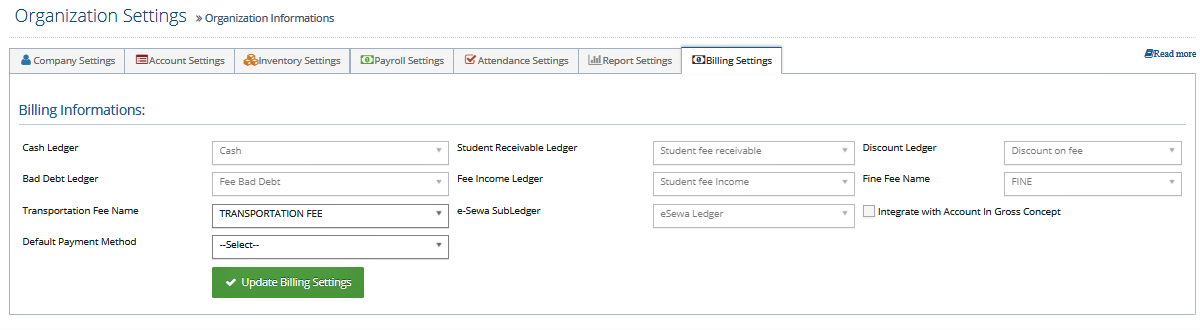
Step V: Billing Settings
- Go to Administration
- Under Organization Setup, select Company Settings
- Select Billing Settings
- Enter all the required details
- Click Update Billing Settings
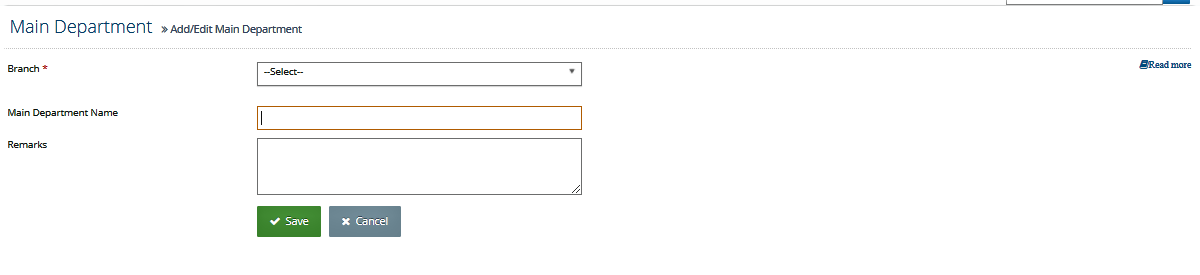
Main Department
To save main departments to the system:
- Go to Administration
- Under Organization Setup, select Main Department
- Enter the required details
- Click Save
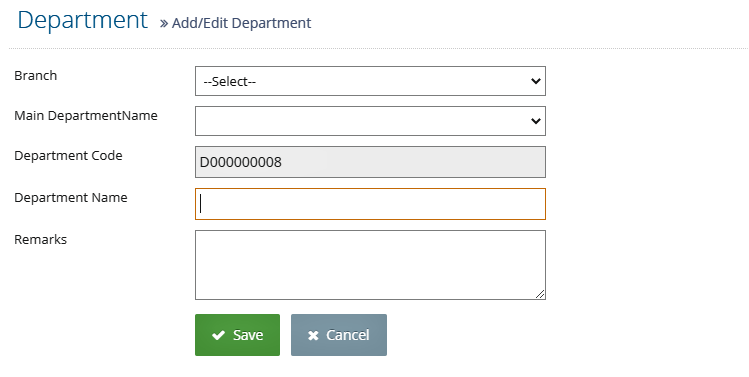
Department
You can set the departments to the system as:
- Go to Administration
- Under Organization Setup, select Department
- Click New
- Enter the required details
- Click Save
If you want to edit or delete the department,
- Go to Administration
- Under Organization Setup, select Department
- Click Edit next to the department you want to edit from the list
- Make required changes
- Click Update
- If you want to delete the department, click Delete
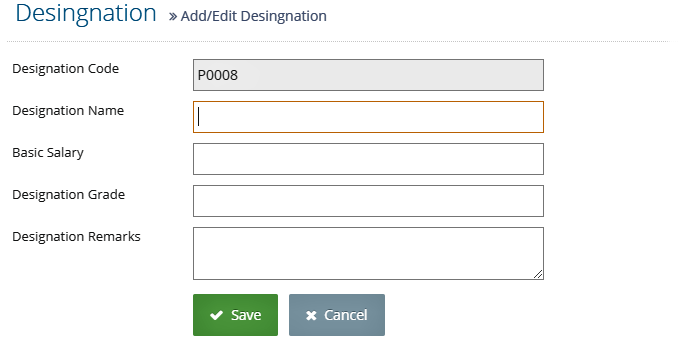
Designation
You can set designation in Software for employee.
- Go to Administration
- Under Organization Setup, select Designation
- Click New
- Enter the required details
- Click Save
If you want to edit or delete the department,
- Go to Administration
- Under Organization Setup, select Designation
- Click Edit next to the department you want to edit from the list
- Make required changes
- Click Update
- If you want to delete the department, click Delete
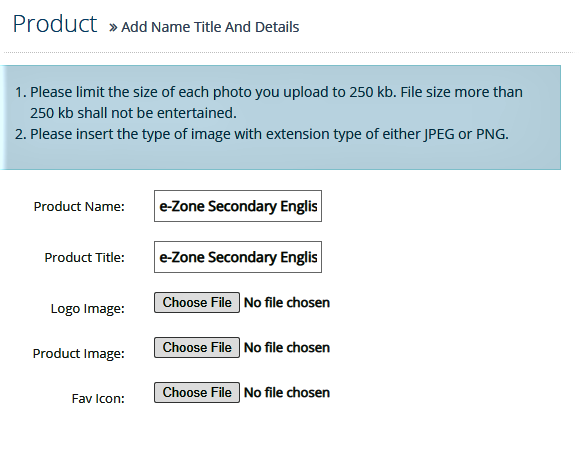
Product Meta Data
To set the product meta data of the company,
- Go to Administration
- Under Organization Setup, select Product Meta Data
- Enter the required attachments
- Click Save
School Setup
Here you can set School administration related data.
- Academic Year
- University/Board
- Level
- Faculty
- Class/Program
- Academic Year Run
- Program Semester
- Class Change
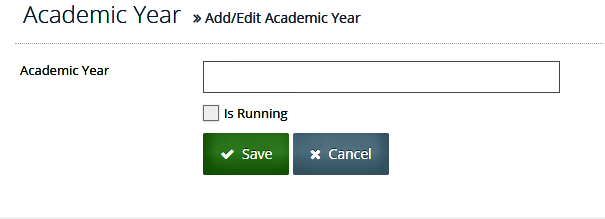
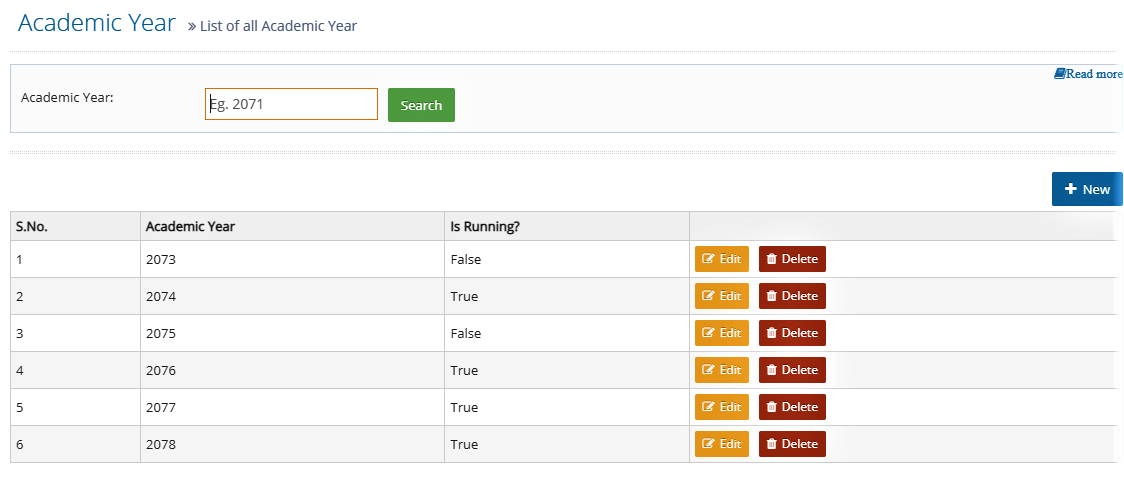
Academic year
Here you can create academic year.
- Go to Administration
- Under School Setup, select Academic Year
- Click New
- Enter the required details
- Click Save
If you want to edit or delete the academic year,
- Go to Administration
- Under School Setup, select Academic Year
- From the list, click Edit/ Delete next to the academic year you want to edit or delete
- If you clicked edit, make necessary changes and click Update
- If you clicked delete, click Ok
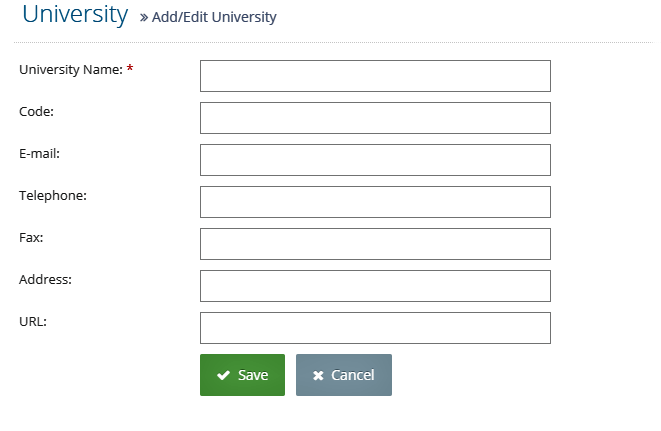
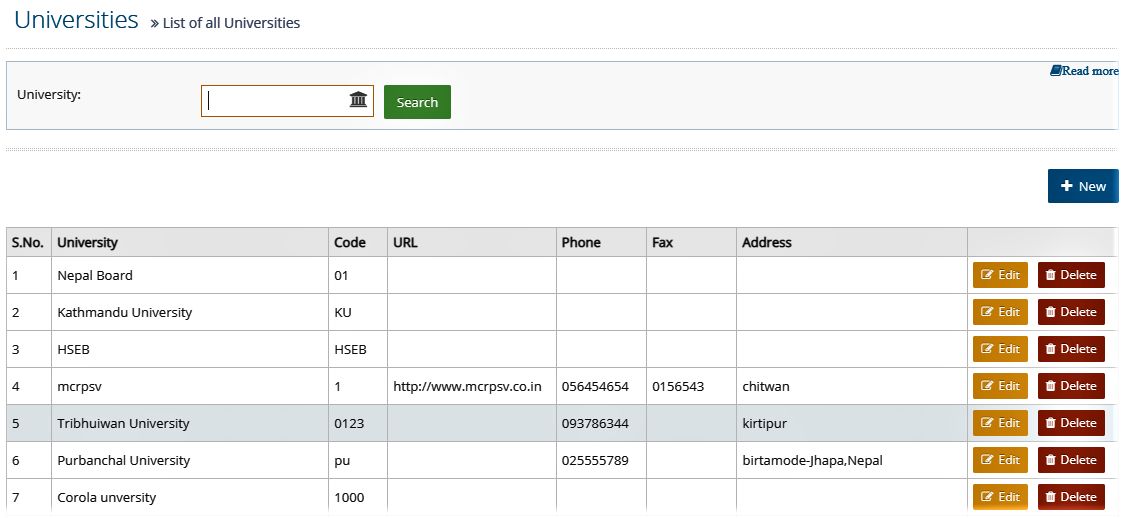
University/Board
Here you can create university/board.
- Go to Administration
- Under School Setup, select University/Board
- Click New
- Enter the required details
- Click Save
If you want to edit or delete the university/board,
- Go to Administration
- Under School Setup, select University/Board
- From the list, click Edit/ Delete next to the university/board you want to edit or delete
- If you clicked edit, make necessary changes and click Update
- If you clicked delete, click Ok
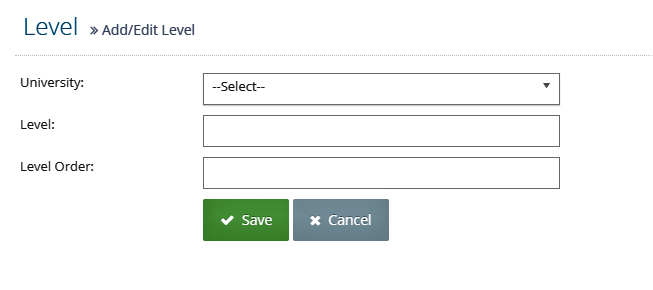
Level
Here you can create level.
- Go to Administration
- Under School Setup, select Level
- Click New
- Enter the required details
- Click Save
If you want to edit or delete the level,
- Go to Administration
- Under School Setup, select Level
- From the list, click Edit/ Delete next to the level you want to edit or delete
- If you clicked edit, make necessary changes and click Update
- If you clicked delete, click Ok

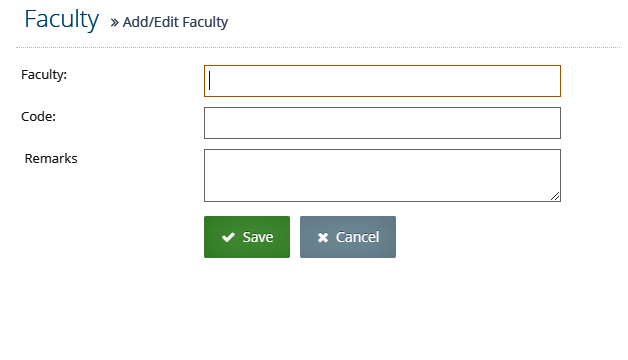
Faculty
Here you can create faculty.
- Go to Administration
- Under School Setup, select Faculty
- Click New
- Enter the required details
- Click Save
If you want to edit or delete the faculty,
- Go to Administration
- Under School Setup, select Faculty
- From the list, click Edit/ Delete next to the faculty you want to edit or delete
- If you clicked edit, make necessary changes and click Update
- If you clicked delete, click Ok

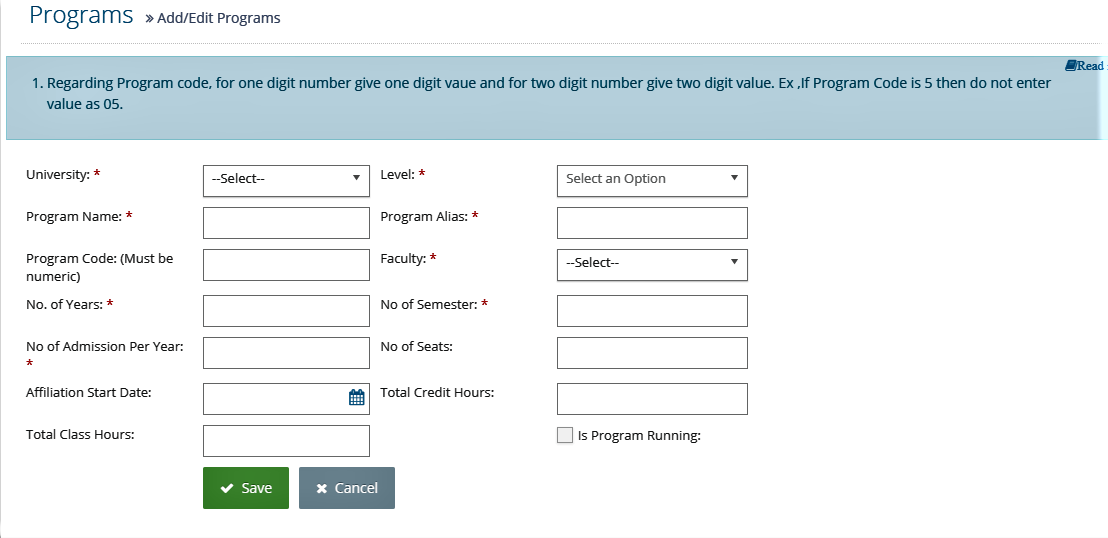
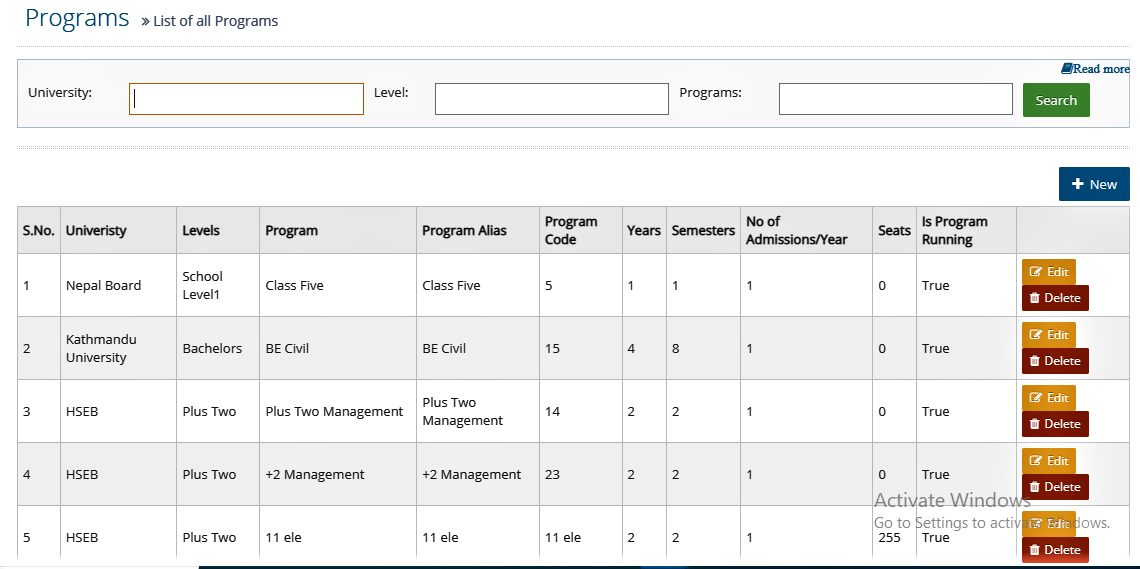
Class/Program
Here you can create class/program.
- Go to Administration
- Under School Setup, select Class/Progam
- Click New
- Enter the required details
- Click Save
If you want to edit or delete the class/program,
- Go to Administration
- Under School Setup, select Class/Progam
- From the list, click Edit/ Delete next to the class/program you want to edit or delete
- If you clicked edit, make necessary changes and click Update
- If you clicked delete, click Ok
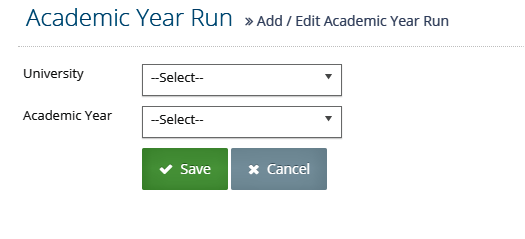
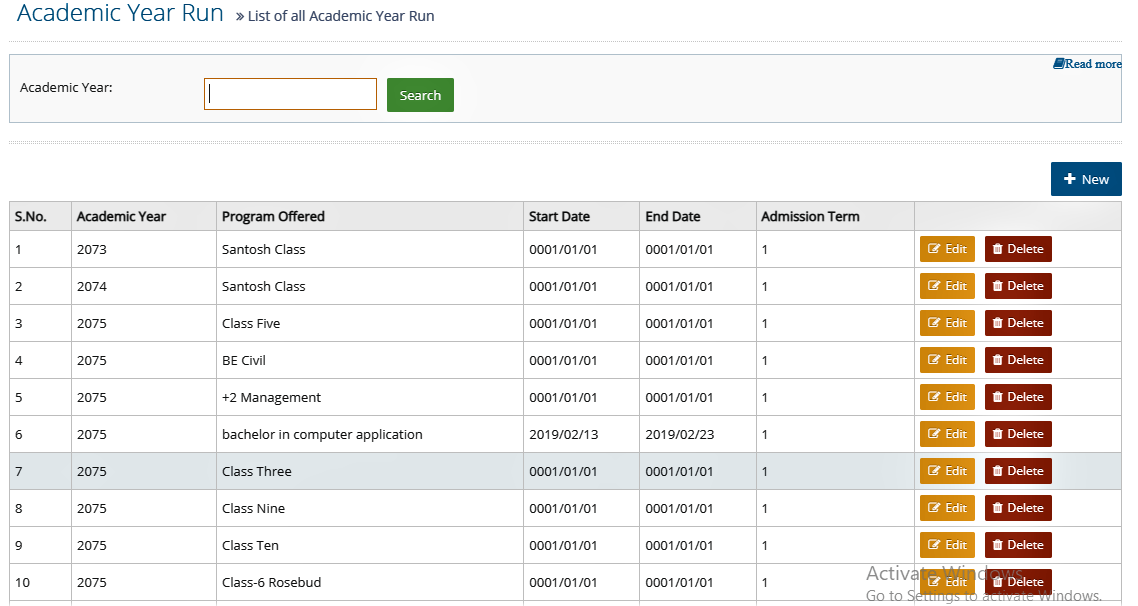
Academic Year Run
Here you can create running academic year .
- Go to Administration
- Under School Setup, select Academic year Run
- Click New
- Enter the required details
- Click Save
If you want to edit or delete the academin year run,
- Go to Administration
- Under School Setup, select Academic year Run
- From the list, click Edit/ Delete next to the academin year run you want to edit or delete
- If you clicked edit, make necessary changes and click Update
- If you clicked delete, click Ok
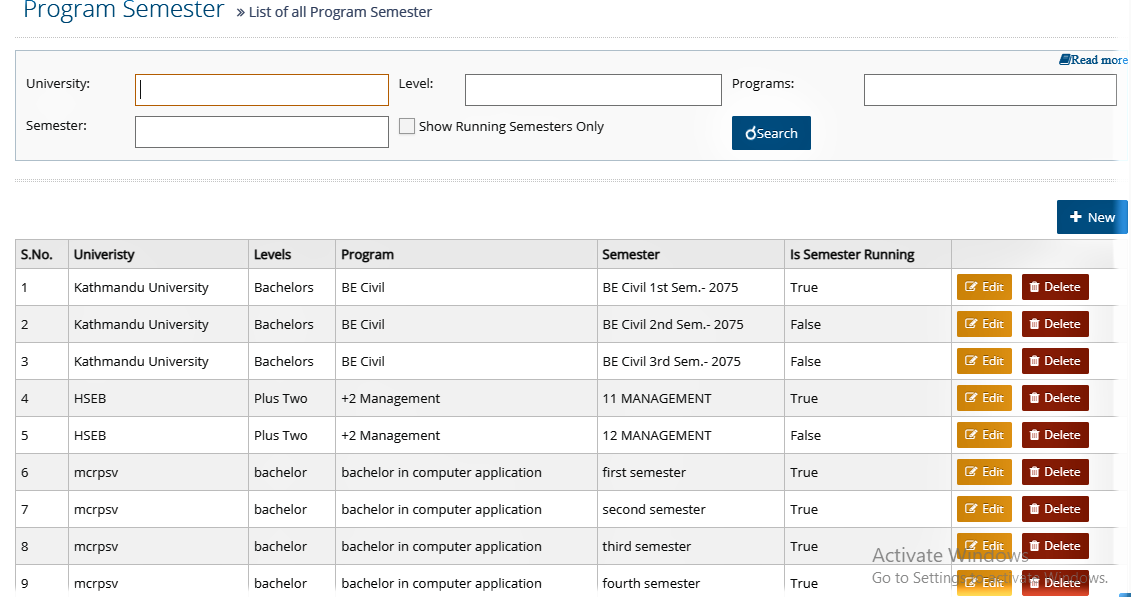
Program semester
Here you can create program semester.
- Go to Administration
- Under School Setup, select Progam Semester
- Click New
- Enter the required details
- Click Save

If you want to edit or delete the program semester,
- Go to Administration
- Under School Setup, select Progam Semester
- From the list, click Edit/ Delete next to the program semester you want to edit or delete
- If you clicked edit, make necessary changes and click Update
- If you clicked delete, click Ok
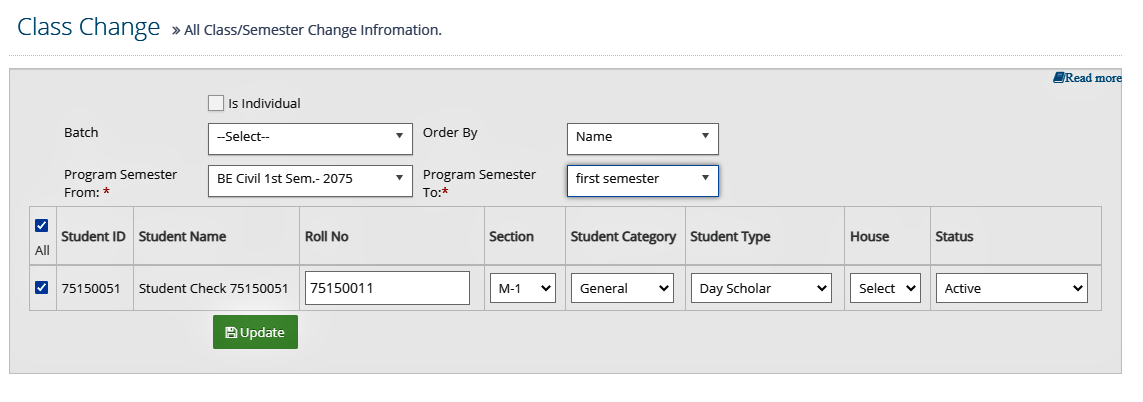
Class Change
Here you can change the class of students .
- Go to Administration
- Under School Setup, select Class Change
- Select the program semester from which you want to shift the student
- Select the program semester to which you want to shift the student
- Tick the checkbox next to name of the student whose class you want to change
- Click Update
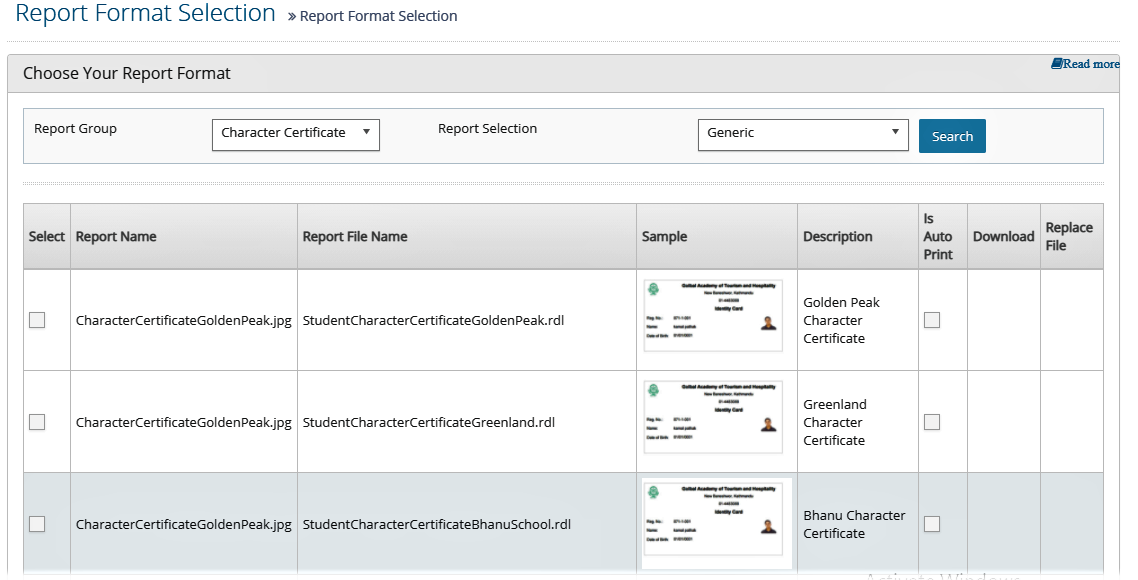
Set Report Format
e-Zone has already developed different type of standard report formats (like Invoice, Receipt, Admit Card, Student ID card, each term wise mark sheets etc.) which are available in system. You can use them as per your requirements.
- Go to Administration
- Under Report Formats and Others, select Set Report Format
- Click New
- Select the report group, class and report specification
- Click Search
- Tick the report format that matches your requirement the best
- Click Save Document
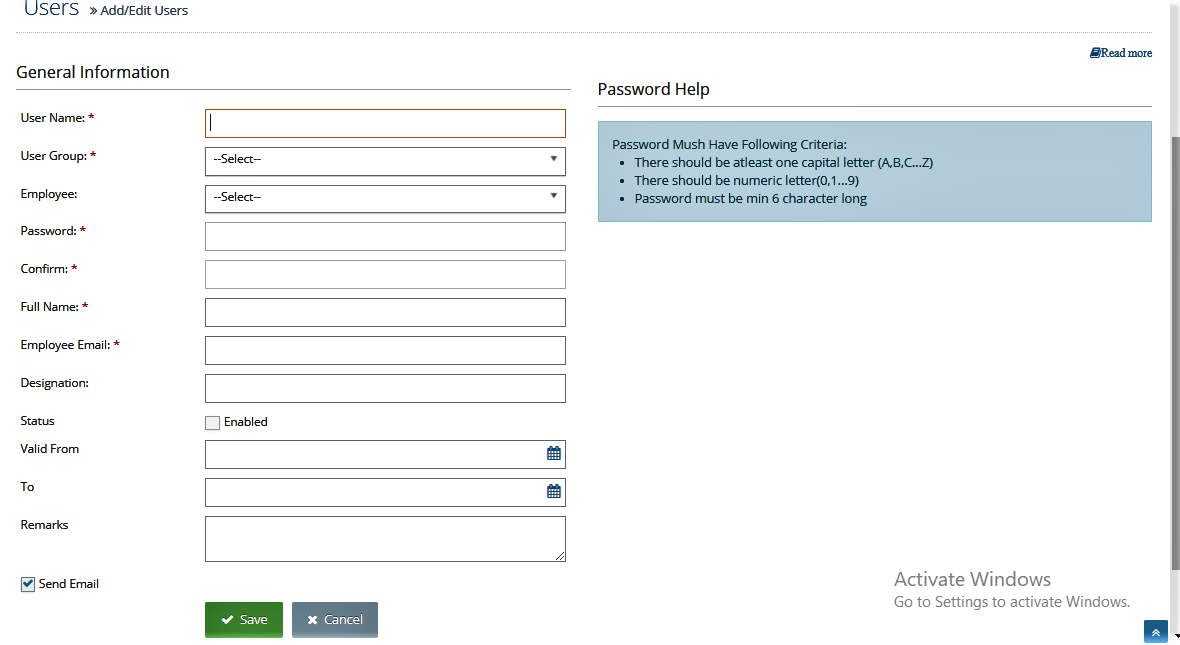
User/Role/Permission
eAccounting allows you to create multiple users and designate particular roles to each user. The features eAccounting provides you under user rolses are:
- Create Users
- Designate user permissions
- Change or reset password
Step I: Create Users
To create users, you need to follow these steps:
- Go to Administration
- Under User/Role/Permissions, select User
- Click New
- Enter all the required details
- Click Save
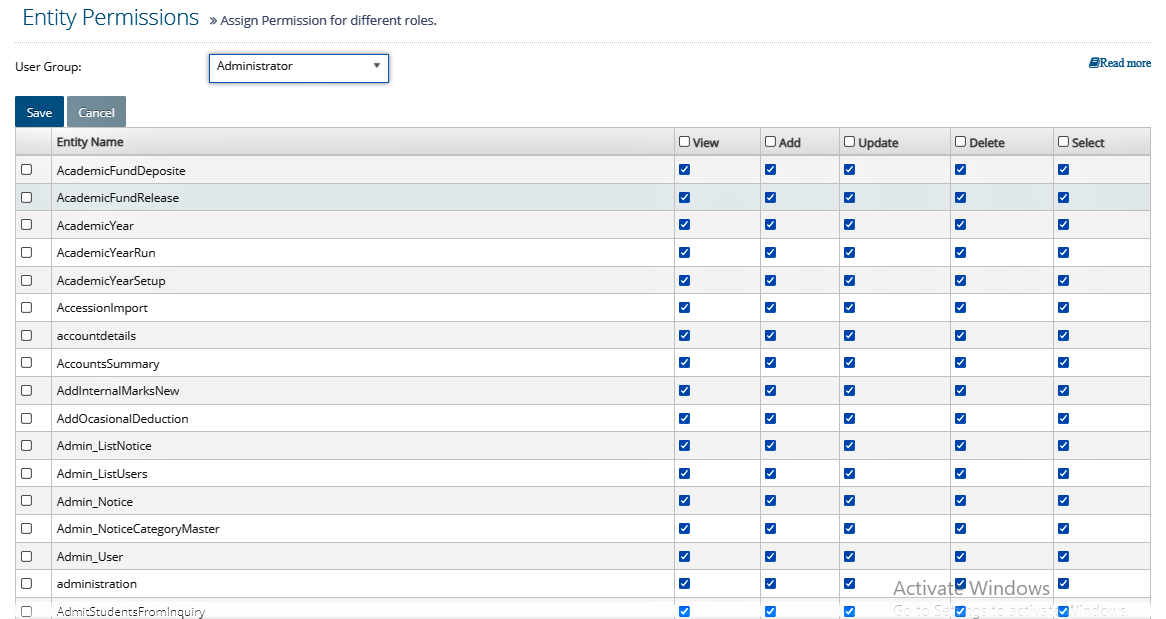
Step II: Designate User Permission
ESchool allows you to designate different set of permissions accourding to user roles. To designate permissions to users, follow these seps:
- Go to Administration
- Under User/Role/Permissions, select Set User Permission
- Select the user group you want to set permissio to
- From the list, tick the pages and activities you want to give access to
- Click Save
Step III: Change or Reset Password
You can change or reset your password as per your convenience. However, only admin has an authority to reset the password of users other than themselves. Once you reset the password, the password changes to default password.
- Go to Administration
- Under User/Role/Permissions, select Reset Password
- Select the user group and user whose password you want to reset
- Click Reset
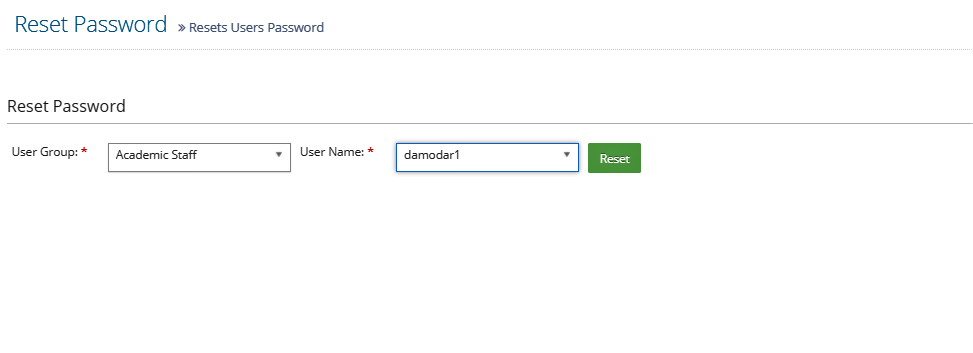
Note: The default password for users is 'abc123'.
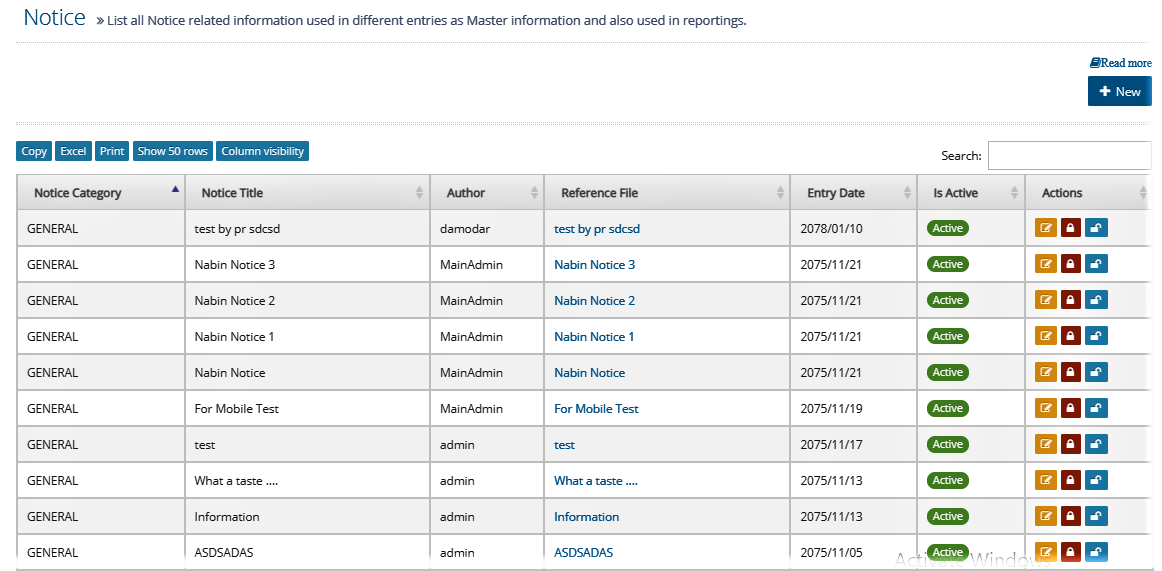
Notice
Here, you can set any notices of school/college to be published publicly like holiday, exams, results, internal/external extra activities alerts etc. These notices will reflect and display to all students, parents, staffs & mobile App as well. To create notice, you need to create:
- Notice Category
- Notice Entry
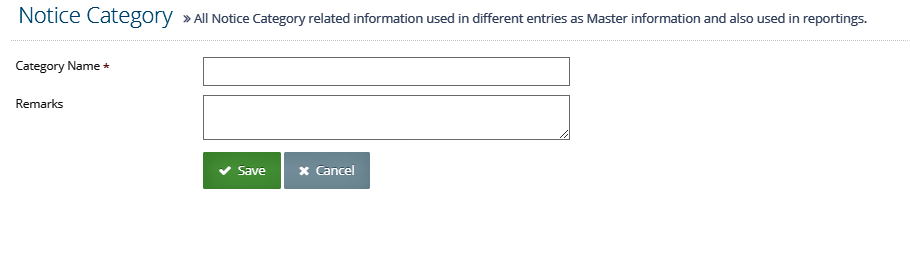
Step I: Notice Category
First of all, you have to create Notice category (heading) & their brief details. ·
- Go to Administration
- Under Events & Notice, select Notice Category
- Click Create Notice Category
- Enter Set Notice Category Name/Heading and their brief details
- Click Save
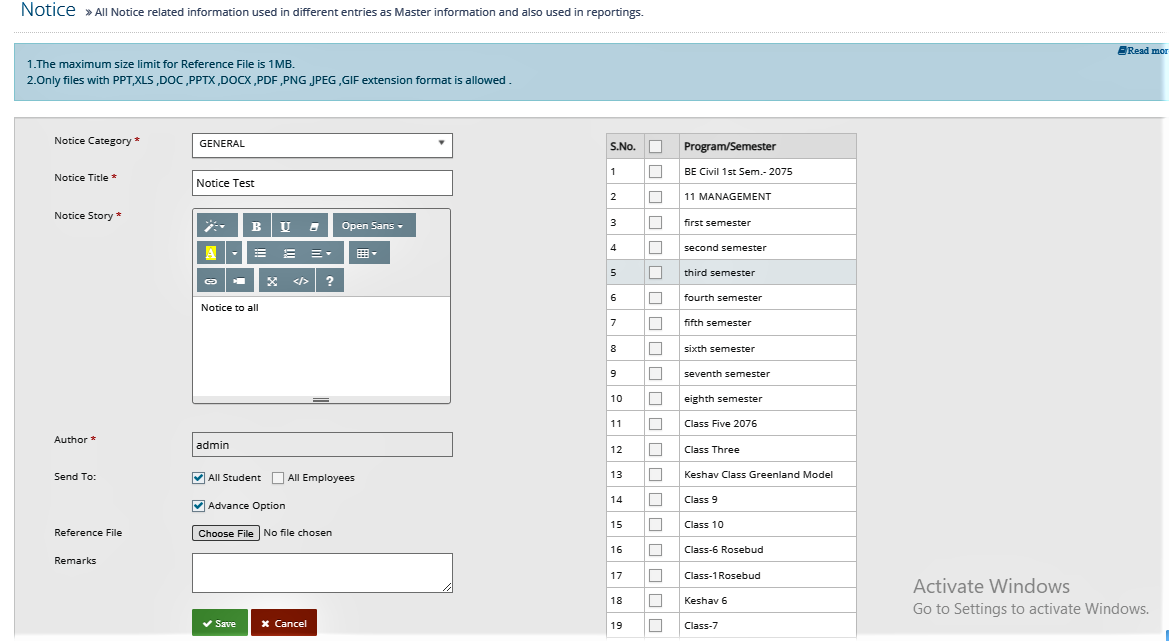
Step II: Notice Entry
After you create notice category, you can finally entry the notice as per the category of notice.
- Go to Administration
- Under Events & Notice, select Notice Entry
- Click New
- Select the respective notice category
- Enter all the details of notice
- Select the program semesters and user you want to notify
- Click Save
If you want to edit or delete the notice,
- Go to Administration
- Under Events & Notice, select Notice Entry
- From the list, click Edit/ Delete next to the notice you want to edit or delete
- If you clicked edit, make necessary changes and click Update
- If you clicked delete, click Confirm
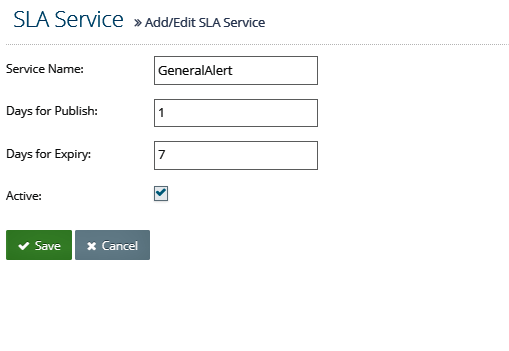
Software Level Alert Settings (SLA)
Software Level Alert Setting is the setting of official alerts. You can set these types alert from here. You can set alert for Software, SMS, E-mail & Mobile App for now. You can set any notification as per the official need like only for software user or for SMS or for Email or for Mobile App of for all or for selected. Even of for class wise, student wise, staff wise, parents wise also. These SLA will be displayed in the top right side of software, mobile app.
SLA includes following:
- SLA Sevices
- SLA Templates
- SLA for Users
Step I: SLA Services
This is the Software Level Service Alert Heading. Currently users cannot create but can edit these headings. Eschool has already created some heading which are frequently used in academic sector. Only developers can add this heading if needed additional.The SLA Services are hopefully sufficient.
To edit SLA services:
- Go to Administration
- Under SLA Settings, select SLA Services
- From the list, click Edit next to the sla service you want to edit
- Make necessary changes
- Click Save
Step II: SLA Templates
This is the Software Level Service Alert Templates. You can create, edit and delete any templates under the SLA headings. You can create templates for select level only like Software, SMS, Email, etc. as per the need.
- Go to Administration
- Under SLA Settings, select SLA Templates
- Click Add New
- Select the service and enter the notification as you want
- Click Save
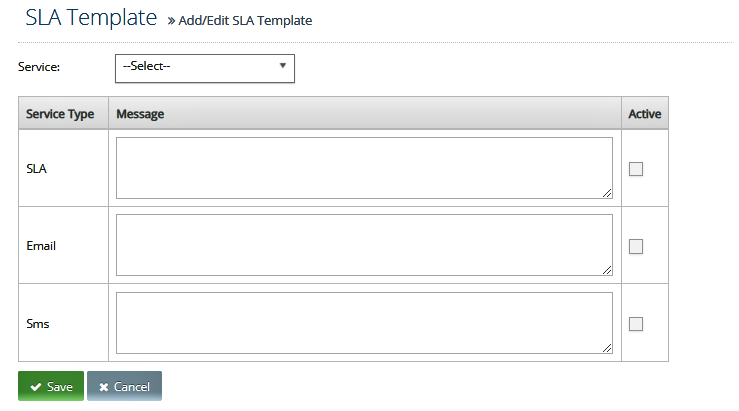
If you want to edit/delete the SLA Template,
- Go to Administration
- Under SLA Settings, select SLA Templates
- From the list, click Edit/ Delete next to the sla template you want to edit or delete
- If you clicked edit, make necessary changes and click Update
- If you clicked delete, click Confirm

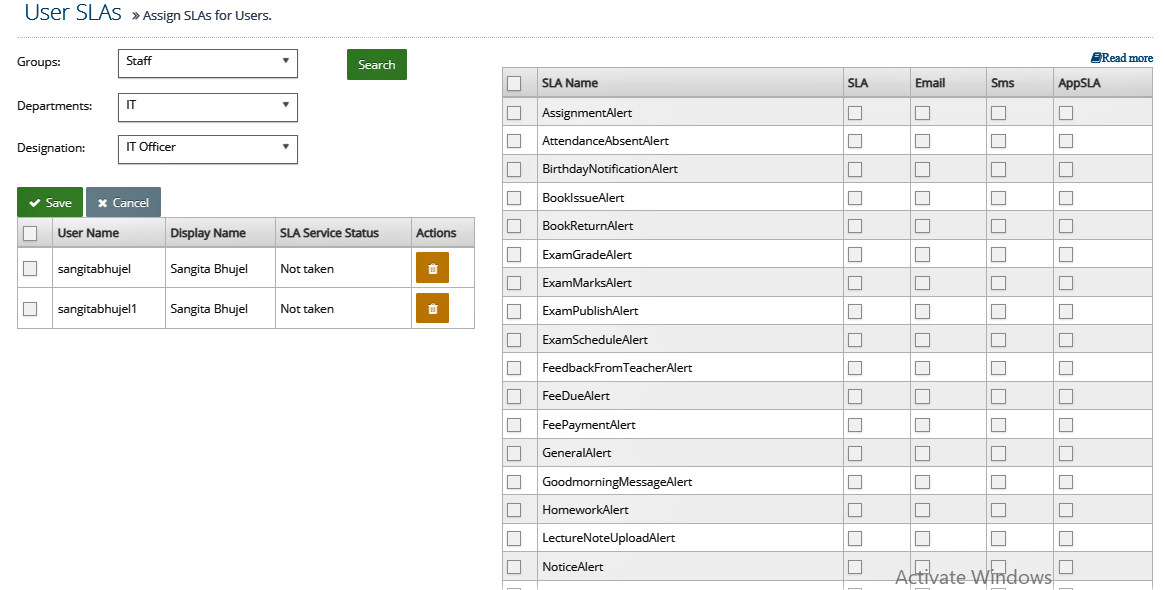
Step III: SLA for Users
When you create templates under the SLA headings, you must select SLAs for users. You can either select all the types of SLA and SLA services for all the users or select only selective SLA service and types.
- Go to Administration
- Under SLA Settings, select SLA Users
- Select the particular groups you want to allow SLA services to
- Select the particular user
- Tick the checkbox next to the user you want to allow SLA services to
- Tick the SLA Sevices and SLA Types you want to allow
- Click Save
Guests and Visitors
Eschool allows you to add details of guests and visitors who visit your organization. Under this, you can
- Add Guests
- Add Visitors
- Guests Reports
- Visitors Reports
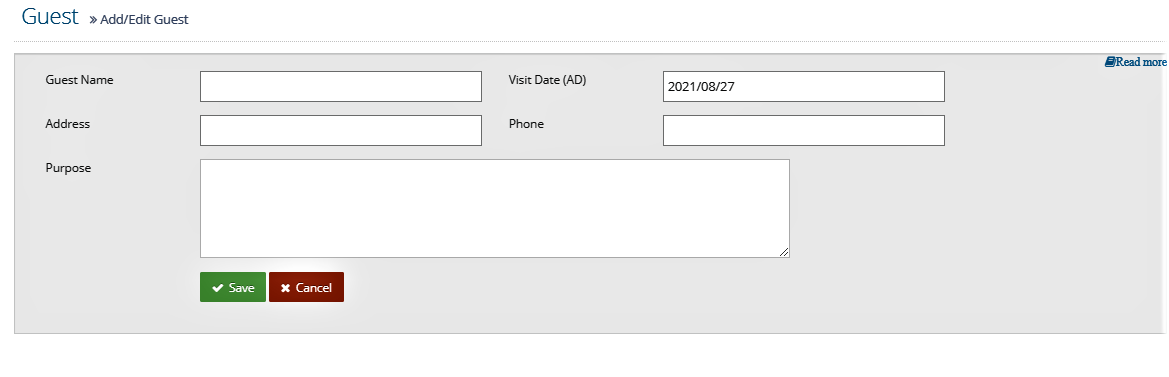
Step I: Add Guests
You can enter the basic information of guests who visit your organization.
- Go to Administration
- Under Guests & Visitors, select Add Guests
- Click New
- Enter all the necessary details of your guest
- Click Save
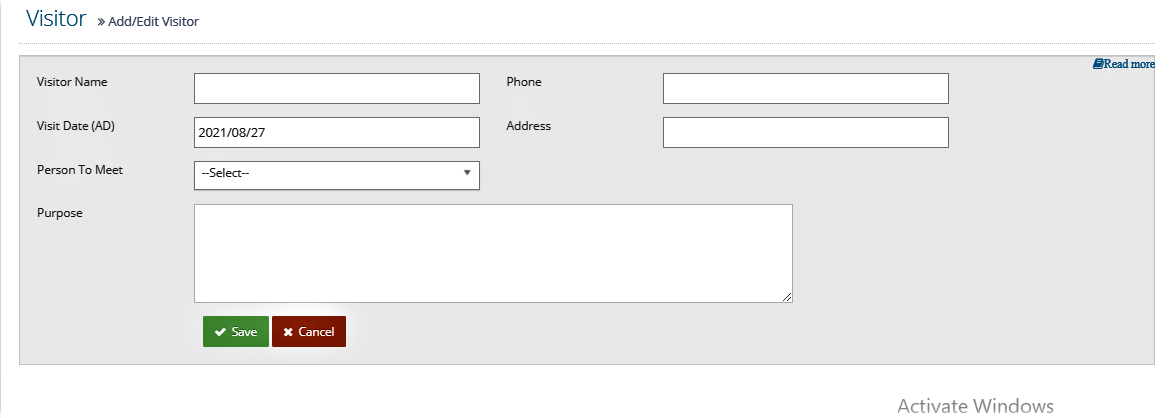
Step II: Add Visitors
You can enter the basic information of visitors who visit your organization.
- Go to Administration
- Under Guests & Visitors, select Add Visitors
- Click New
- Enter all the necessary details of your guest
- Click Save
Step III: Guests Report
You can generate the report of the guests visiting your organization within particular period of time.
- Go to Administration
- Under Guests & Visitors, select Guests Report
- Select date and guests' name
- Click Generate Report
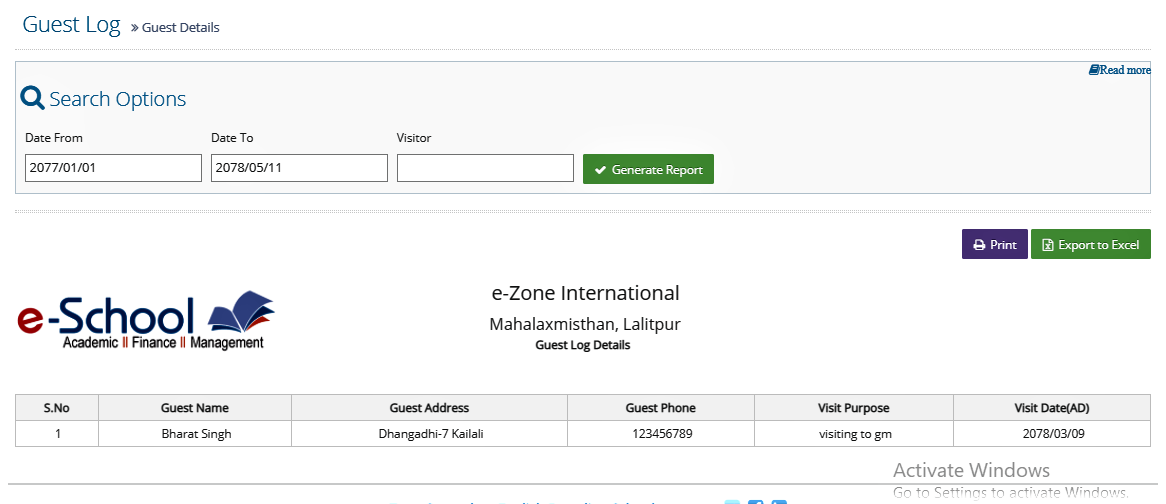
If you want to print or export the report to excel,
- Click Print / Export to Excel
Step IV: Visitors Report
You can generate the report of the visitors visiting your organization within particular period of time.
- Go to Administration
- Under Guests & Visitors, select Visitors Report
- Select date and visitors' name
- Click Generate Report
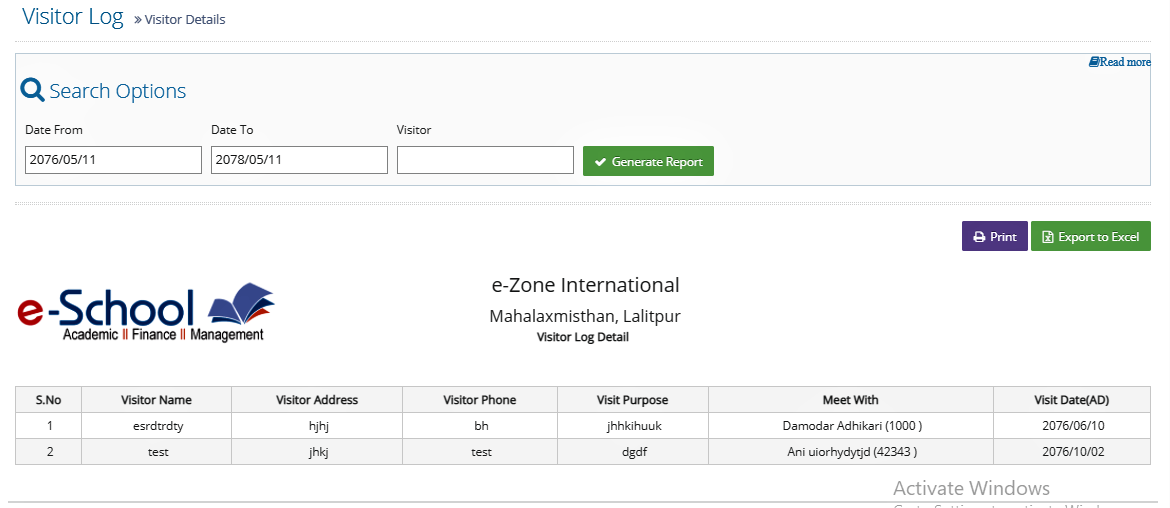
If you want to print or export the report to excel,
- Click Print / Export to Excel
Events
You can set the events on the respective dates and view already saved events as well
- Go to Administration
- Under Events & Notice, select Events Calendar
- Click on the respective date where you want to set an event
- Enter the details of the event
- Click Save

Account Module
Accounting is the process of recording financial transactions pertaining to a business. The accounting process includes summarizing, analyzing, and reporting of these transactions. e-School accounting module helps your school/ colleges to manage these financial transactions. Accounting module in e-School software is integrated with Billing and Payroll module. Billing and Payroll related data will automatically reflect in financial reports.
Preliminary Settings
Some settings for Account Module are in different places on the system:
- Company setting
- Billing Module
- Payroll Module
- Account Module
Step 1: Company Settings
Here, you can set the ledger name in which accounting effect made as per the company rules.
- Go to Administration
- Under Organization Setup, select Company Setting
- Select Account Setting
- Fill all the setting details as favorable to your organization
- Click Save Account Settings
Step 2: Payroll Settings
Here, you can set the ledger name in which accounting effect made as per the company rules.
- Go to Administration
- Under Organization Setup, select Company Setting
- Select Payroll Setting
- Fill all the setting details as favorable to your organization
- Click Save Payroll Settings
Step 3: Billing Settings
Here, you can set the ledger and sub ledger in which accounting effect made as per the company rules.
- Go to Billing
- Under Fee Setting, select Fee Name
- Click New
- Fill all the setting details as favorable to your organization
- Click Save
Step 4: Account Settings
This is the main module of the financial related data and reflection of all other associated modules like, billing, payroll related data which are integrated with accounting module. Here you can generate various account related reports like, trail balance, balance sheet, income expenditure report, cash flow etc. which will be required for annual audit report and other required reports.
Note: We must set fiscal year, ledger & sub-ledger names, bank cheque book details, opening balance etc. before starting to entry vouchers. These data will be as per the company rules.
Here are the some steps to operate account module:
- Account Setting
- Chart of Account
- Account Activity
- Vouchers
- Financial Reports
Account Settings
To use account module, First of all, you have to set account related information like (currency, Fiscal Year, ledger names, bank account and cheque numbers, opening balance etc.
Step I: Fiscal Year
You must set each Fiscal Year annually at the time of initial setup and starting of each fiscal year. Currently required fiscal year must be in running status. You can change any fiscal through this setting and view or update as per their requirement.
- Go to: Account
- Under Account Setting , select Fiscal Year
- Click Add New
- Enter Fiscal year name, fiscal year, start date, end date and other details
- Click Save
Note: Running Fiscal Year must be selected ‘Yes’ in Option.
If you want to edit the fiscal year already saved in the system.
- Go to: Account
- Under Account Setting , select Fiscal Year
- Click Edit on side of the fiscal year you want to edit from the list of the
- Make necessary changes to the fiscal year
- Click Update
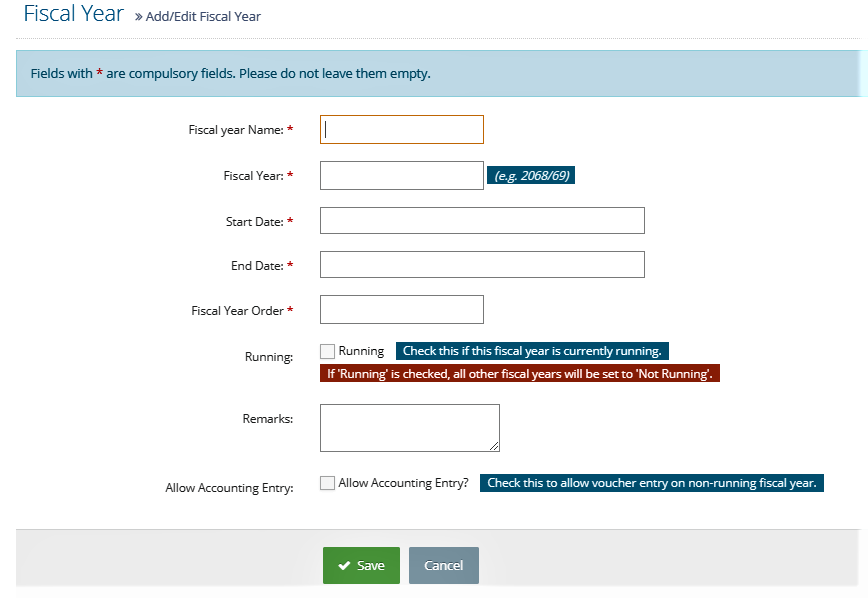
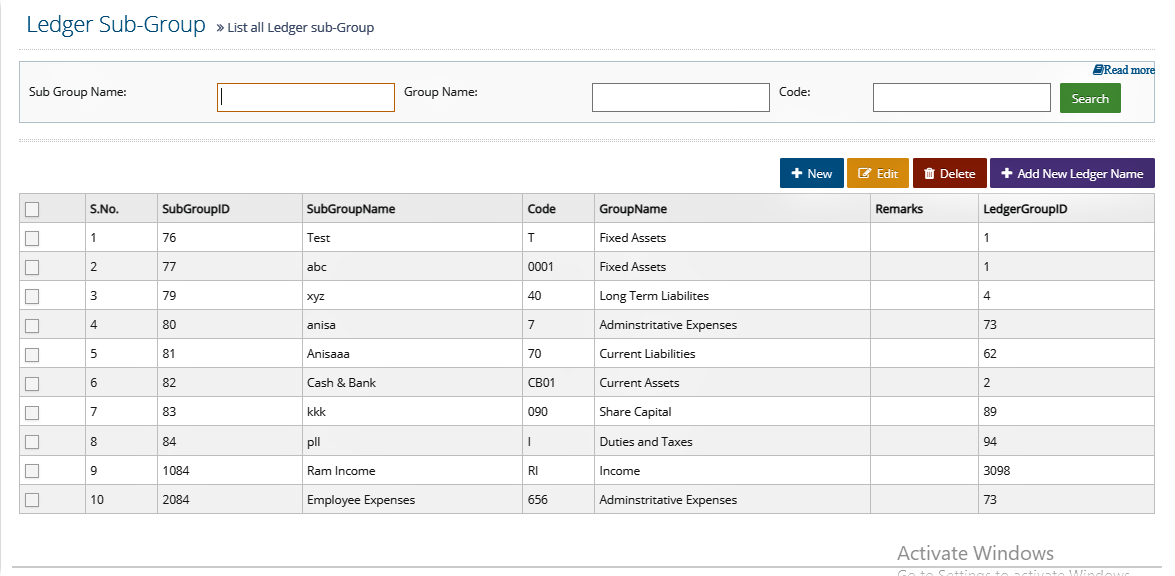
Chart of Account
Chart of Account allows you to make settings of Ledger and sub-ledgers without which generation of voucher is not allowed. You can add/edit ledger and sub-ledger at any time as per their later requirement. Under Chart of Account exists following features:
- Ledger master
- Sub-ledger master
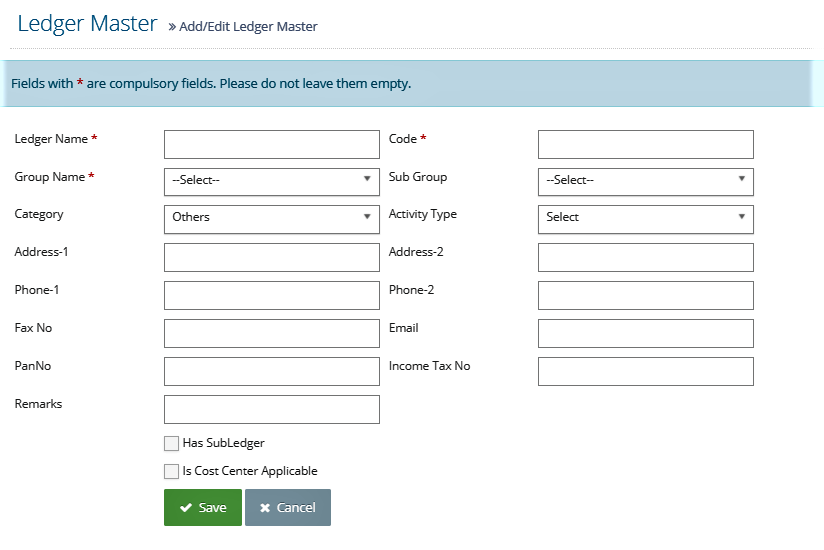
Step I: Ledger Master
You must set Ledger Master before generating vouchers. Ledger master includes the income, expenditure, assets and liabilities headings. This is one time setting, no need to create annually.
- Go to: Account
- Under Chart of Account, select Ledger Master
- Click New
- Set ledger name same as fee title for income related headings. (if fee name is Monthly Fee, set Ledger also Monthly Fee)
- Enter all the necessary details
- Click Save
Note: Income related data will automatically reflect from billing module when you collect payment from different fee heading. In expenditure payroll related expenditure will automatically reflect when you generate payroll in related ledgers and sub ledgers. No need to generate from account module.
If you want to edit the ledger master already saved in the system,
- Go to: Account
- Under Chart of Account, select Ledger Master
- From the lists of ledger, check the checkbox on the side of the ledger you want to edit
- Click Edit
- Make necessary changes
- Click Update

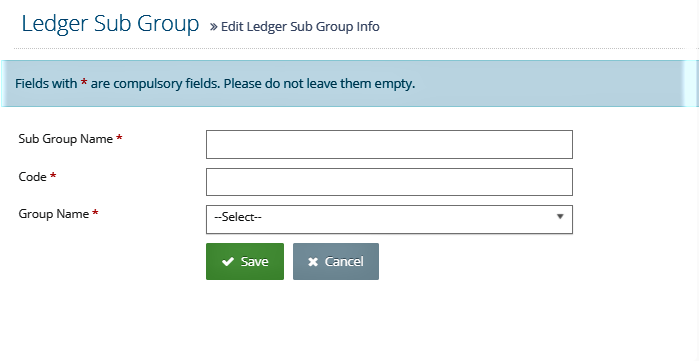
Step II: Sub-Ledger Master
Here you can created sub ledgers as per your organization’s chart of account. Sub-Ledger master include the Party names. This is one time setting, no need to create annually.
- Go to: Account
- Under Chart of Account, select Sub Ledger Master
- Click New
- Set sub ledger name same as fee title for income related headings. (If fee name is tie, set sub ledger also tie etc.)
- Enter all the necessary details
- Click Save
If you want to edit the ledger master already saved in the system,
- Go to: Account
- Under Chart of Account, select Sub Ledger Master
- From the lists of sub ledger , check the checkbox on the side of the sub ledger you want to edit
- Click Edit
- Make necessary changes
- Click Update
Account Activity
Under Account Activity, following features are present:
- Cheque Book
- Opening Entry
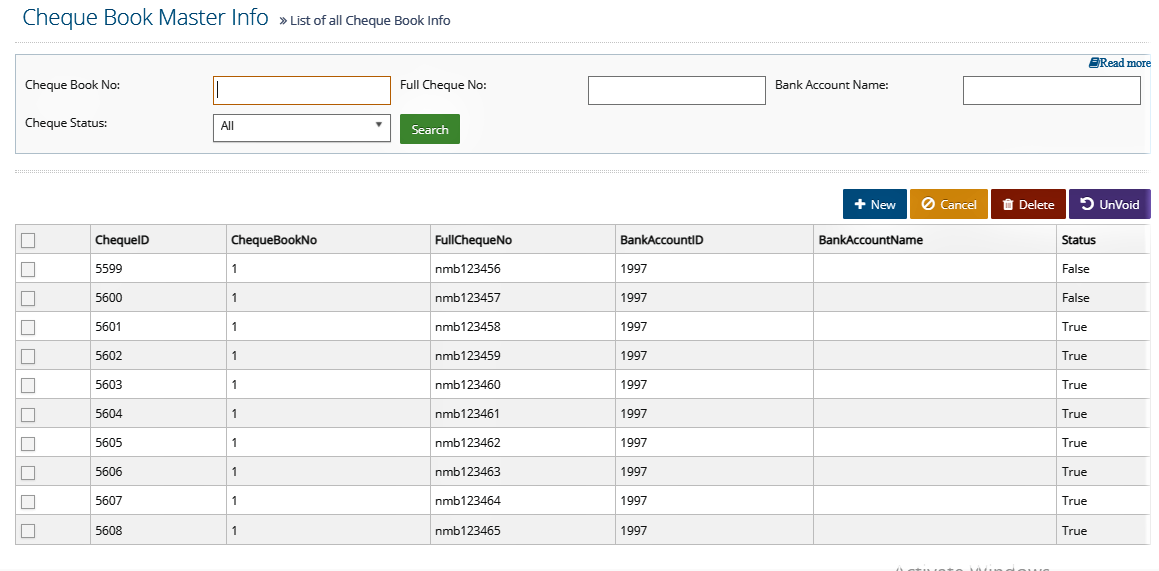
Step I: Cheque Book
Here you can set cheque book numbers of different banks where official account is running due to which you can find out the payment status by cheque when required.
- Go to: Account
- Under Account Activity, select Cheque Book
- Click New
- Enter all the necessary details
- Click Save

If you want to delete the cheque book that is already saved in the system,
- Go to: Account
- Under Account Activity, select Cheque Book
- From the lists of cheque book , check the checkbox on the side of the sub ledger you want to edit
- Click Delete
- Click Ok
Step II: Opening Entry
Before starting accounting module, you must set opening balance as per their heading of previous FY or before the system starts. When you complete one Fiscal Year, system will automatically set the opening balance for next Fiscal Year.
- Go to: Account
- Under Account Activity , select Opening Entry
- Click New
- Select the related ledger name and sub-ledger name
- Enter debit amount and credit amount
- Click Save
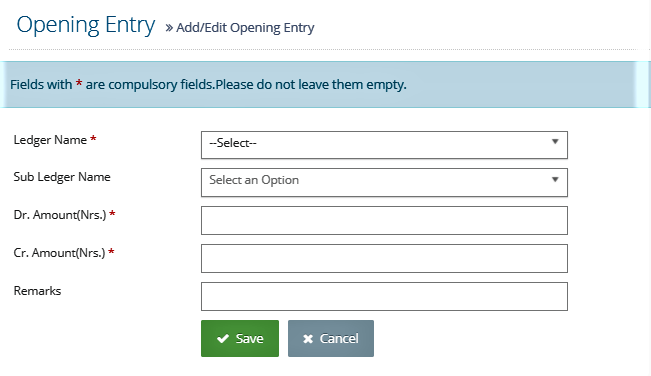
If you want to edit any opening entry,
- Go to: Account
- Under Account Activity , select Opening Entry
- Click Edit on the side of any entry you want to edit
- Make necessary changes
- Click Update
Vouchers
Voucher allows you to enter the real financial data related to income and expenditures. Under Voucher, following features are included:
- Journal Voucher
- Receipt Voucher
- Payment Voucher
- Contra Voucher
Journal Voucher
You can create journal voucher from this place. Generally journal is created for credit transactions (in terms of payable and receivable both). In accounting concept, expenses and assets are debited and income and liabilities are credited when creating journal voucher. Voucher No. is auto generated by system. Journal voucher can be added, edited, deleted, posted and viewed as per the requirement.
- Go to: Account
- Under Vouchers, select Journal Voucher
- Click New
- Set fiscal year, date, due date (if required),
- Select ledger and sub ledger and put DR/CR amount, description (if needed)
- Click on Add button.
- Repeat the same process until you finish your journal transaction.
- Now we can view in bottom side DR & CR equal amount and difference is 0.
- Set Narration as per need
- Click Save
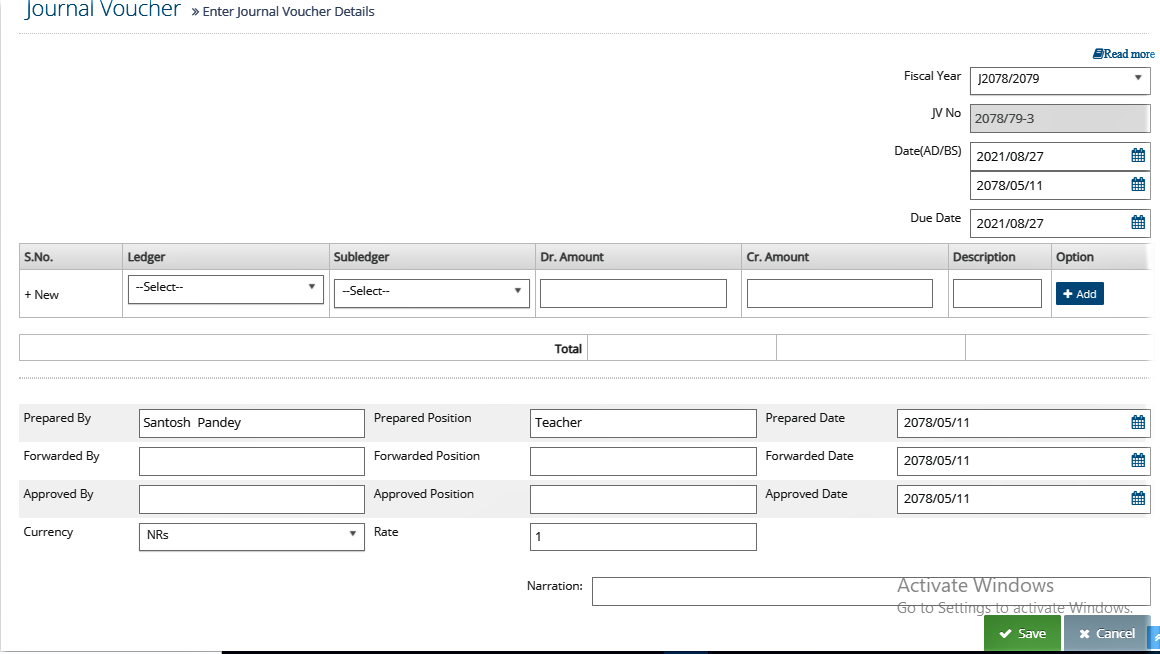
Note: Generally journal is created for credit transactions (in terms of payable and receivable both). In accounting concept, expenses and assets are debited and income and liabilities are credited when creating journal voucher.If you post the voucher, you could not make any changes. So, do not post initially, better do not use this option. This can be used as per company rules.Total DR and CR amount (shown on bottom of the page) must be equal. If not, system can’t save the data.
Receipt Voucher
This voucher is used to record only for income collection from different heading. Voucher No. is auto increment. Journal voucher can be added, edited, deleted, posted and viewed as per the requirement. If you use integrated billing-account module then you don’t need to create receipt voucher for fee related income.
- Go to: Account
- Under Vouchers, select Receipt Voucher
- Click New
- Set fiscal year, date, due date (if required),
- Select ledger and sub ledger and put DR/CR amount, description (if needed)
- Click on Add button.
- Repeat the same process until you finish your journal transaction.
- Now we can view in buttom DR & CR equal amount and difference is 0.
- Set Narration as per need
- Click Save
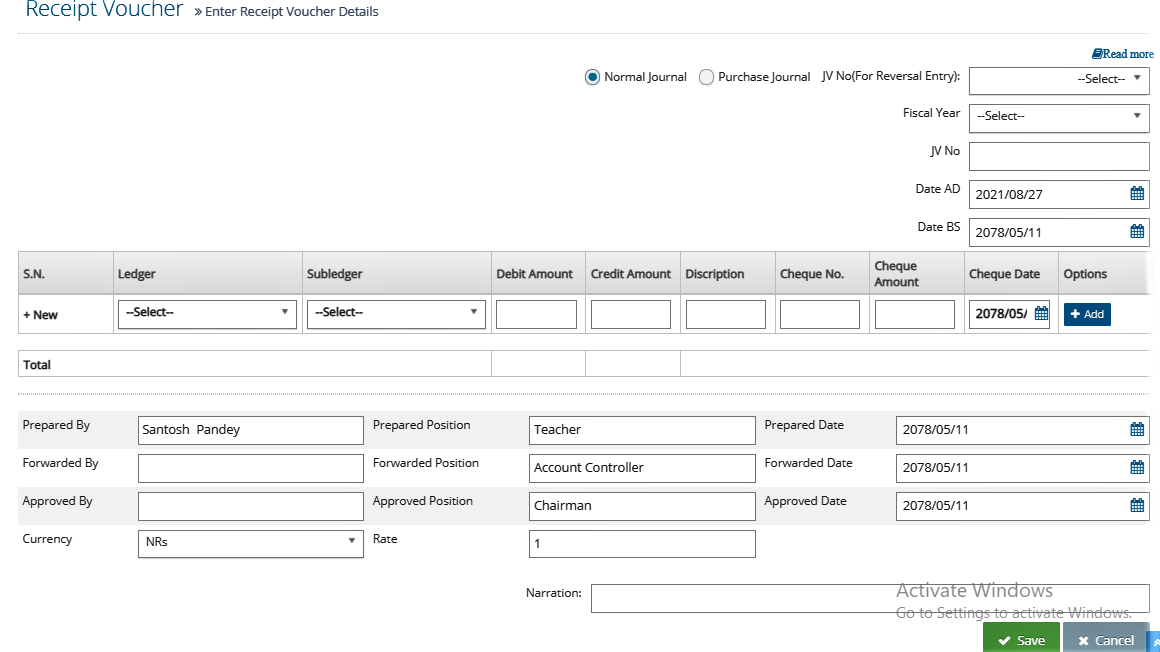
Note: Generally receipt voucher is created for cash/bank transactions (in other words, when money comes in organization then we create receipt voucher). Cash or bank accounts are debited and income heads or receivable (party name) are credited when creating receipt voucher.If you post the voucher, you couldn’t make any changes. So, do not post initially, better do not use this option. This can be used as per company rules.
Payment Voucher
This voucher is used to record for payment made by organization. Voucher No. is auto increment. Payment voucher can be added, edited, deleted, posted and viewed as per the requirement.
- Go to: Account
- Under Vouchers, select Payment Voucher
- Click New
- Set fiscal year, date, due date (if required),
- Select ledger and sub ledger and put DR/CR amount, description (if needed)
- Click on Add button.
- Repeat the same process until you finish your journal transaction.
- Now we can view in bottom side DR & CR equal amount and difference is 0.
- Set Narration as per need
- Click Save
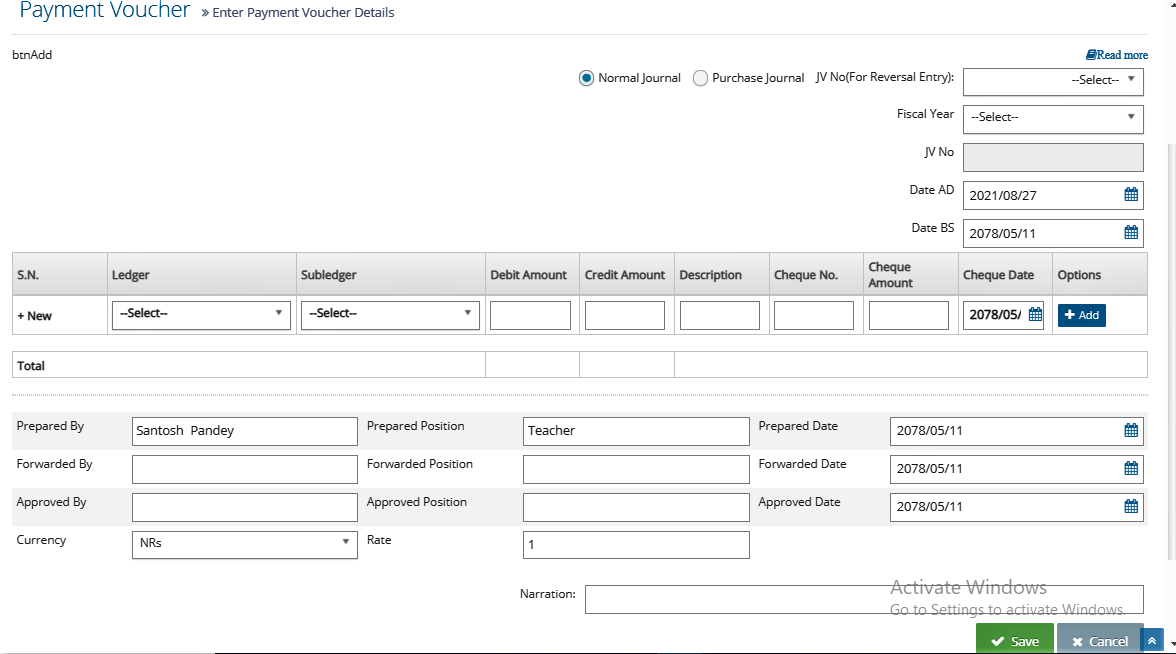
Note: Generally Payment voucher is created for cash/bank transactions (in other words, when money goes out from organization then we create Payment voucher). Cash or bank accounts are credited and expense heads or payable (party name) are debited when creating Payment voucher.If you post the voucher, you couldn’t make any changes. So, do not post initially, better do not use this option. This can be use as per company rules.
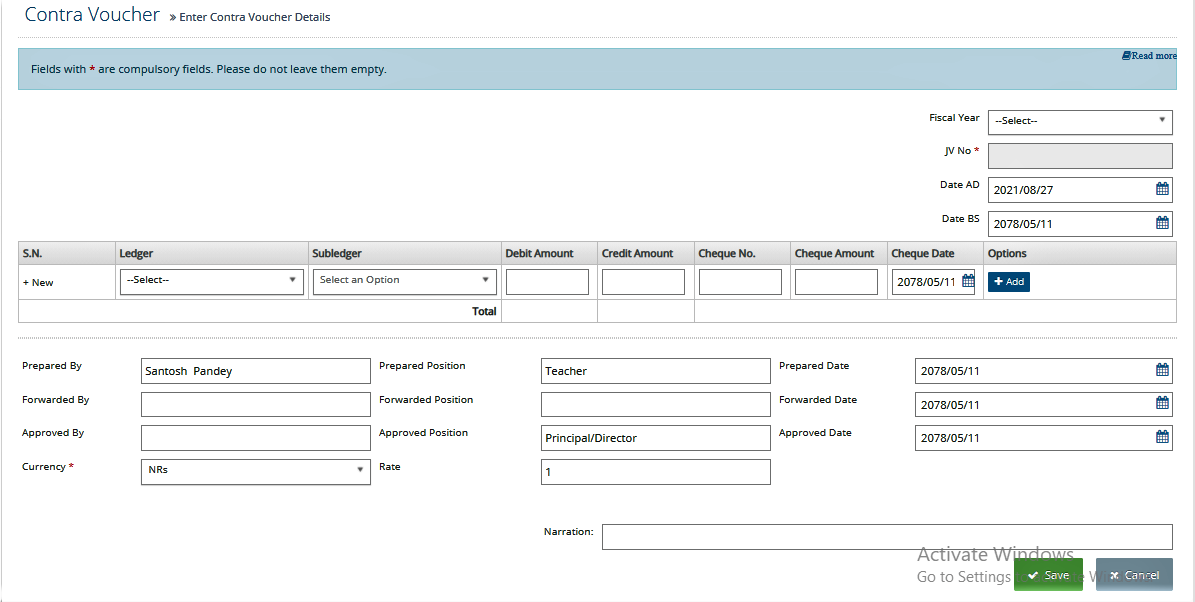
Contra Voucher
This voucher is used to record for cash/bank account adjustment made by organization. Voucher No. is auto increment. Contra voucher can be added, edited, deleted, posted and viewed as per the requirement.
- Go to: Account
- Under Vouchers, select Contra Voucher
- Click New
- Set fiscal year, date, due date (if required),
- Select ledger and sub ledger and put DR/CR amount, description (if needed)
- Click on Add button.
- Repeat the same process until you finish your journal transaction.
- Now You can view in bottom side DR & CR equal amount and difference is 0.
- Set Narration as per need
- Click Save
Financial Reports
Under Financial Reports, following reports can be generated:
- Trial balance
- Balance sheet
- Income/Expenditure report
- Ledger report
- Subledger report
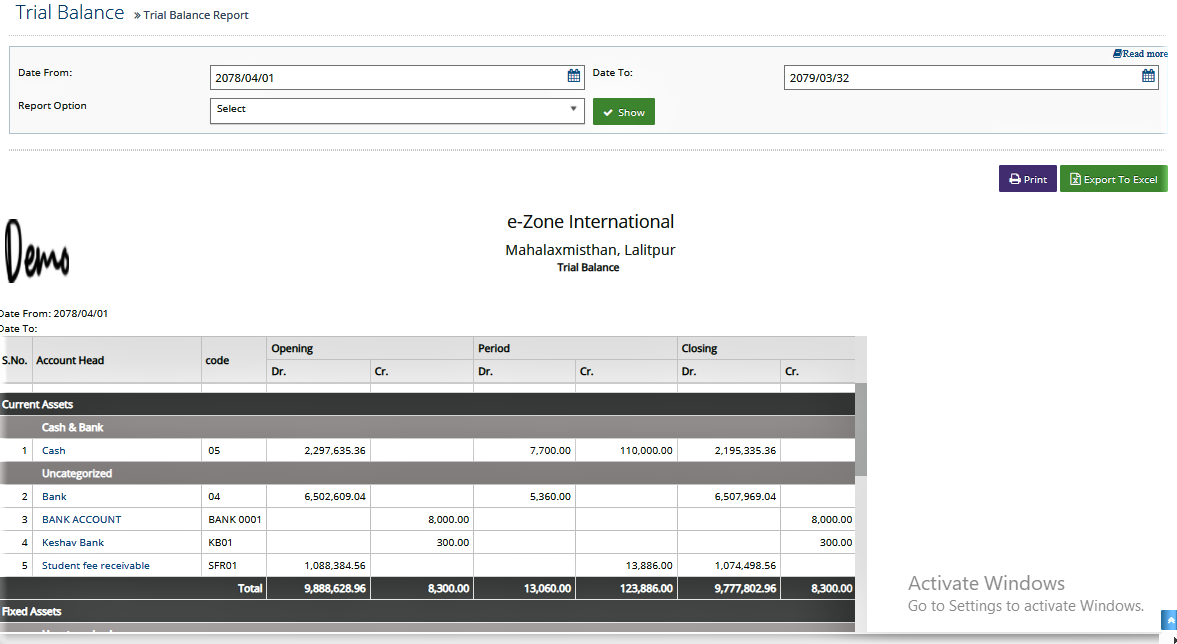
Trial Balance
Trial Balance is a book keeping worksheet in which the balances of all ledgers and sub ledgers are compiled into debit and credit columns. A company prepares a trial balance periodically, usually at the end of every reporting period. The general purpose of producing a trial balance is to ensure the entries in a company's bookkeeping system are mathematically correct.
- Go to: Account
- Under Financial Reports , select Trial Balance
- Filter the report according to date and report option
- Click Show
If you want to print or export this report to excel,
- Click Print / Export to Excel
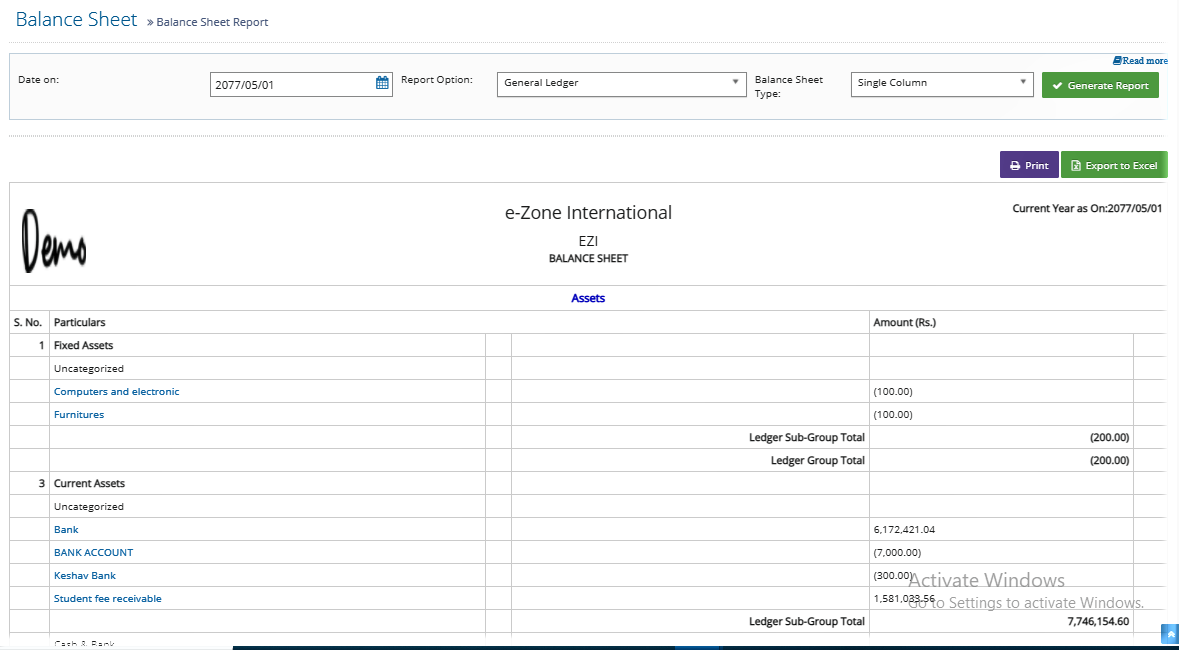
Balance Sheet
Balance Sheet is a financial statement that summarizes a company's assets, liabilities and shareholders' equity at a specific point in time.
- Go to: Account
- Under Financial Reports , select Balance Sheet
- Filter the report according to date, report option and balance sheet type
- Click Generate Report
If you want to print or export this report to excel,
- Click Print / Export to Excel
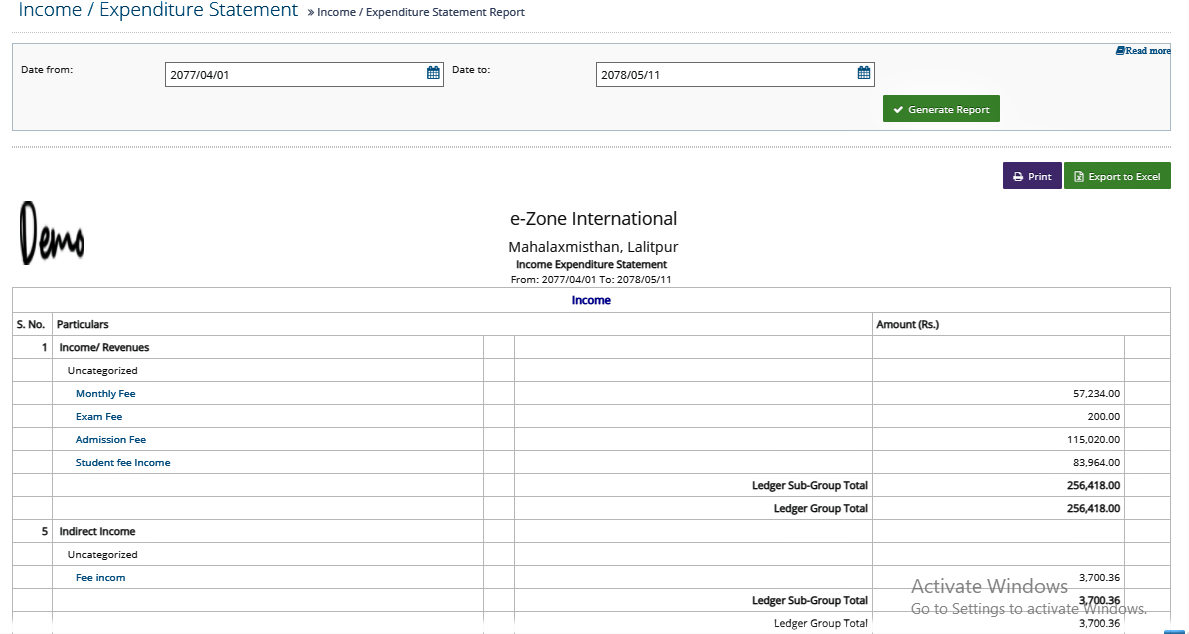
Income/ Expenditure Statement
Income Statement is a financial statement that reports a company's financial performance over a specific accounting period.
- Go to: Account
- Under Financial Reports , select Income Expenditure Statement
- Filter the report according to date
- Click Generate Report
If you want to print or export this report to excel,
- Click Print / Export to Excel
Ledger Report
In Ledger Report, you can view the ledger name related reports like, income related heading, expenditure related heading etc. of a company's financial performance over a specific accounting period.
- Go to: Account
- Under Ledger & Others , select Ledger
- Filter the report according to date
- Select Ledger
- Click Generate Report
If you want to print or export this report to excel,
- Click Print / Export to Excel

Sub-Ledger Report
In Sub-Ledger Report, you can view the sub-ledger name related reports like, individual party wise reports etc. of a company's financial performance over a specific accounting period.
- Go to: Account
- Under Ledger & Others , select Ledger
- Filter the report according to date
- Select Ledger and Sub-ledger
- Click Show
If you want to print or export this report to excel,
- Click Print / Export to Excel

LMS Module
In LMS, there are various modules to manage Teachers, Students, academic staffs etc. It provides an instructor with a way to create and deliver content, monitor student participation, and assess student and staff’s performance. LMS is used to the record the learning related process data of the school/college. This system manage the learning related data like Timetable, homework details, Assignment Details, Routine & Class, Lecture Notes, Students/Parents Feedbacks, Syllables & Questions etc. LMS Module includes:
- Routine and Classrooms
- Assignments
- Lecture Notes
- Homework
- Syllabus and Questions
- Time table
Step 1: Routine and Classrooms
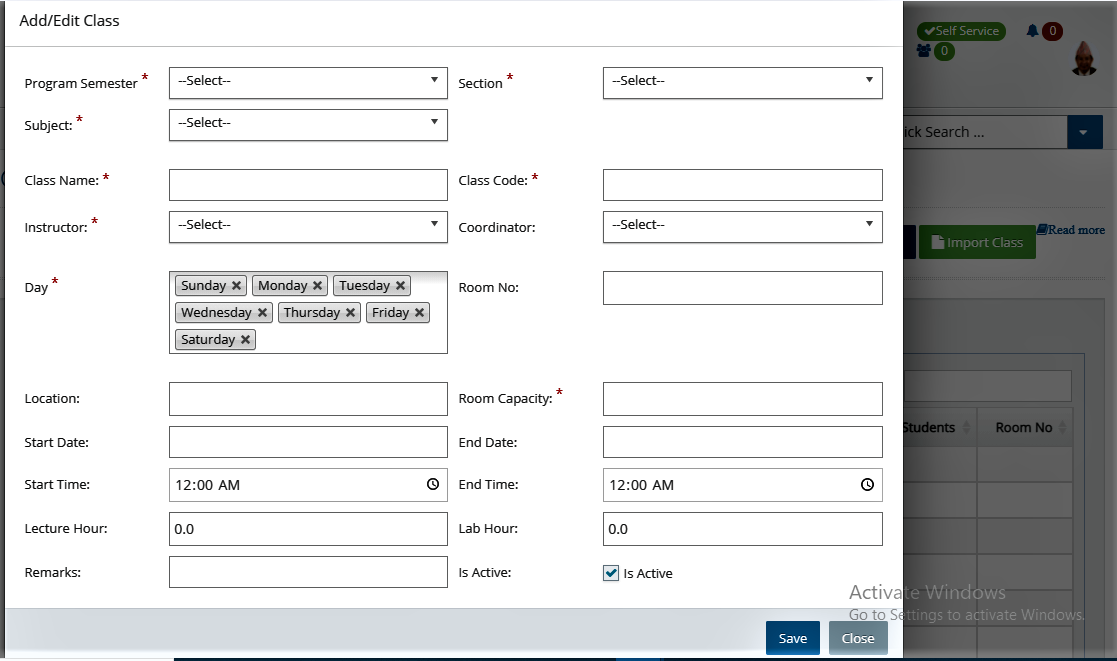
Under this tab, you are allowed to manage the class. To manage class, following steps are required to carry out:
- Go to LMS
- Under Routine and Classrooms , select Manage Class
- Click New
- Fill all the details as favorable to you
- Click Save
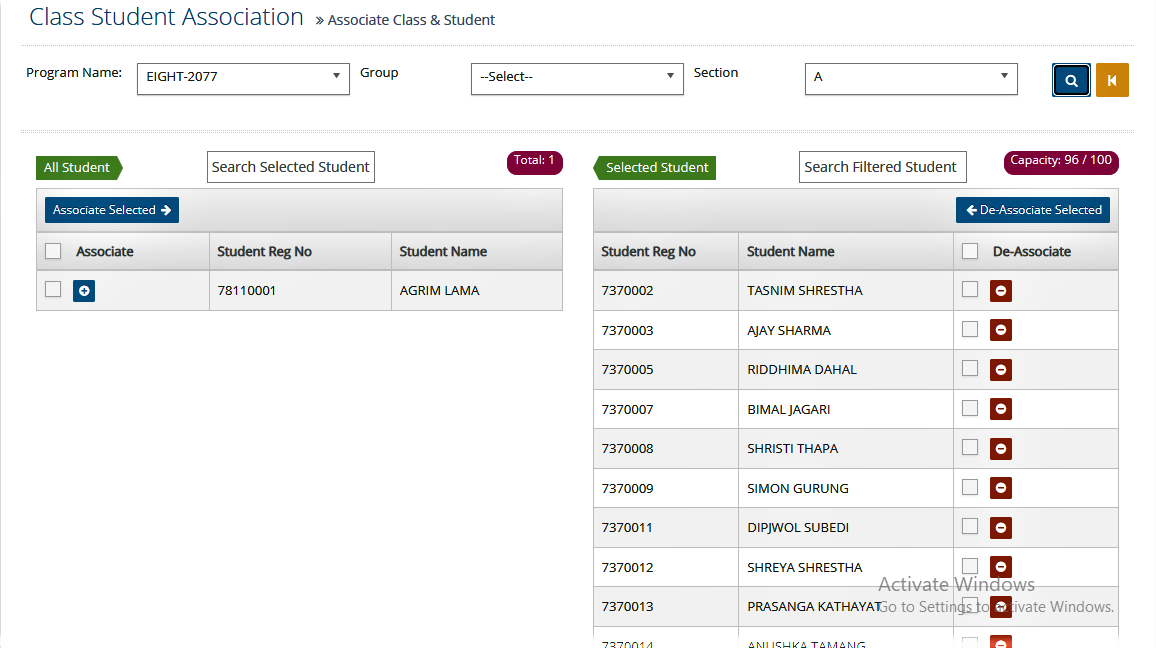
After you create a class, if you want to add students to this class,
- Go to LMS
- Under Routine and Classrooms , select Manage Class
- Click + to view all fields next to the class you want to add students to
- Click Add Students
- Select the respective program,group and section to load students
- The students who are not associated to the class apear on the list on your left below All Students
- The students who are already associated to the class appear on the list on your right below Selected Students
- If you want to associate a student, click + sign next to the name of respective student
- If you want to deassociate student, click - sign next to the name of respective student
Step 2: Assignments
Under assignment, the you are allowed to create assignment and evaluate assignment.
- Create Assignment
- Evaluate Assignment
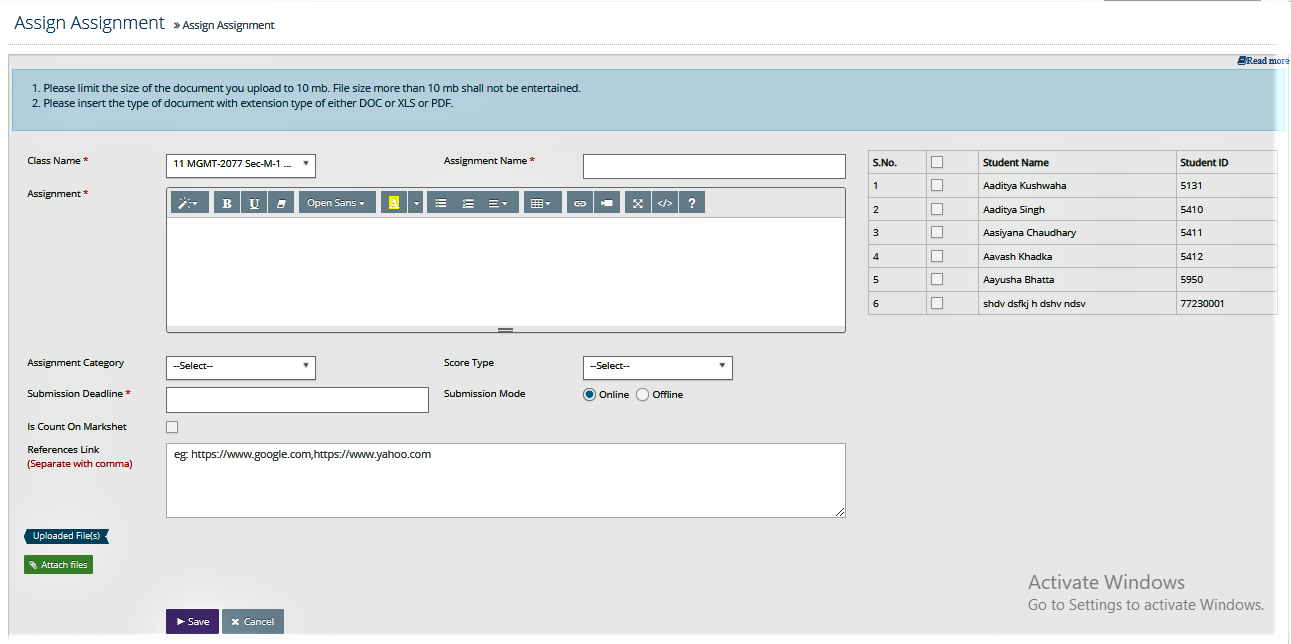
Create Assignment
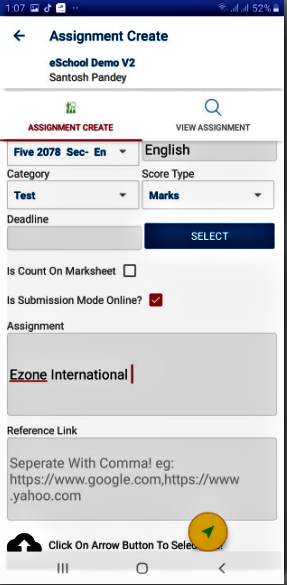
You can create assignment to any class of any subjects related to that class individually. You can also attach here the file from outside.
- Go to LMS
- Under Assignment, select Create Assignment
- Click New
- Select the class to whom you want to asign
- Enter assignment name, assignment details, submission date and other required information
- If you want to add the referernce link, input the link on the textbox for reference links
- If you want to upload a file, click Attach Files
- Check the checkbox to select the students whom you want to assign this assignment to
- Click Save
Note: Student gets notification from mobile apps whenever teacher assign the assignment .
Note: You can aslso login as a teacher in mobile app to create assignment.
Note: Students can also submit their assignment through mobile app.
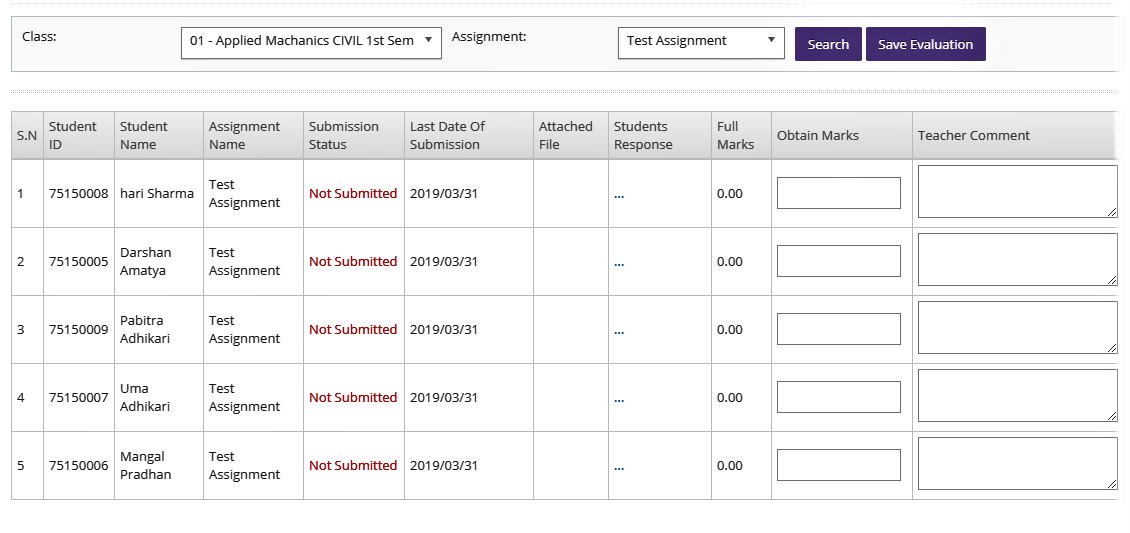
Evaluate Assignment
You are allowed to evaluate the assignment according to the class and subject. Under evaluation, you can insert the details of assignment submission status, submission date , submitted assignment, obtained marks and teacher's comments. For this, follow the following instruction:
- Go to LMS
- Under Assignment, select Evaluate Assignment
- Search the specific assignment by selecting respective class and assignment name
- You can also filter by date
- Click Search
- The list shows all the details such as submission status, submission date, student's response and attachments
- You can input marks to each student based on their assignment
- You can also comment on their assignment
- As you complete the evaluation, click Save Evaluation
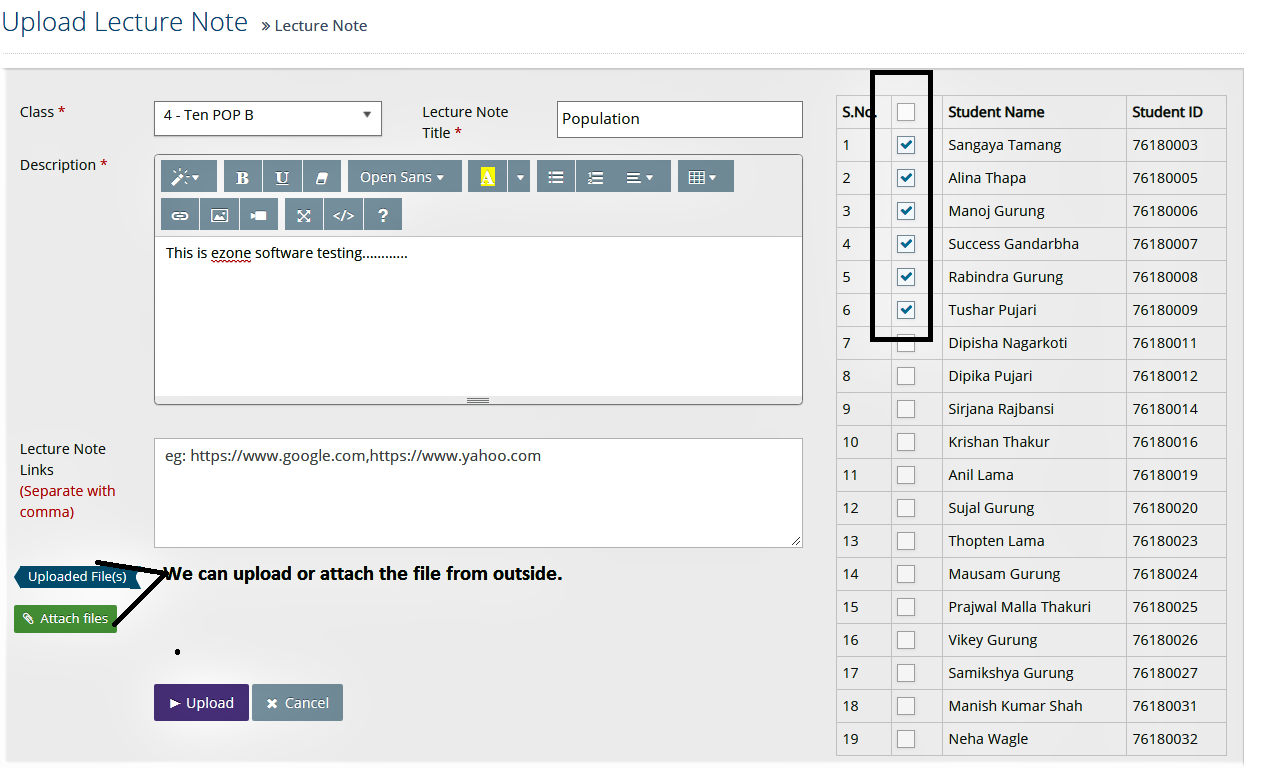
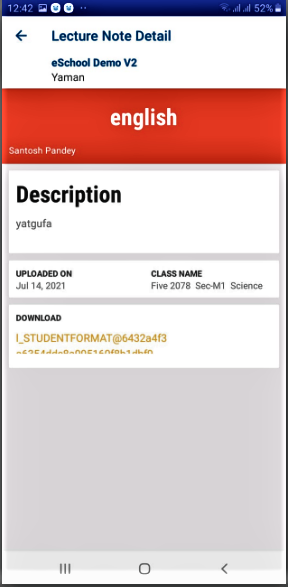
Step 3: Lecture Notes
‘Lecture Notes’ allows you to upload lecture notes and view lecture notes on the system. You can upload the lectures notes to any class of any subjects individually. You can also attach here the file from outside repository. So, it alerts Students, teachers can send to student to notify the class student association.
- Go to LMS
- Under Lecture Notes, select Upload Lecture Notes
- Click New
- Select the respective class and enter lecture note title and description
- If you want to add the referernce link, input the link on the textbox for reference links
- If you want to upload a file, click Attach Files
- Click Upload
Note: Student gets notification from mobile apps whenever teacher uploads the lecture note.
Step 4: Homework
‘Homework’ consists features to
- Add homework
- View homework
- Check homework
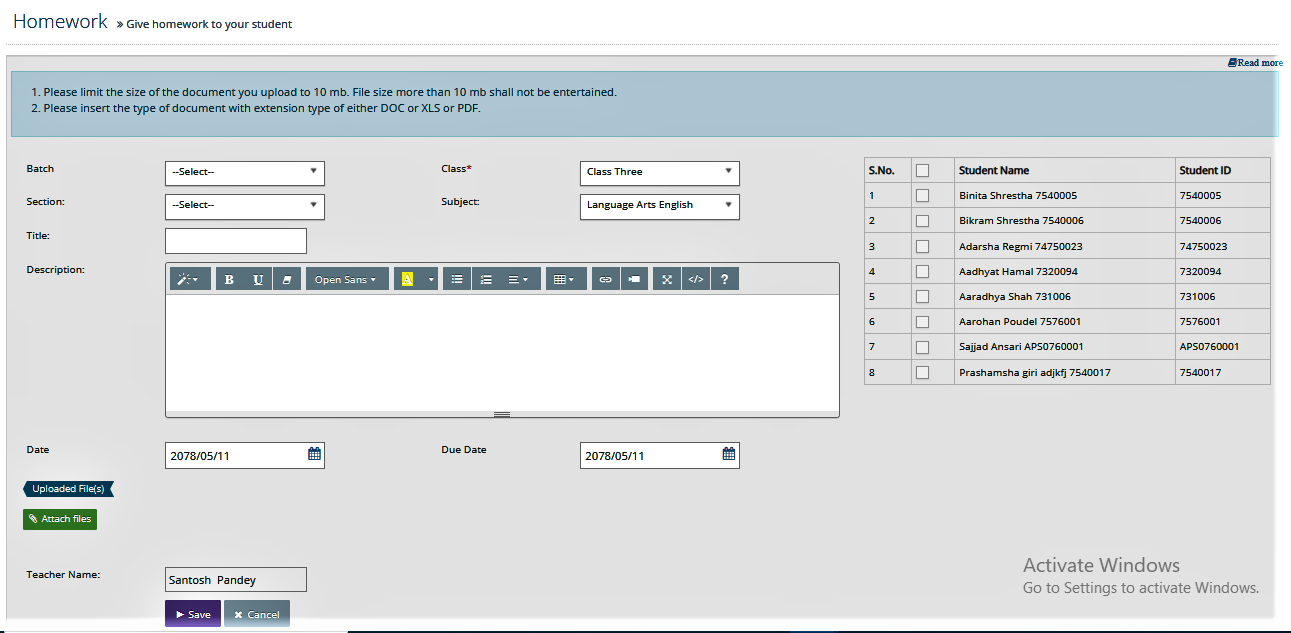
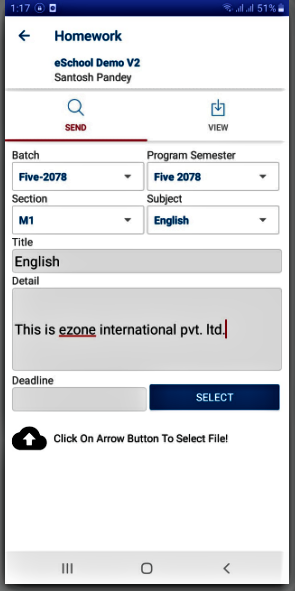
Step I: Add Homework
Academic staffs can add, upload homework to any class of student. Staffs also have to permission upload homework in mobile apps.
- Go to LMS
- Under Homework, select Add Homework
- Select the class to whom you want to asign homework
- Enter homework name, homework details, submission date and other required information
- If you want to upload a file, click Attach Files
- Check the checkbox to select the students whom you want to assign this homework to
- Click Save
If you want to edit or delete homework,
- Go to LMS
- Under Homework, select Edit/Delete Homework
- From the list, click Edit/Delete next to the homewok you want to edit/delete
- If you clicked edit, make required changes and click Update
- If you clicked delete, click Confirm and the homwork is deleted
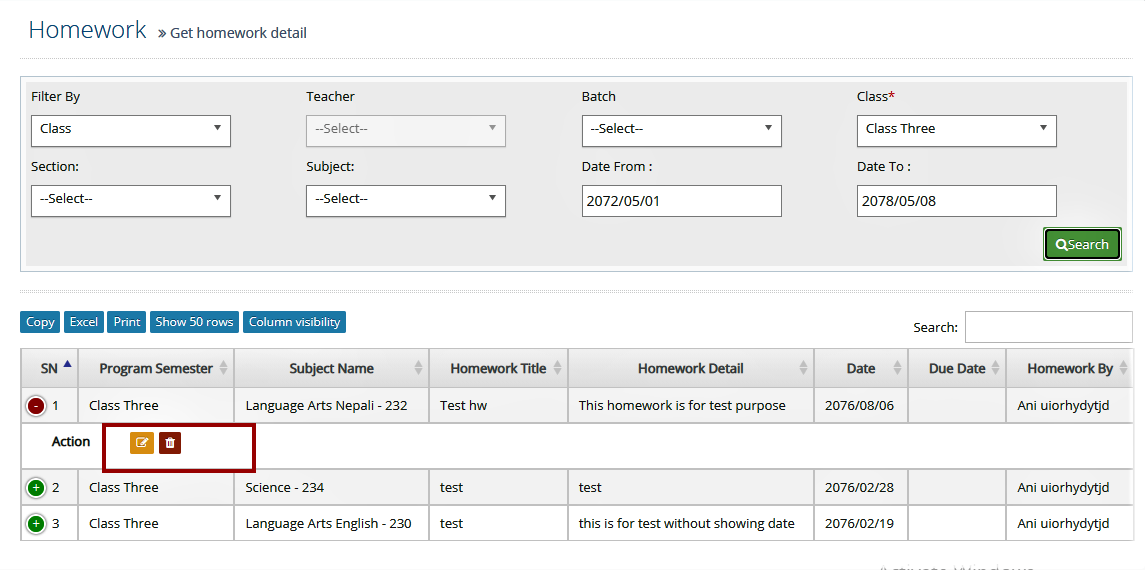
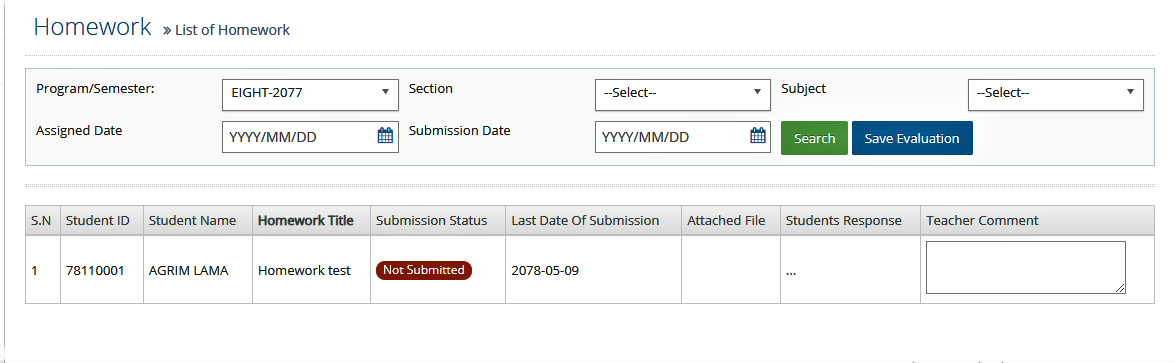
Step II: View Homework
Once the homework has been updated, you can get the list of all the homeworks assigned.
- Go to LMS
- Under Homework, select View Homework
- Select the class whose homework you want to view
- To get specific homework, filter by date from, date to, section and subject
- Click Search
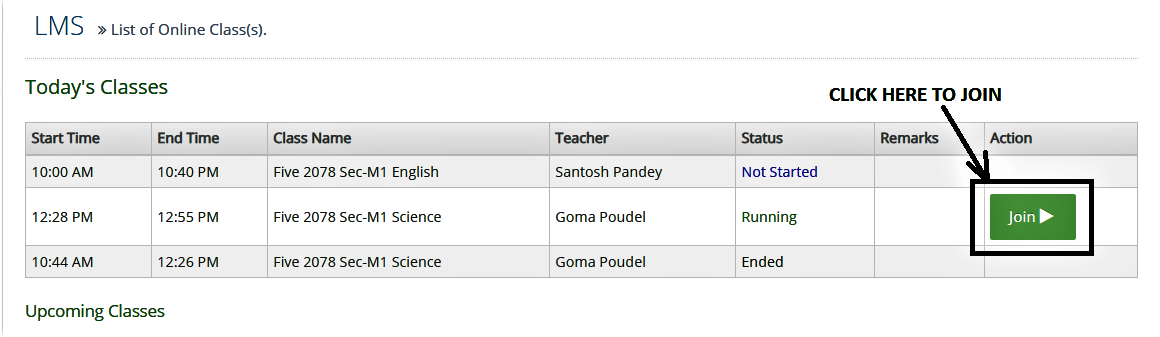
<image>
Step III: Check Homework
If you have logged in as a teacher, you can check the homework submitted by students.
- Go to LMS
- Under Assignment, select Check Assignment
- Search the specific homework by selecting respective class, section and subject
- You can also filter by date
- Click Search
- The list shows all the details such as submission status, submission date, student's response and attachments
- You can check and comment on their homework
- As you complete the evaluation, click Save Evaluation
Note: You can login from mobile app as well to assign, check and view homework.
Note: Students can also login from mobile app to submit homework.
Step 5: Syllabus and Questions
Features to Upload Question, Upload Syllabus and View Question/Syllabus are included under ‘Syllabus and Questions’ menu. Under this, you can
- Create Syllabus
- Create Questions
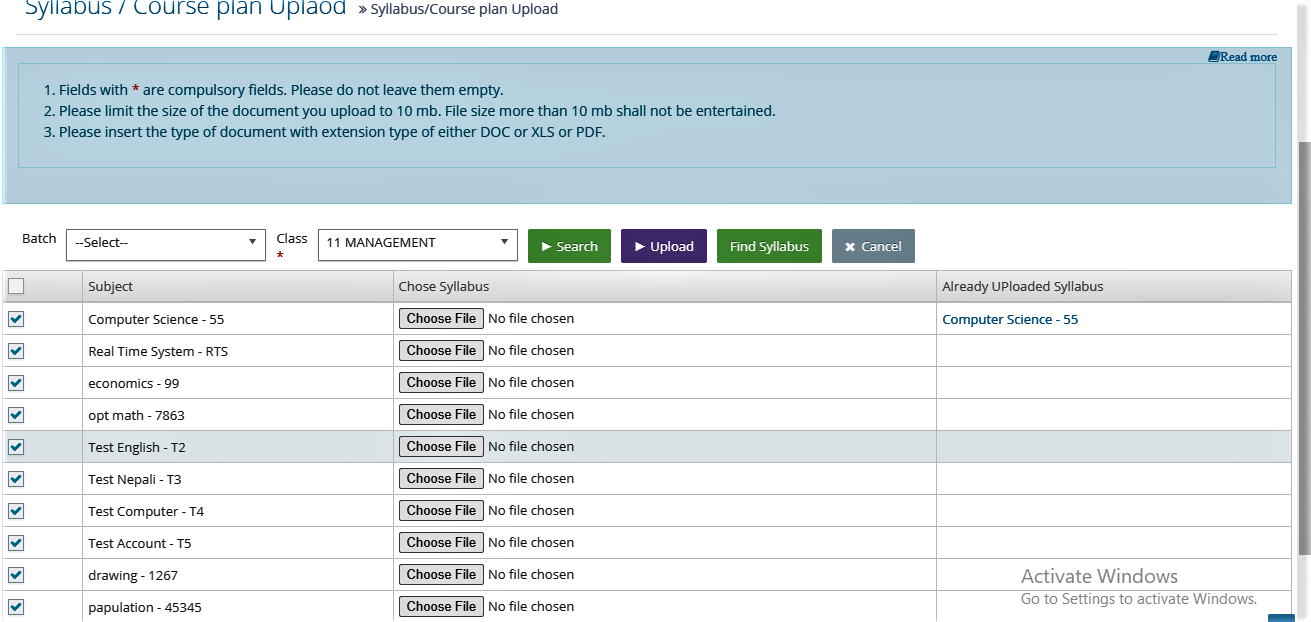
Step I: Create Syllabus
This is where you can give students your big picture for the course, explain more details, and share your passion about your subject. A syllabus lists the specific course requirements a student must complete, once he/she actually registered for the class.
- Go to: LMS
- Under Syllabus & Questions, select Upload Syllabus
- Select the specific class whom you want to upload syllabus to
- Click Search
- Attach the respective file
- Click Upload
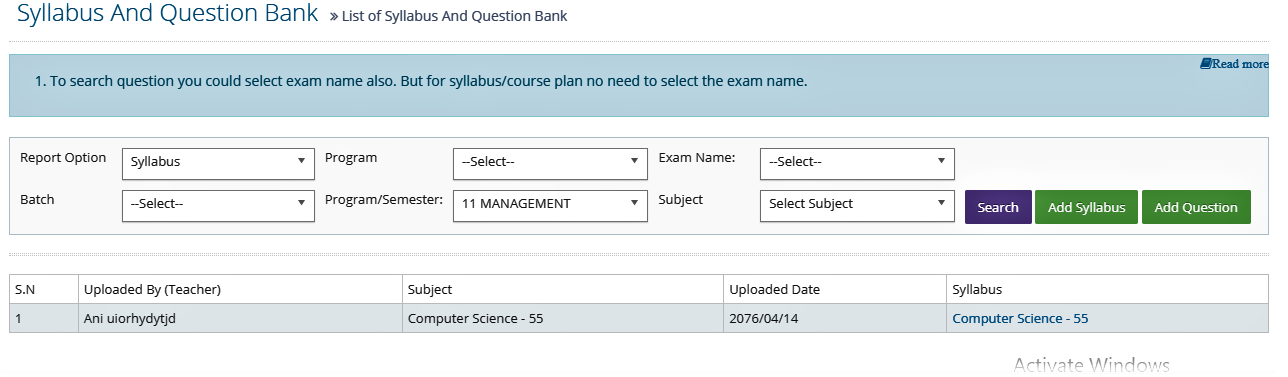
If you want to view the list of already save syllabus,
- Go to: LMS
- Under Syllabus & Questions, select View Syllabus & Questions
- Select respective class
- Click Search
<image>
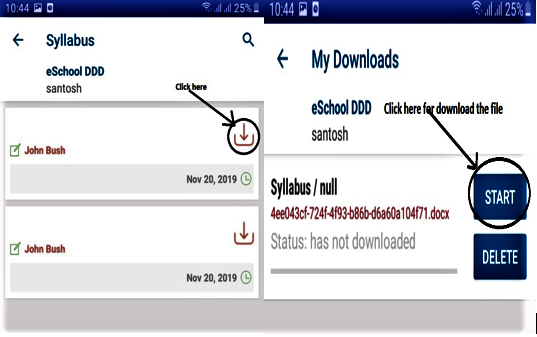
Note: Students can view the syllabus using mobile app as well.
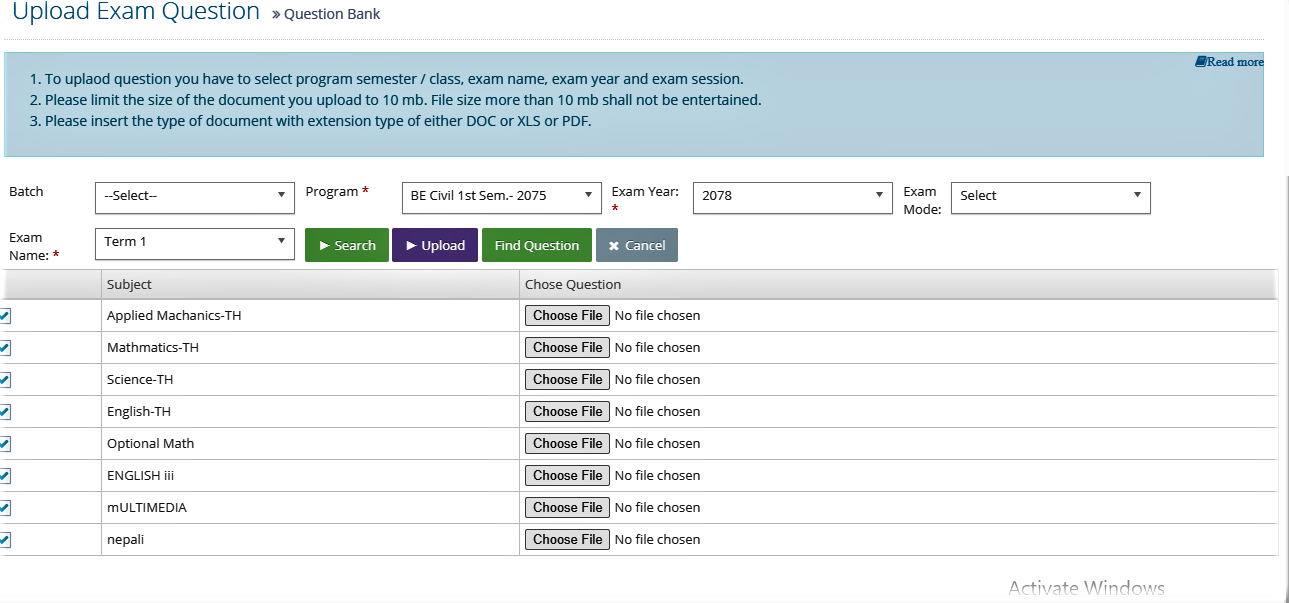
Step II: Create Question
Staffs create his/her own custom questions to use in homework assignments, tests, and quizzes.
- Go to: LMS
- Under Syllabus & Questions, select Upload Questions
- Select the specific class whom you want to upload question to
- Select the respective exam
- Click Search
- Attach the respective file
- Click Upload
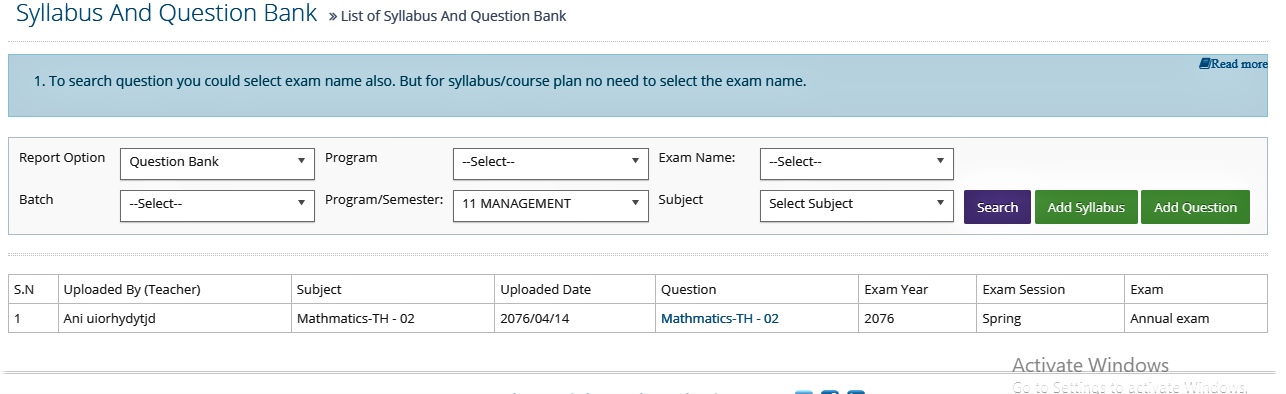
If you want to view the list of already save question,
- Go to: LMS
- Under Syllabus & Questions, select View Syllabus & Questions
- Select respective class
- Select respective exam
- Click Search
Note: Students can view the syllabus using mobile app.
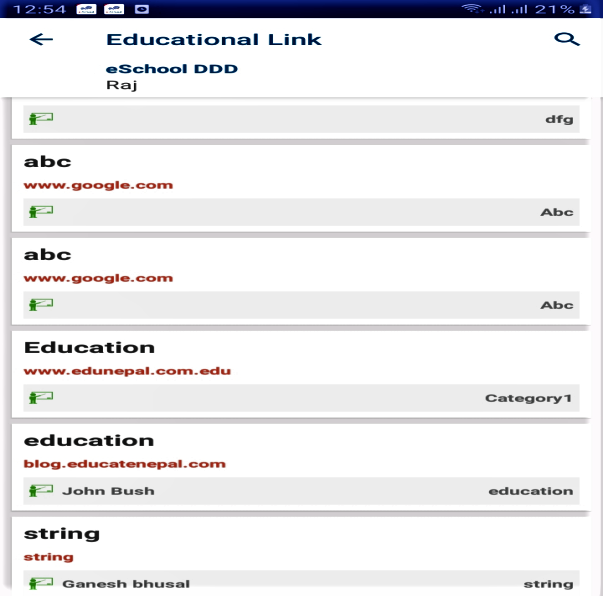
Educational Links
It is reference of assignments in educational link. This page contains web links to educational related any websites.
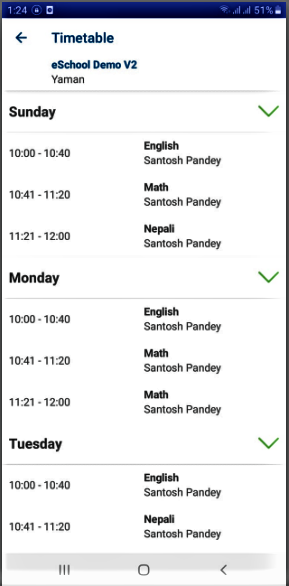
Step 6: Time Table
Under time table, the primary task to be done is to set the timetable period. Then, eventually period program association, teacher subject association and, teacher subject period association can be done. Time Table contains:
- Timetable Period Setting
- Program Period Association
- Teacher Subject Association
- Teachers Subject Period Association
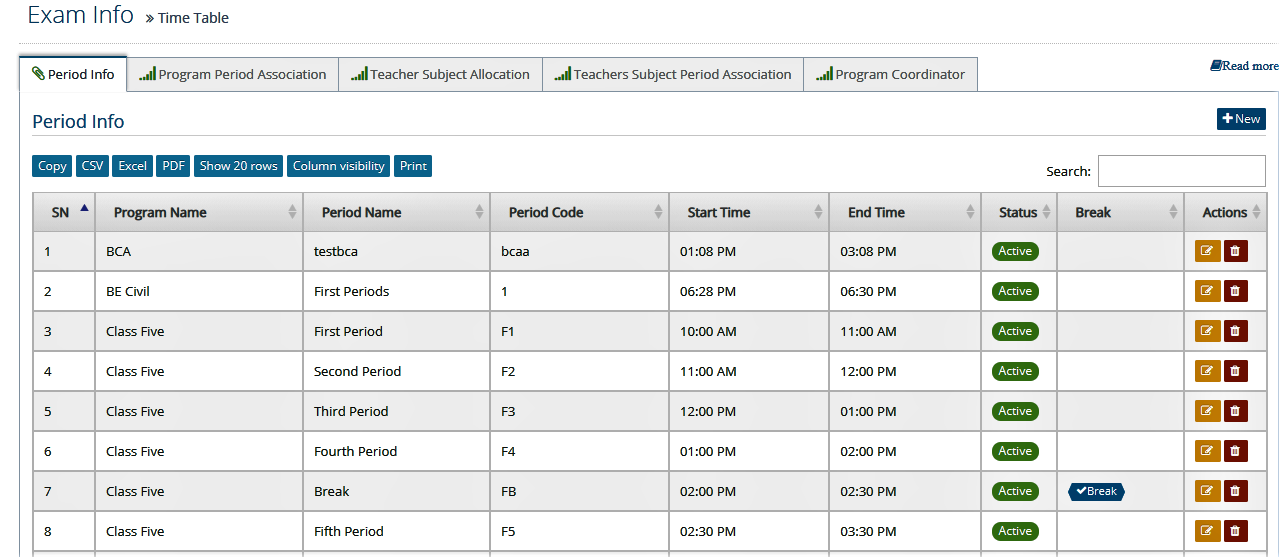
Step I: Timetable Period Setting
Here you can set one week period details of the school timetable. This will be repeated for all weeks. This setup is only for 1 year. You should set again if academic session is changed.
- Go to: LMS
- Under Routine & Classroom , select Timetable
- Select Period Info
- Click New
- Add period name, period code, start time, end time, break status and active status for each period
- Click Save
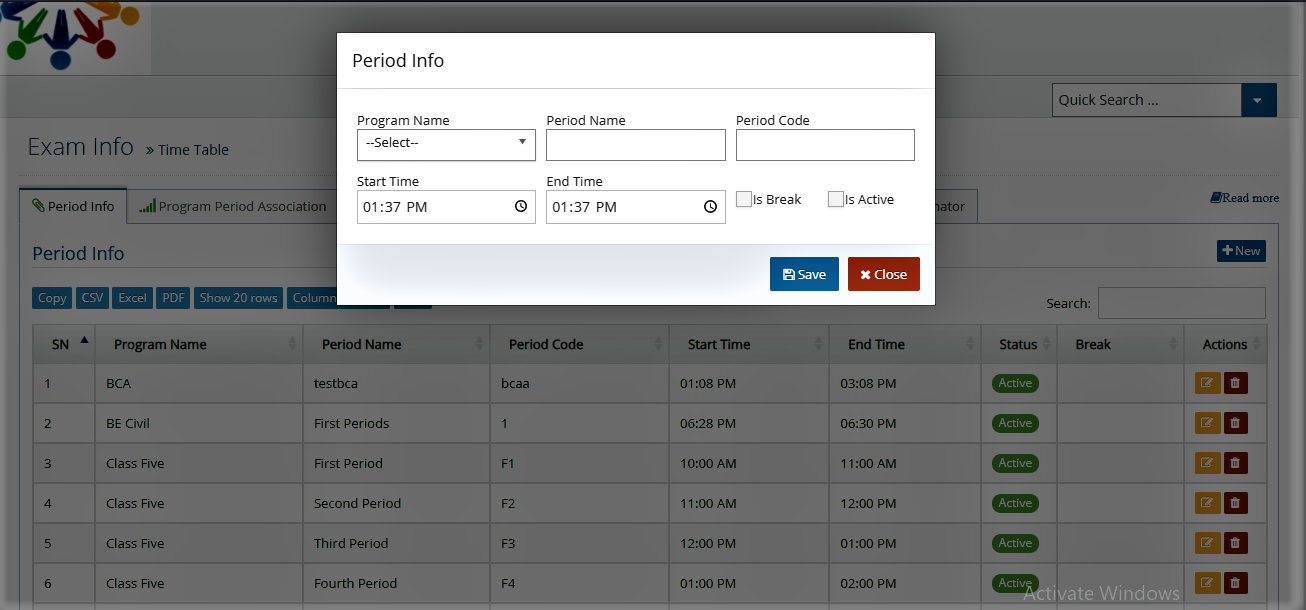
Note: The blank space before and after period is not alloyoud in our system and there must be unique period code. So, the start and end hours must be in 24 hours format. (eg; if you need to enter 5:00 pm, you enter 17:00 pm)
If you want to edit or delete timeperiod,
- Go to: LMS
- Under Routing & Classroom , select Timetable
- Select Period Info
- From the list, click Edit/Delete next to the specific time period you want to edit/delete
- If you clicked edit, make necessary changes and click Save
- If you clicked delete, click Confirm
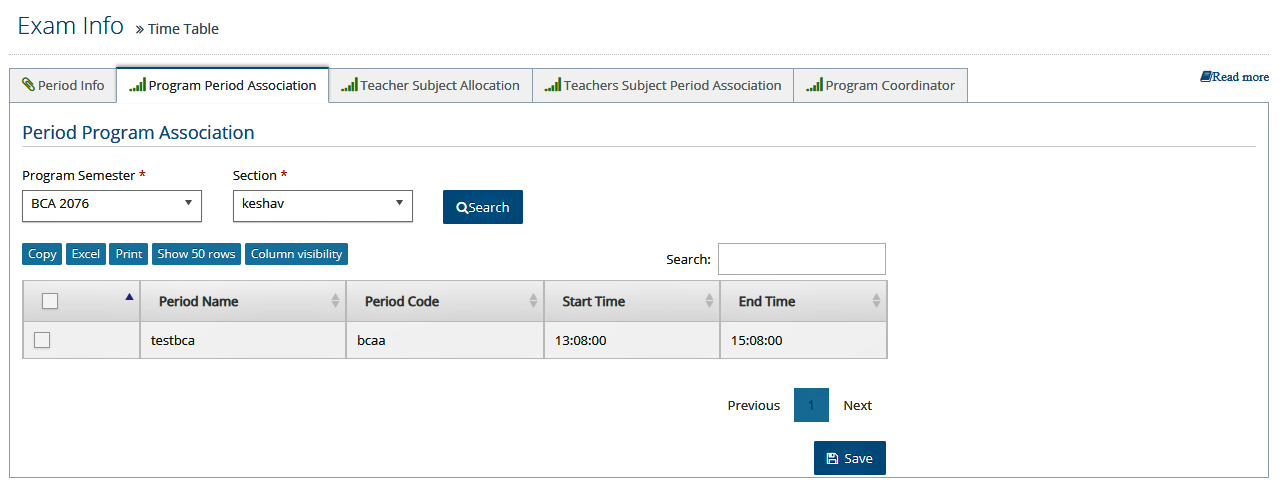
Step II: Program Period Association
Here you can associate the school period with each class.
- Go to: LMS
- Under Routing & Classroom , select Timetable
- Select Program and Period Association
- Select respective program semester and section
- Click Search
- Tick the periods that you want to associate to this program semester
- Click Save
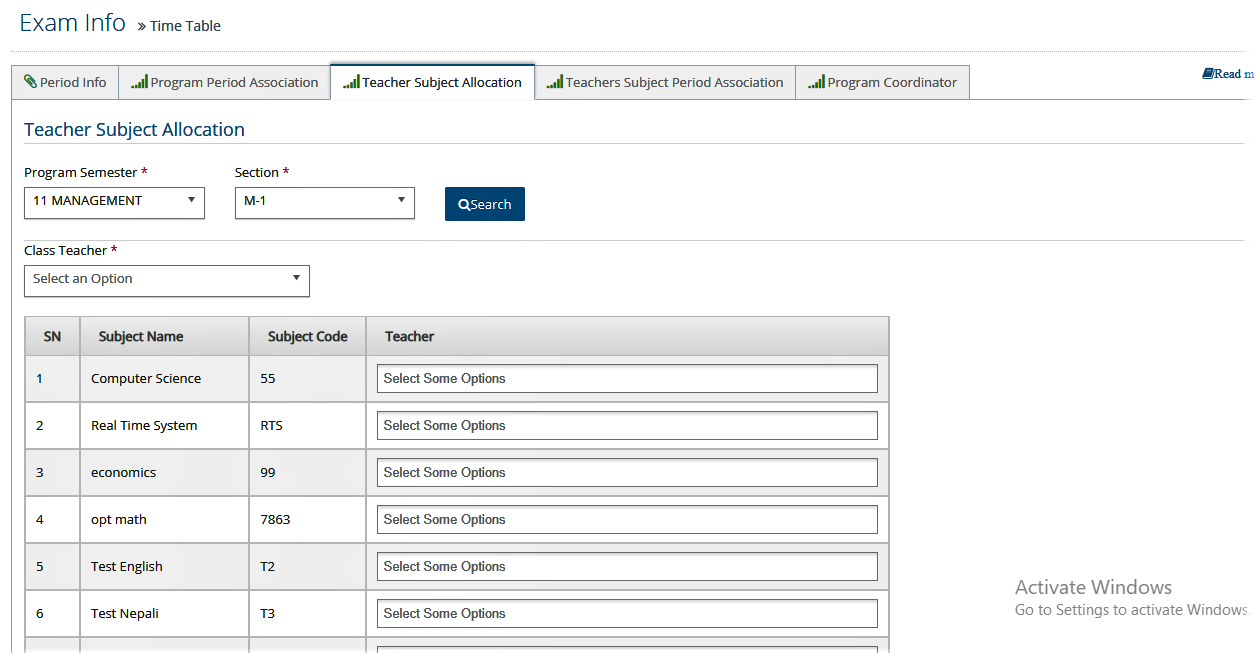
Step III: Teacher Subject Association
Here you can associate the school period with each class.
- Go to: LMS
- Under Routing & Classroom , select Timetable
- Select Teacher Subject Allocation
- Select respective program semester and section
- Click Search
- Select the teacher next to each subject
- Click Save
Step IV: Teacher Subject Period Association
Here you can associate the school period with each staff, class & subject.
- Go to: LMS
- Under Routing & Classroom , select Timetable
- Select Teacher Subject Period Association
- Select respective program semester and section
- Click Search
- Select Teacher
- Click Save

Note: You can also login from mobile app to view timeperiod.
Billing Module
You can do all the fee related activities of the students in billing module. Here you can do Fee Setting; Fee Assign, Discount & Fine Setting, Fee Payment, Invoice Print, Adjustment, Void Invoice & Receipts, Generate Required Report etc. Here are the some steps to operate billing module:
- Fee Setting
- Discount & Fine Setting
- Fee Schedule
- Assign Fee
- Fee Payment
- Quick/Misc. Payment
- Adjustment
- Print Invoice
Fee Setting
All settings must be done before assigning fee to student. Here are the steps for fee settings:
- Bill Period
- Fee Group
- Fee Name
- Fee Rate
- Optional Fee Setting
- Opening Balance
Step I : Bill Period
Bill Period is one time setting for one academic year. This should be set as per the Bill Generation type. If you have monthly billing system set according to 12 months or else if you have to set multiple months in assigned bill you can set according to it (e.g. January – March).
- Go to Billing
- Under Fee Setting, select Bill Period
- Click New
- Insert/Select Bill Period Name, Code, Hierarchy, Is active
- Click Save
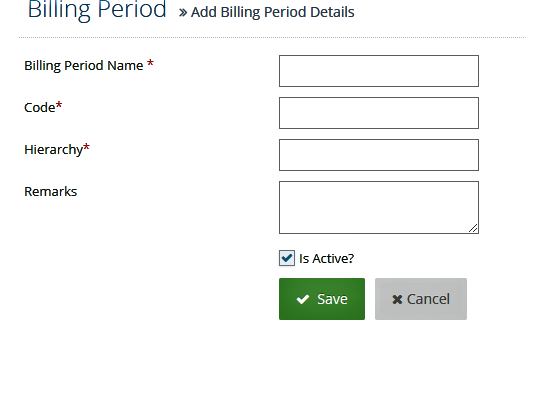
Note: Code & Hierarchy are Unique. You can set any code but for hierarchy set order of bill period as per billing process in numeric only.
Step II: Fee Group
Here you can set fee group. Each organization may have multiple fee headings, you have to define them in common groups. This is one time setting for one academic year. Fee group can be like; Annual Fee, Monthly Fee, Miscellaneous Fee, Yearly Fee etc. There may be specific Fee name except this; you will set them in Fee Name Page.
- Go to Billing
- Under Fee Setting, select Fee Group
- Click New
- Insert/Select Fee Group Name, Code, Is active
- Click Save
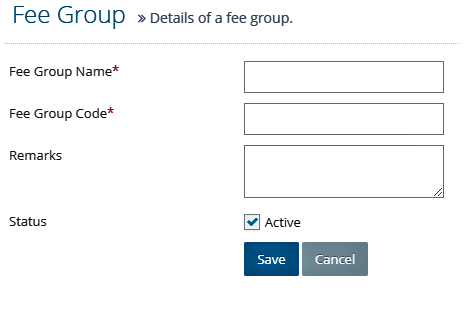
Note: Code is Unique. You can set any code.
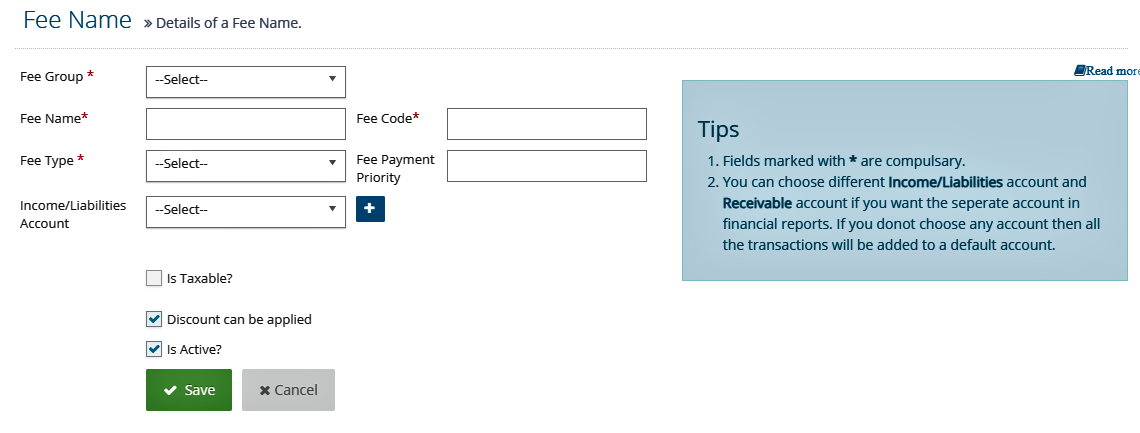
Step III: Fee Name
Here you can add all Fee Name/Fee Heading according to fee structure of your School/college. Fee Names will be like as monthly fee, semester fee, admission fee, bus fee, stationary Fee, Miscellaneous Fee etc.
- Go to Billing
- Under Fee Setting, select Fee name
- Click New
- Select Fee Group
- Set Fee Name/Fee Heading & Code (Code is unique).
- Select Fee Type. (Fee Type is fixed Compulsory/Regular, Extra/Miscellaneous, and Optional).
- Select Income/Liabilities Account: In this setting, data will be displays only after add the ledger & sub ledger names in Accounting Module. If you will not use Accounting Module (Core Accounting) leave it blank. If you use Accounting Module, you must set this also. If you will not set this setting properly, your Income report will not be proper in income/expenditure, trail balance, balance sheet reports.
- Set Is Taxable, Discount can be applied and is active for each fee name
- Click Save
Note:
- You can select Compulsory/ Regular fee type if the fee name is applicable for all students.
- You can select Extra/ Miscellaneous fee type if the fee name is applicable for certain students with different fee in specific Bill period (for example: extra class, diary, stationary )
- You can select Optional fee type if the fee name is applicable for certain students with same fee rate in specific time period. ( For example: computer fee, Transportation fee)
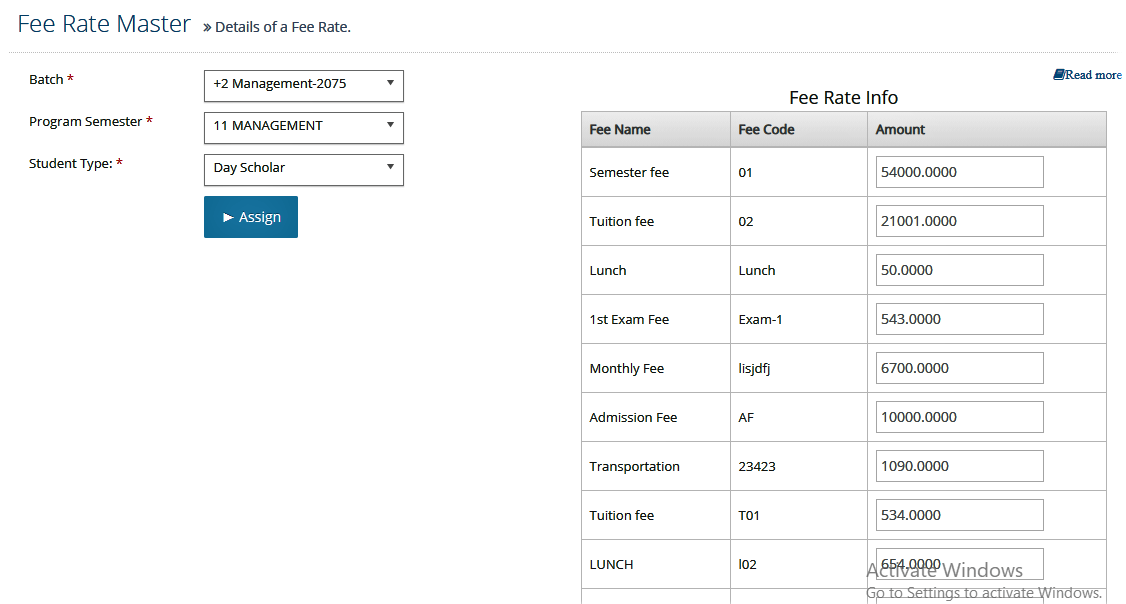
Step IV: Fee Rate
Here you can set fee rate for different classes in different fee headings.
- Go to Billing
- Under Fee Setting, select Fee Rate
- Select Batch, Program Semester (Class Name), Student Type
- Click Assign
- Set Fee Rate of each fee heading which are applicable for this Program Semester (Class Name) for the running academic year.
- Click Submit
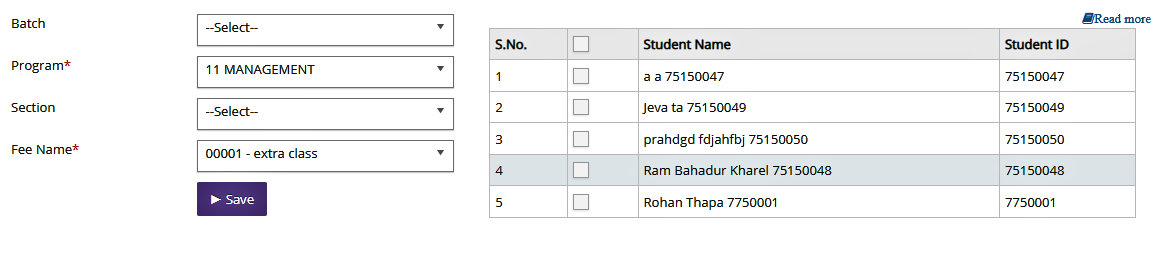
Step V: Optional Fee Setting
Here you set the optional fee for each individual student. Here you set that type of fees which are in regular monthly fee but applicable for some students only. Like Transportation, lunch, snacks etc.
- Go to Billing
- Under Fee setting, select Optional Fee Setting
- Select required field as per form, it automatically shows whole student of a class or section
- Tick students to whom this fee will be applicable.
- Click Save
Step VI: Opening Balance
If any students have any due balance or advance balance then you set those amounts in opening balance before starting the system. Opening balance is set only one time before starting the system in implementation process. System automatically carries out the opening balance in next fiscal year after completely running the billing system.
- Go to: Billing
- Under Fee Setting, select Opening Balance
- Select the respective program semester and section
- Click Search. The system will show the list of all students of the respective program semester.
- Set Opening Date, Due Date, DR Amount (Due Amount), CR Amount (Advance Amount) as per the requirements. If you charge fine of any amount to student you must set due date this due date should be as per fine setting rules. Just fill the amount whose due or adv. amount is applicable, leave blank for not related students
- Click Save
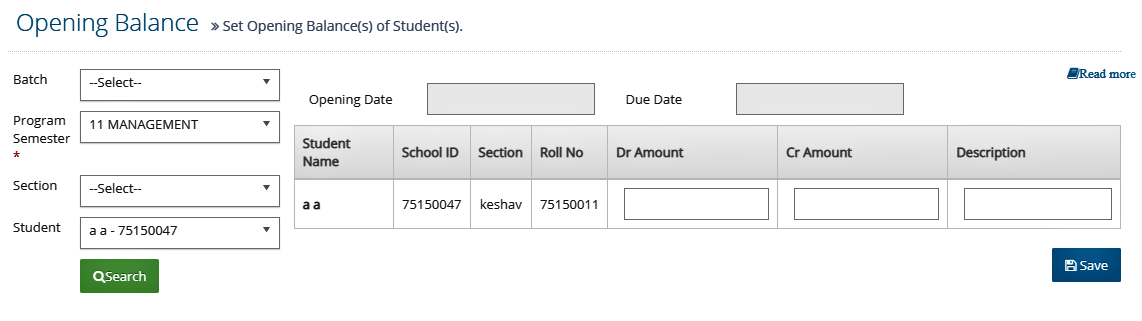
Note: You can change these values at any time in same method if required. However, confirm the changes before editing.
Discount and Fine Setting
Discount and fine setting contains following features:
- Scholarship/Discount
- Fine Settings
- Fee Generate
- Fine Waive
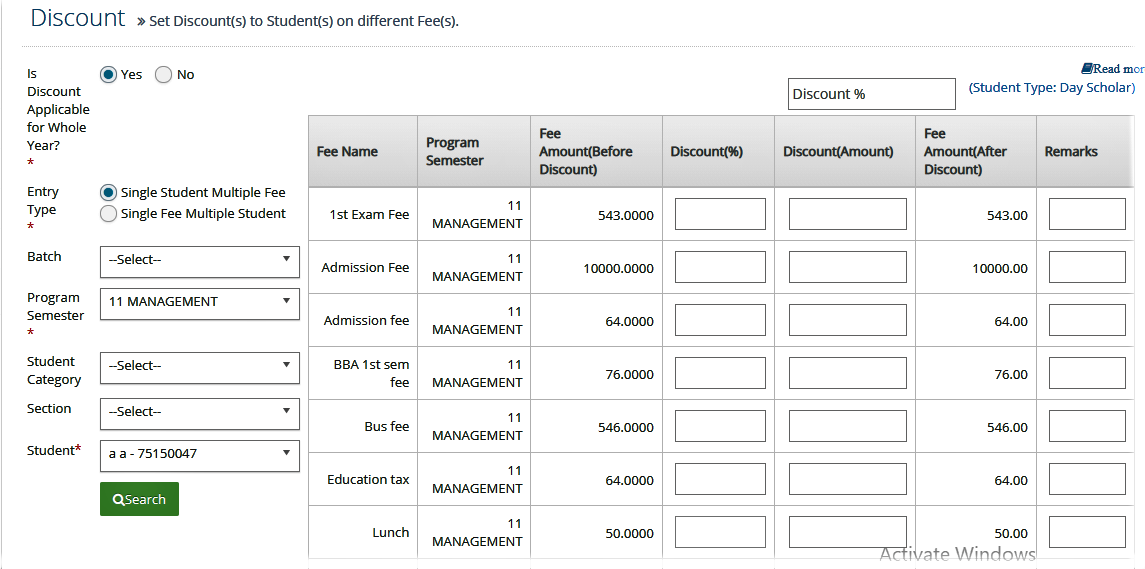
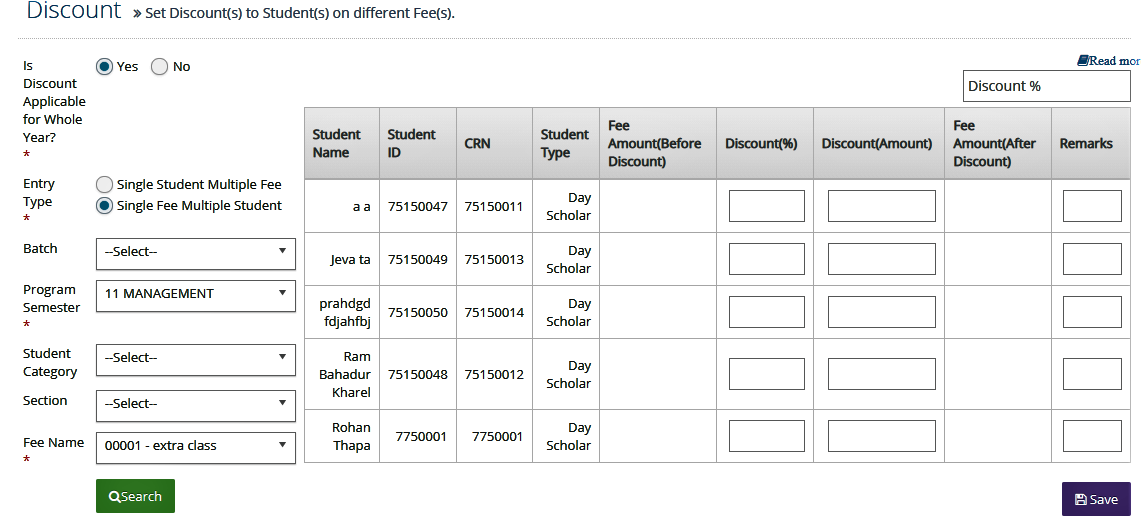
Scholarship/Discount
Here you set the scholarship/discount on fee name individually or in bulk (class wise) at once. This can be set in % basis or amount basis. Discount/Scholarship can be set for whole year or for specific bill period also. However, fee name & fee fate must be set before this setting.
If you want to set the discount/scholarship for an individual student,
- Go to Billing
- Under Discount & Fine, select Discount
- Select Single Student Multiple Fee
- Select the required program semester
- Select the respective student
- Set Discount in % or amount according to your requirement next to each fee head
- Click Save
If you want to set the discount/scholarship in bulk:
- Go to Billing
- Under Discount & Fine, select Discount
- Select Single Fee Multiple Student
- Select the required program semester
- Select the respective fee head
- Set Discount in % or amount according to your requirement next to each fee head
- Click Save
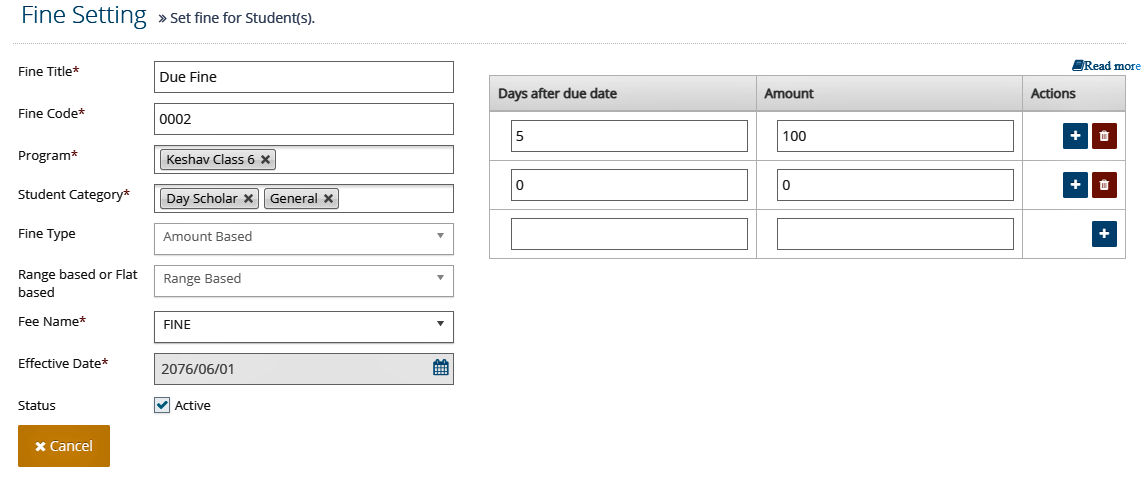
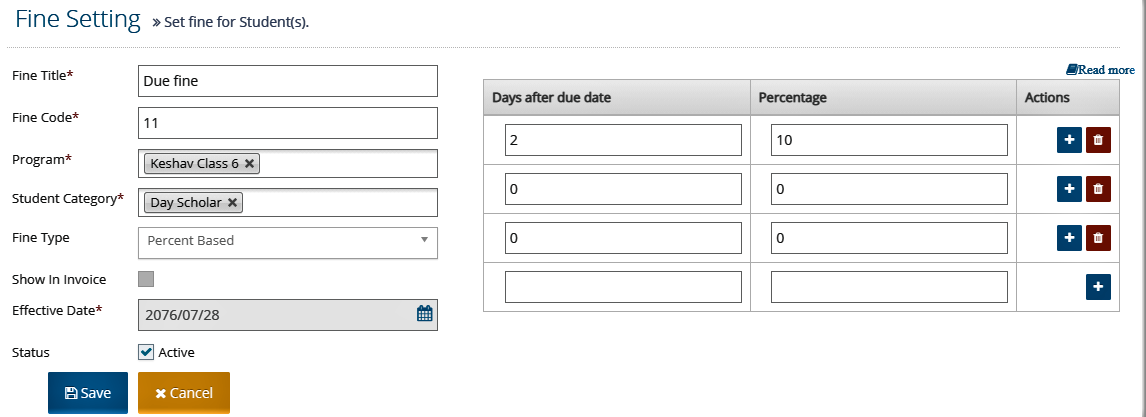
Fee Settings
Here you can set the fine rate in percentage basis or amount basis as per your requirements.
To set the fine based on amount follow following steps:
- Go to Billing
- Under Discount & Fine, select Fine Setting
- Click New
- Make necessary selections
- Select Amount Based as fine type
- Set related settings
- Click Save
To set the fine based on percentage follow following steps:
- Go to Billing
- Under Discount & Fine, select Fine Setting
- Click New
- Make necessary selections
- Select Percentage Based as fine type
- Set related settings
- Click Save
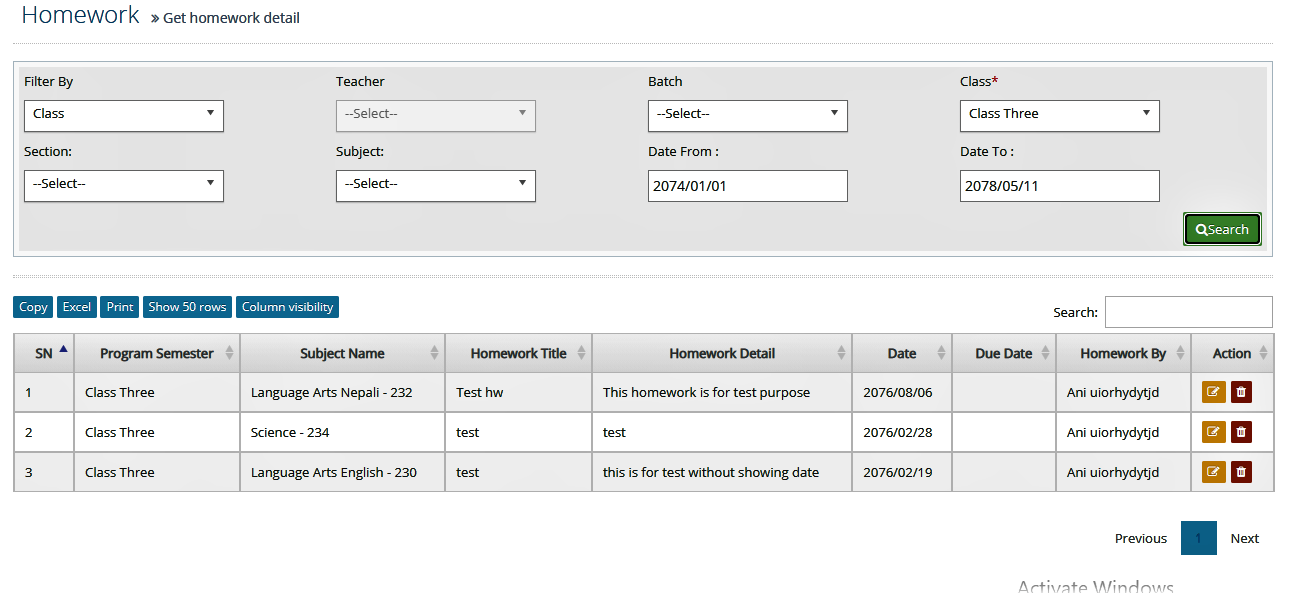
Fine Generate
Here you can generate fine for individual student or program semester in bulk only for Amount based Fine related setting.
If your fine is amount based, you have to generate fine for each bill period before the Fee assign of each bill period. System will automatically show this fine in Invoice.
- Go to Billing
- Under Discount & Fine, select Generate Fine
- Click New
- Make necessary selections
- Click Search
- Set related settings
- Click Save
<image>
If your fine is percent based, system will automatically generate fine as per the fine setting for each billing period at the time of fee assign & show this fine in Invoice. You donot have to work for this process just set fine setting only.
Fine Waive
Here you can waive fine for each individual student if you required. For this you can waive fine before Fee Payment.
- Go to Billing
- Under Payment, select Fee Payment
- Select related program or student to whom you want to waive fine.
- Click Pay Fee
- Click Fine Waive.
- System shows popup box, set waive date, amount and click Save
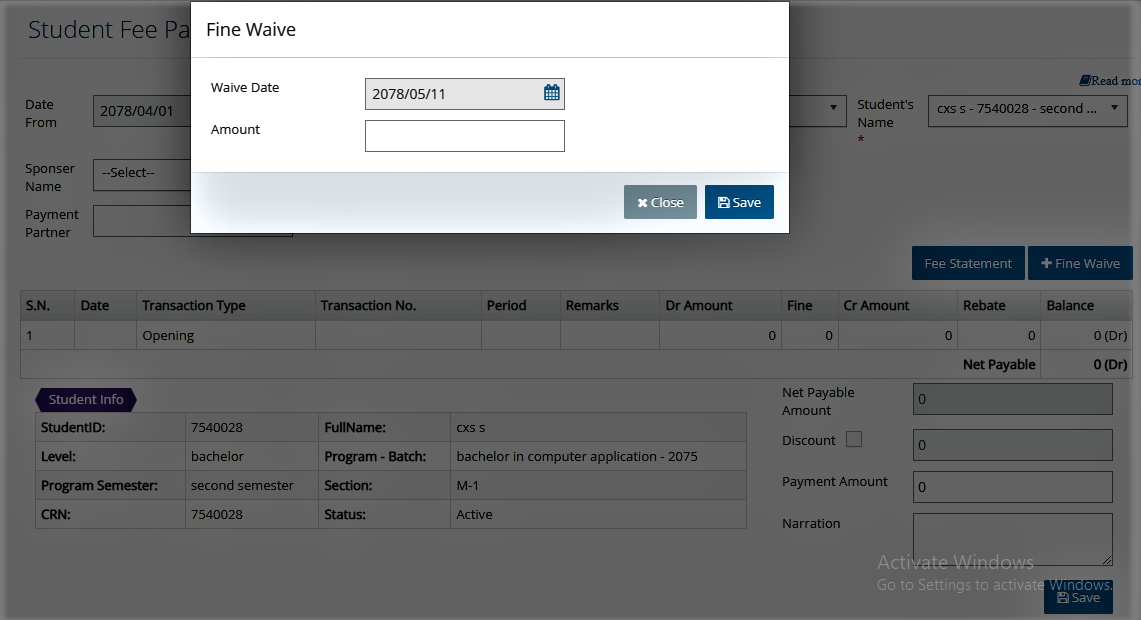
Note: You can view the fine waived details by selecting Fine waive under Discount & fine.
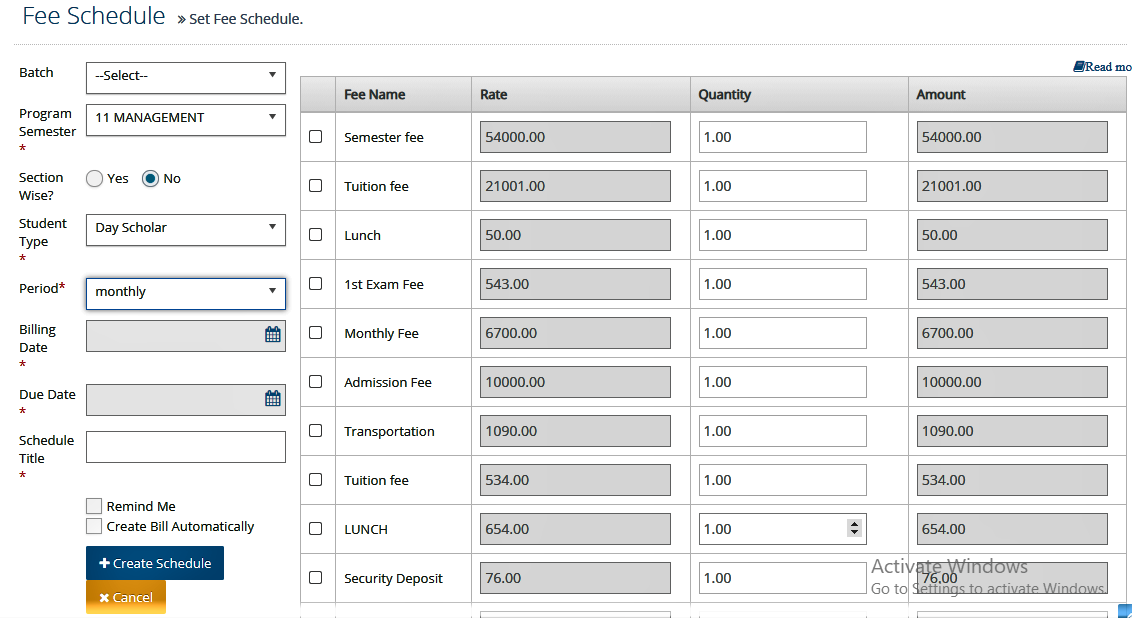
Fee Schedule
This feature is used to schedule bill (invoice) period. You can schedule the setting as per billing period and make our fee assign process easier. If you set this setting, system will automatically assign the invoice or reminder for fee invoice at the defined date of schedule.
- Go to: Billing
- Under Assign Fees, select Fee Schedule
- Click New
- Make all the necessary selections
As soon as you make these selections, the list of fee heads with fee rates and amount will appear.
If you want to set fee schedule for one month,
5.Set Quantity as 1
If you want to set fee schedule for multiple months,
5.Set Quantity as much as the number of months you want to assign this fee for
Then,
6.Tick the fee heads you want to assign fees to
7.Click Create Schedule
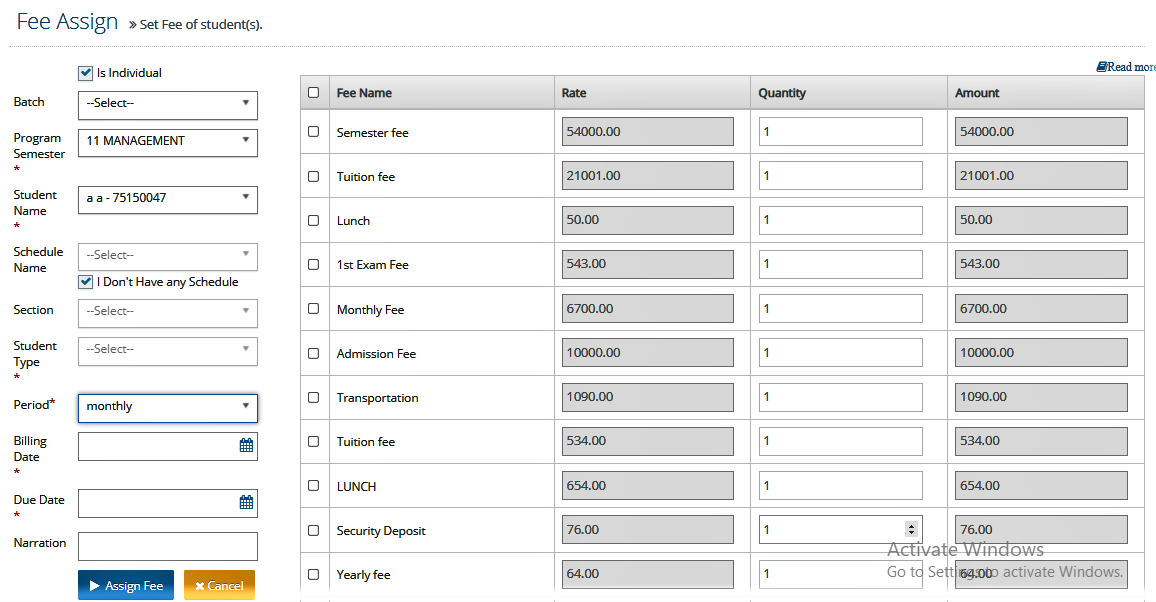
Assign Fee
This feature is used to generate bill (invoice). You can assign fees class wise or individual in monthly basis or as per bill periods. Before starting this feature all billing related setup should be completed as defined.
- Go to: Billing
- Under Assign Fees, select Fee Assign
- Click New
If you want to set fee to individual student,
4.Tick Is Individual
5.Select the respective program semester, section and student
If you want to set fee to all students at once,
4.Untick Is Individual
5.Select the respective program semester and section
As soon as you make these selections, the list of fee heads will appear.
If you want to set fee for one month,
6.Set Quantity as 1
If you want to set fee for multiple months,
6.Set Quantity as much as the number of months you want to assign this fee for
Then,
7.Tick the fee heads you want to assign fees to
8.Enter Amount next to each fee head you selected
9.Click Assign
Fee Payment
This feature is used to collect fee from students. Here you can pay fee (Payment collection) of the generated bill or as per credit invoice or Advance Payment of each student individually by cash or Bank or Bank to Bank Transfer or e- Sewa ID or for Staff Salary. You can pay Fees in Total or Fee Head wise also. For one academic Year user must follow only one process in bulk or fee head wise.
If you want to make the bulk fee payment,
- Go to: Billing
- Under Payment, select Fee Payment
- Select respective program semester
- Click Search
- Next to the respective student whose payment you want to make, Click Pay Fee
- Select the related parameters like, Date, Payment type, sponsor etc.
- Set discount if any.
- Set the Payment Amount
- Set Narration of this receipt
- Click Save
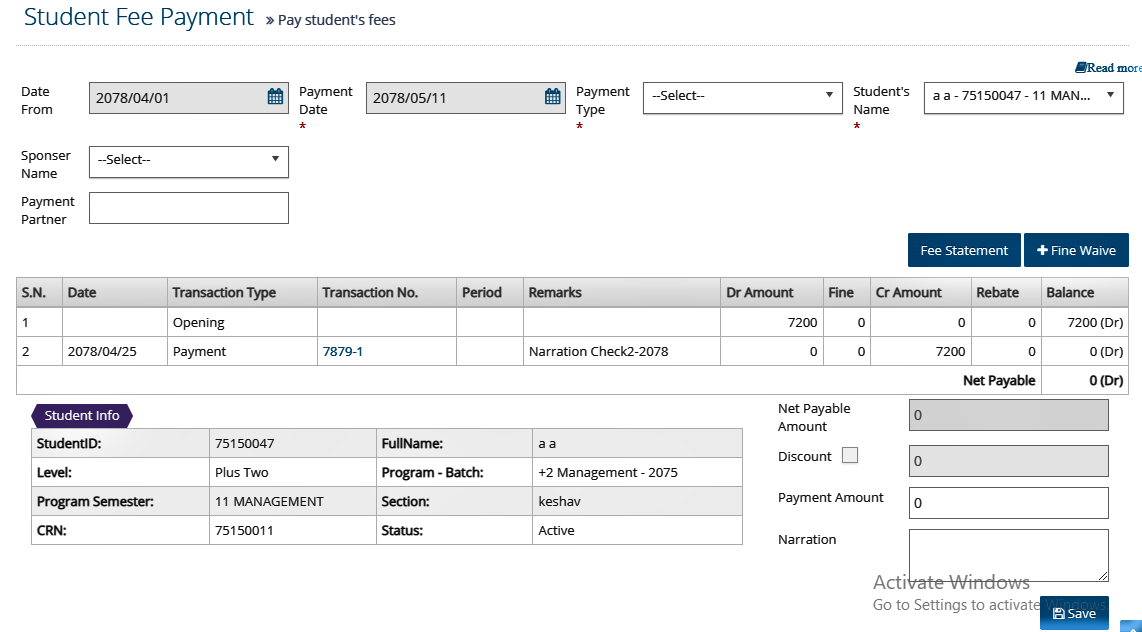
If you want to make headwise fee ppayment,
- Tick the respective fee heads whose payment you want to make
Note: You can make partial, full as well as advance payment. However, if any amount is due as per the assigned invoice, you cannot make advance payment.
<image>
If there occurs any mistake in Fee Payment/Collection, you cannot edit or delete the receipt from Fee payment. At this point you have to void receipt and regenerate the receipt/pay fee. This can be done for individual only.
- Go to: Billing
- Under Payment, select Regenerate Receipt
- Search the related student data for void.
- Click (+) sign. You can view the void button.
- Click Void
- Void the receipt details with cause
- Click Save

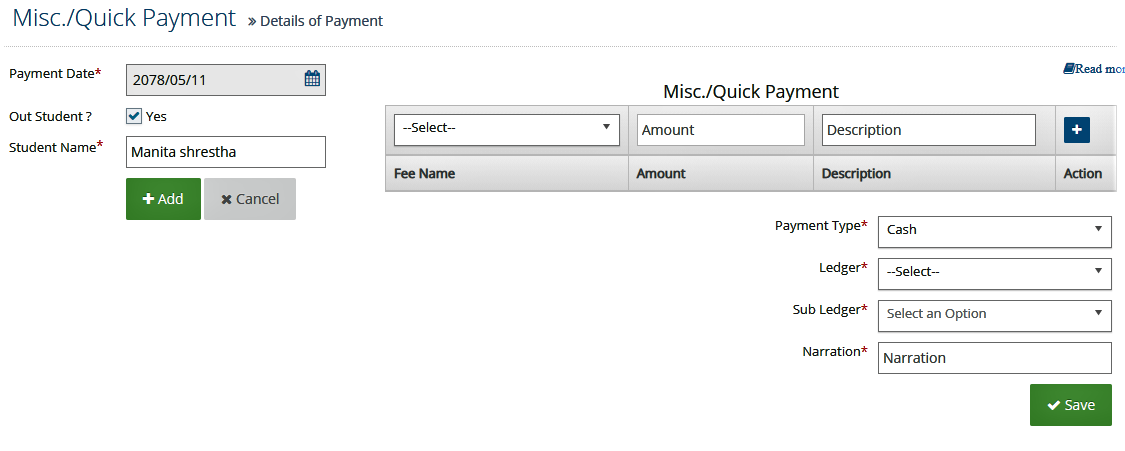
Quick/Misc Payment
This feature is used to collect out incomes from existing students or any others. For this process there should not be assign fees. You can collect extra incomes like character certificates fee, of out students which are not in system. If this payment from out student you must tick on Is out student.
If you want to make payment for students who have not been enrolled or admitted yet,
- Go to: Billing
- Under Payment, select Quick/Misc. Payment
- Click New
- Select payment date
- Tick Yes for Is out student
- Enter the Student Name
- Click Add
- Select Fee head, amount, payment type, Ledger Name, Sub ledger Name & Narration
- Click Save
If you want to make payment for students who have already been enrolled or admitted,
- Go to: Billing
- Under Payment, select Quick/Misc. Payment
- Click New
- Select program semester, section, student and payment date
- Click Add
- Select Fee head, amount, payment type, Ledger Name, Sub ledger Name & Narration
- Click Save

Adjustment
Adjustment contains following features:
- Bad Debt
- Bill Adjustment
Bad Debt
If any student did not clear their due amount since a long time after school left, this type of amount is Bad Debt. In this condition, this is not continue the opening balance or due balance account for this student for long term. At that point company will adjust that amount in Bad Debt and close his due in financial reports.
Our system will accept Incurred & Recovered Bad Debt types only. If that amount will not receive in future and have to close his account completely you have to choose Incurred and If that amount may be received in future, you have to choose Recovered. This will be the as per your status.
- Go to: Billing
- Under Adjustment, select Bad Debt
- Set the related fields
- Click Save

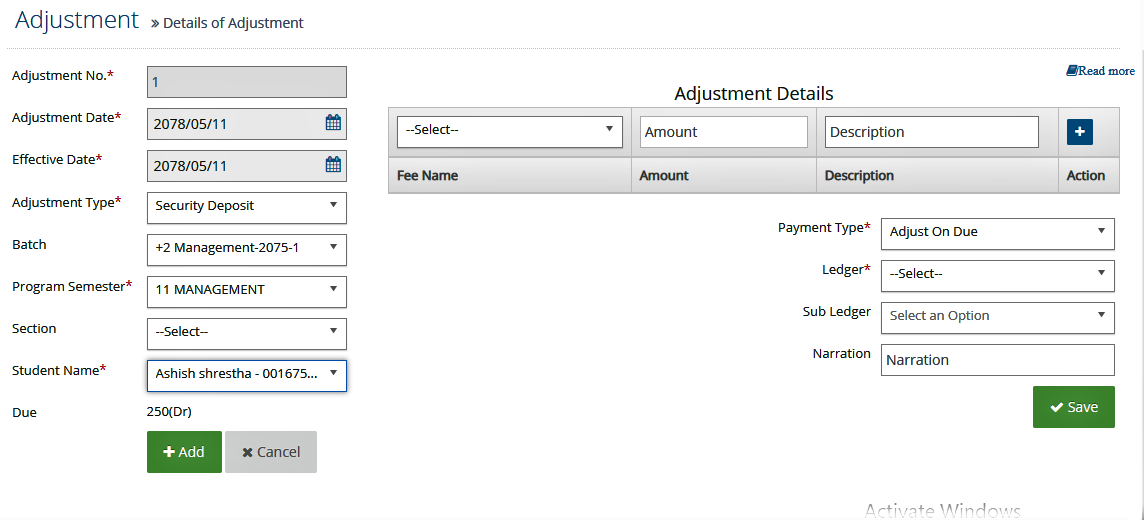
Bill adjustment
If any student left the school and have to adjust his deposit amount or fees, you can use this feature. In this condition, school can adjust deposit amount or any advance payment in his due or return cash or by bank as the situation. This type of transaction will automatically effect on account as per the condition..
- Go to: Billing
- Under Adjustment, select Fee Adjustment
- Set the related fields
- Click Add
- Select the Fee head, amount, adjustment type (Adjust on fee, cash, bank), related ledgers
- Click Save
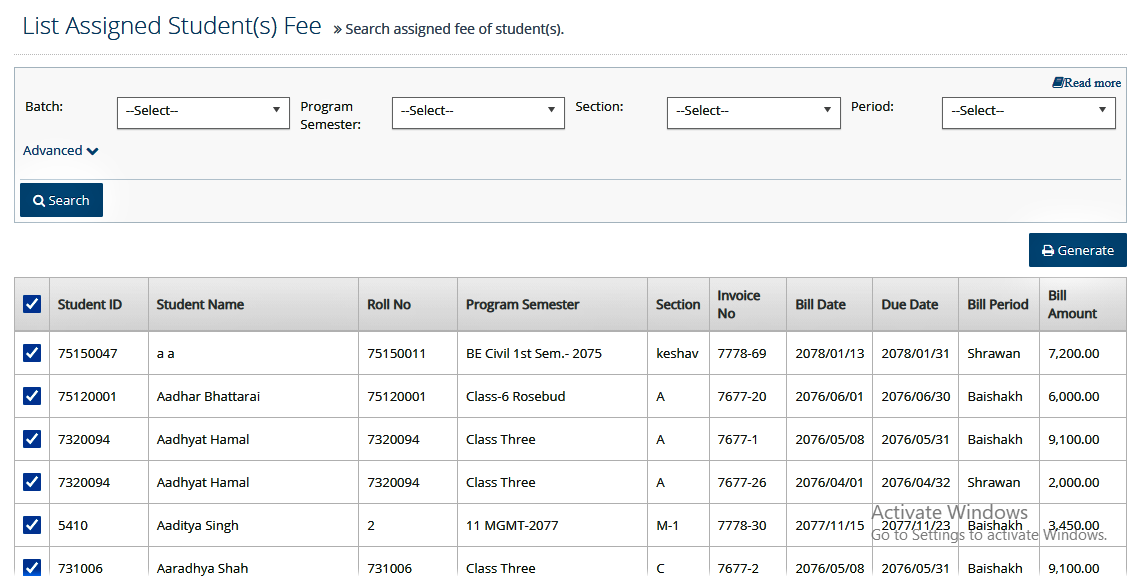
Print Invoice
You can print or view the already assigned fee of individual or class wise in invoice format.
- Go to: Billing
- Under Print Invoice, select Fee Invoice
- Select the respective program semester, section and period
- Click Search
- Tick the checkbox next to the name of students to select the students whose invoice you want to view/print
- Click Generate
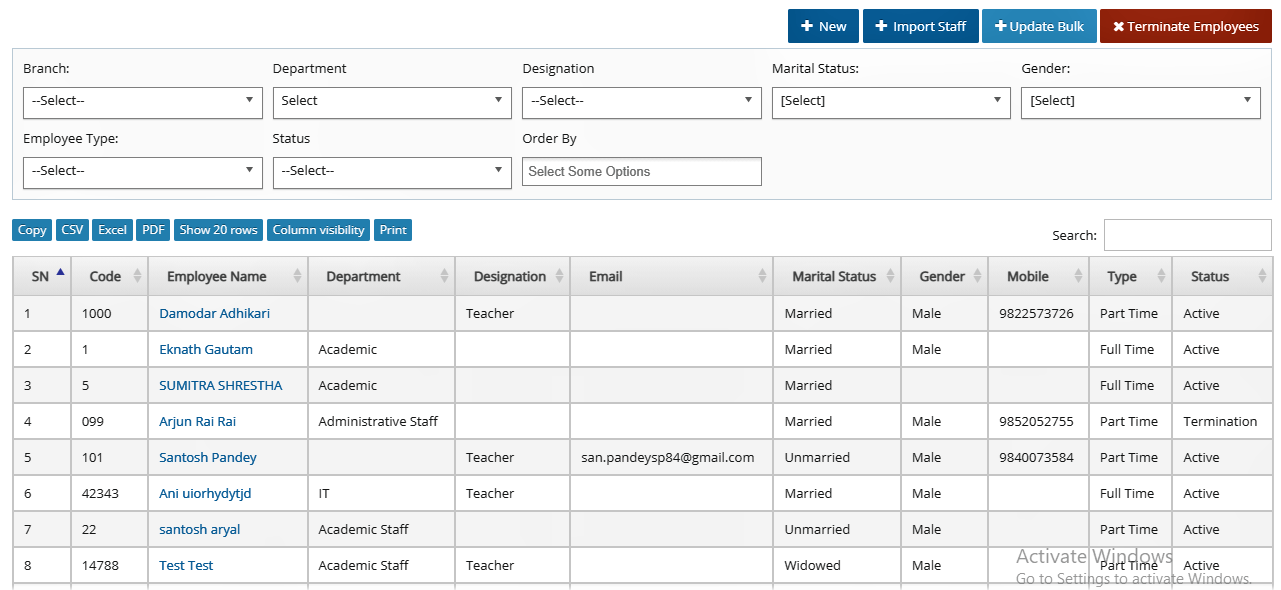
Staff Module
In Staff Module, you can do all the staff information related activity of the staff of the school. Here you set running staff details, staff profile, left staff info, staff ID, Staff time table, Comments to students etc.. Some of the features that staff module includes are:
- Enter staff individually form staff info.
- Or, collect Staffs data (in XLS) as per software database format
- Migrate Staffs Data in software
- Update/Add additional Staff information individually from each staffs data (Staffs Details, Photo, others)
The activities that you can do under staff modules are:
- Staff Info Insert
- Staff Info Update
- Staff Comment
- Staff Left Info
- Reports
Staff Info Insert
Here we manage the all staff records. You can insert the staff info ndividually or in bulk.
To save the information of staffs individually,
- Go to: Staff
- Under Activity, select Staff Info
- Click New
- Enter all the necessary details
- Click Save
To save the information of multiple staffs in bulk,
- Go to: Staff
- Under Activity, select Staff Info
- Click Import Staffs
- Select the respective branch
- Download the already saved data by clicking Download Sample
- Make necessary changes
- Upload the excel file with new information by clicking Choose
- Click Get Excel data
- Tick the checkbox next to the student from the list whose information you want to insert or update
- Click Upload

Note: Please consider the compulsory fields and data type before you upload the information. The cells where compulsory fields do not contain any data are marked red. You cannot upload the data until the red cells are resolved.
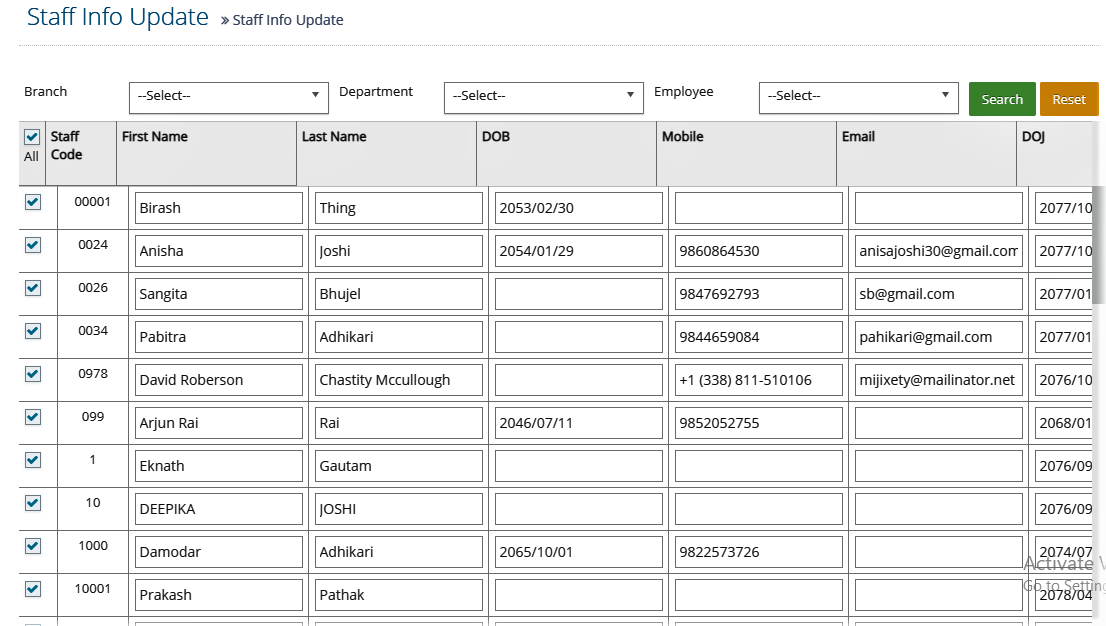
Staff Info Update
Staff information can be updated either individually or in bulk. Details regarding each of them are mentioned below:
To update the staff information individually,
- Go to: Staff
- Under Activity, select Staff Info
- From the list of staffs, click name of the staff you want to update
- Make the necessary changes
- Click Update
To update the information of multiple satffs in bulk,
- Go to: Staff
- Under Activity, select Staff Info
- Click Update Bulk
- Select the respective branch, department and employee
- Click Search
- Make necessary changes
- Click Update Info
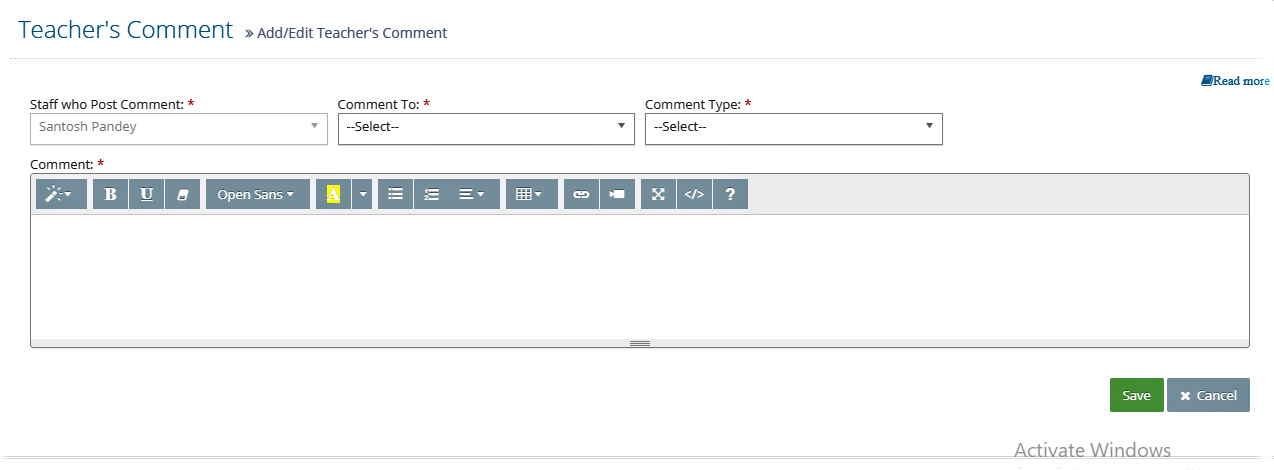
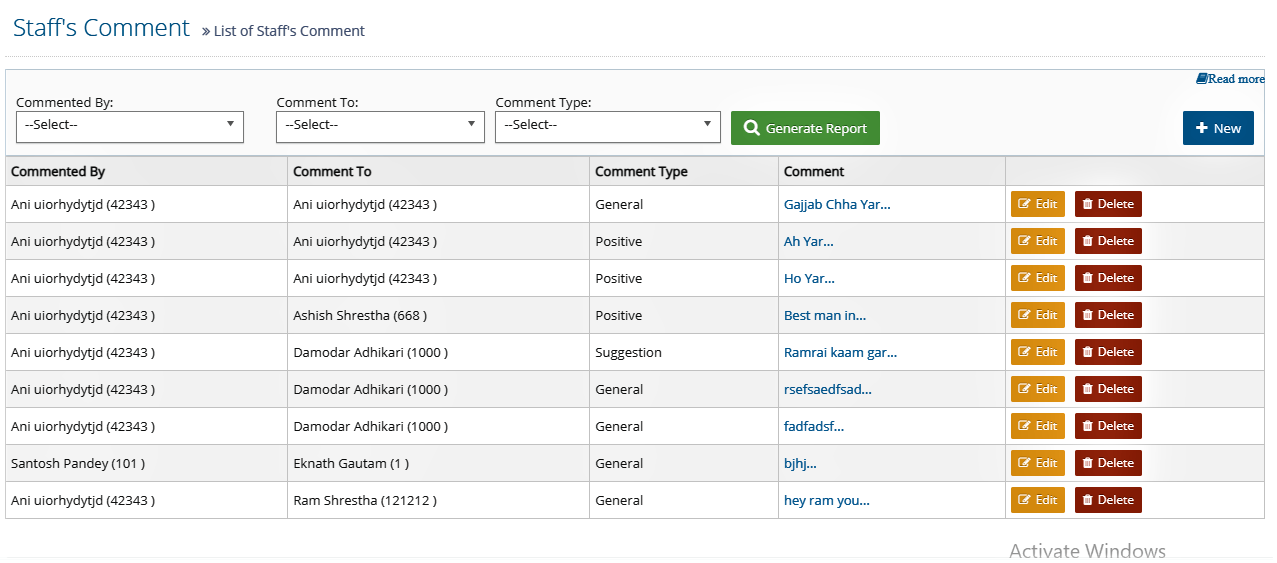
Staff Comment
Staff Comments can be used to comment on employee’s performance individually. If you are a manager, then chances are that you have to write performance reviews. For individual data insertion
- Go to: Staff
- Under Activity, select Staff Comment
- Click New
- Enter all the necessary details
- Click Save
If you want to edit or delete staff comment,
- Go to: Staff
- Under Activity, select Staff Left Info
- Click Edit / Delete next to the comment you want to edit or delete from the list
- If you clicked edit, make all the necessary changes and click Update
- If you clicked delete, click Ok
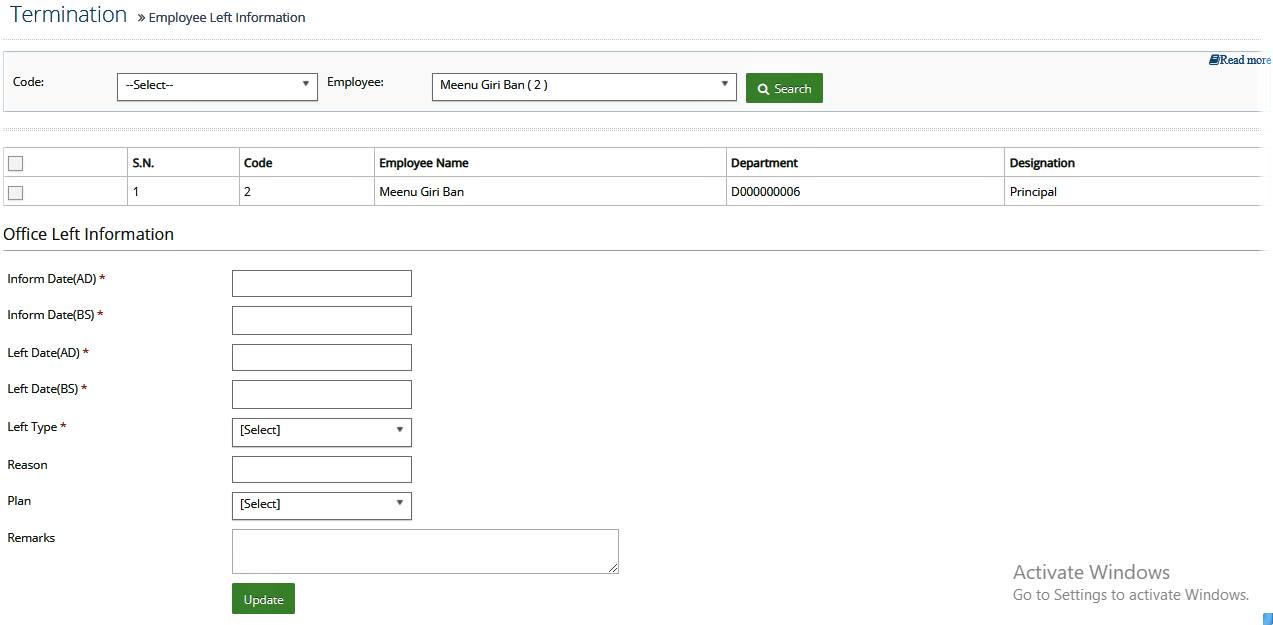
Staff Left Info
Employees quit their job for many reasons. Here, you can add and view staff left info.
- Go to: Staff
- Under Activity, select Staff Comment
- Search the respective employee
- Tick the checkbox next to respective employee from the list
- Fill the details below the list
- Click Update
Reports
Under this users are allowed to generate various reports regarding staff summary, staff general report, staff aggregate report and staff time table.
- Staff Summary
- Staff Aggregate Report
- Staff General Report
Staff Summary
The summary of staff tasks and/or behaviors the person will perform and is accountable for can be viewed here. The results or outcomes the person with their personal details profile and their academic information is provided. The summary of each individual can be obtained here.
- Go to Staff
- Under Reports, select Staff Summary
- Select respective employee
- Click Get Employee Info
Staff Aggregate Report
You can view individual staff aggregate report. To generate the report
- Go to Staff
- Under Reports, select Staff Aggregate Report
- Select respective designation, department
- Click Generate Report
If you want tp print or export this report to excel,
- Click Print or Export to Excel
Staff General Report
You can view individual staff general report. To generate the report:
- Go to Staff
- Under Reports, select Staff General Report
- Select respective designation, department
- Click Generate Report
If you want tp print or export this report to excel,
- Click Print or Export to Excel
Student Module
In Student Module, you can do all the student information related activity of the student. Here you set student details, parent’s details, photos, running class/section, generate required report etc. Some of the features that student module includes are:
- Directly take admission to students.
- Or, collect Students data (in XLS) as per software database format and migrate Student Data in software
- Update/Add additional student information individually from each student data (Parents Details, Photo, others)
The activities that you can do under student modules are:
- Inquiry
- Admission Form Inquiry
- Student Information
- Student Attendance
- Reports
Inquiry
Inquiry provides platform to make various inquiries regarding the school/ colleges. The data provided by the students while making an inquiry is saved in the system and cab be viewed by the school/college administration for further follow up regarding the inquiry. There are two types of inquiry:
- Student Inquiry
- Student Quick Inquiry
Student Inquiry
Any individual who has inquiry regarding the school/college can input their data individually. For this, below mentioned instructions are to be followed:
- Go to: Student
- Under Inquiry, select Inquiry
- Click New
- Enter all the necessary details
- Click Save

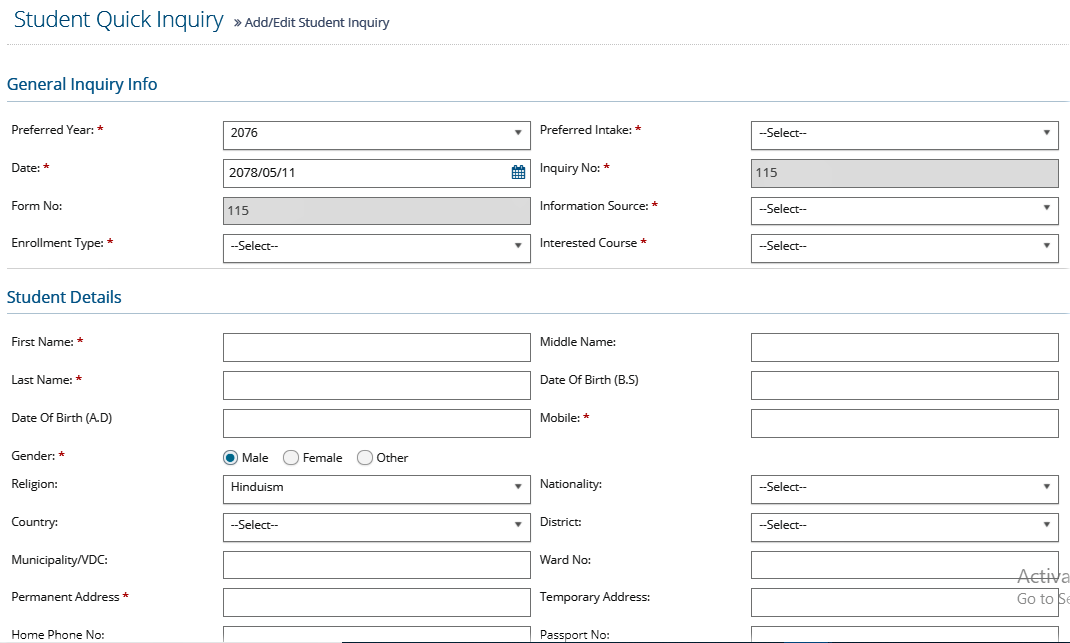
Student Quick Inquiry
Student Quick Inquiry includes general inquiry details of each individual student and excludes administrative role. For this, below mentioned instructions are to be followed:
- Go to: Student
- Under Inquiry, select Inquiry
- Click Student Quick Inquiry
- Enter all the necessary details
- Click Save
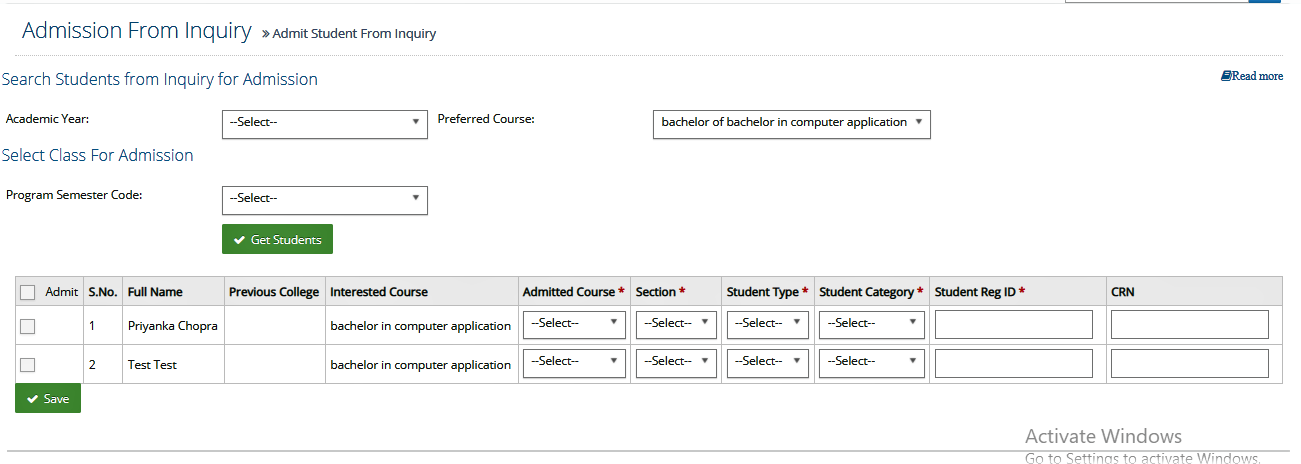
Admission From Inquiry
Here, the inquiry of students are more specific to admission process and requirements.
- Go to: Student
- Under Inquiry, select Admission From Inquiry
- Select the academic year, preffered course, program you want to admit students to
- Tick the checkbox next to the student you want to admit from the list
- Enter all the necessary details
- Click Save
Student Information
Student Information contains various information of students. It also enables users to update student information. You can save the student information into the system in following ways:
- Student Admission
- Student Info Update
- Student Bulk Photo Info
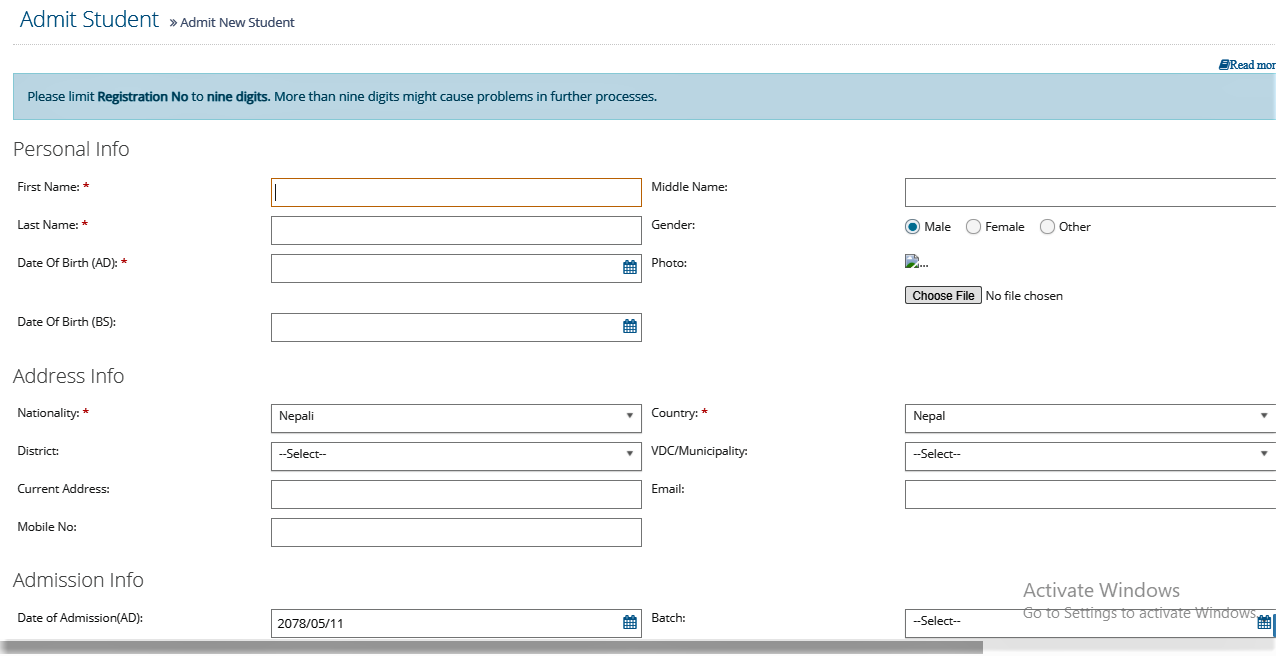
Student Admission
Details of students to be admitted can be input here. This can be done both individually and in bulk.
To save the information of students individually,
- Go to: Student
- Under Student Information, select Student Admission
- Click Admit Student
- Enter all the necessary details
- Click Save & Continue to fil the information about students under further headings
- Click Save & Exit to exit
To save the information of multiple students in bulk,
- Go to: Student
- Under Student Information, select Student Admission
- Click Import Students
- Select the respective program semester
- If you are entering the information for the first time, download the sample by clicking Click Here to Download Sample File to match the data format
- If you have already entered data and are wishing to update download the already saved data by clicking Click Here To Download
- Make necessary changes
- Upload the excel file with new information by clicking Choose
- Click Get Excel data
- Tick the checkbox next to the student from the list whose information you want to insert or update
- Click Upload
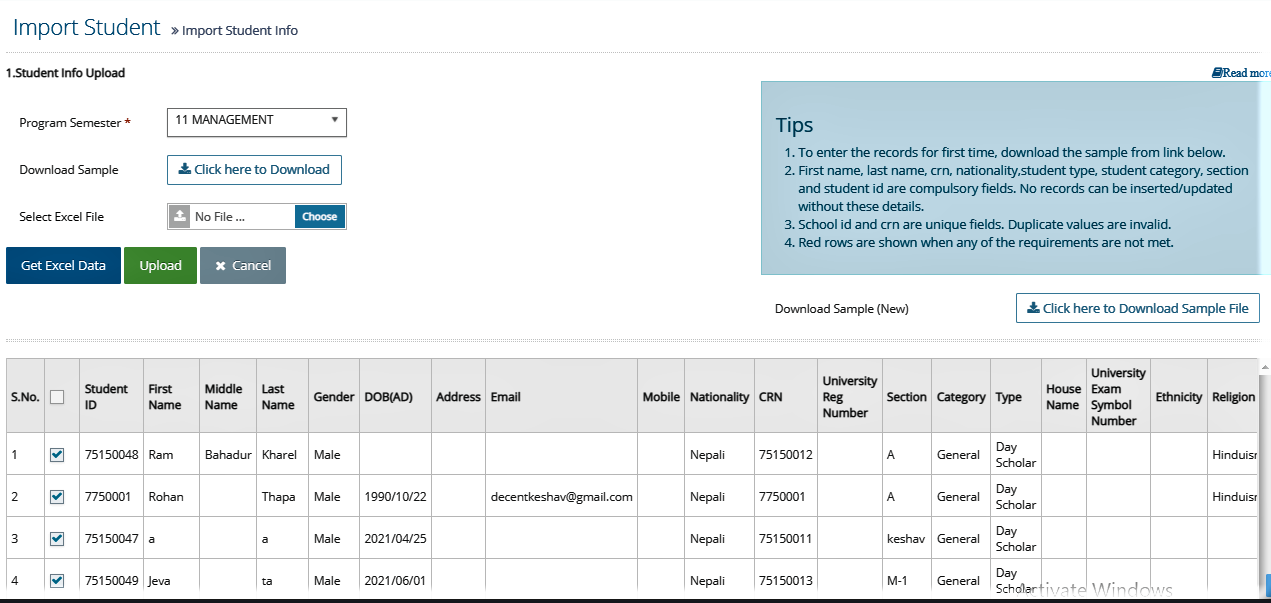
Note: Please consider the compulsory fields and data type before you upload the information. The cells where compulsory fields do not contain any data are marked red. You cannot upload the data until the red cells are resolved.
Student Info Update
You can keep your student/ parent records current by reviewing your personal information in where here to update your more additional information and fill the given format in excel. You can update the student information either individually or in bulk.
To update the student information individually,
- Go to: Student
- Under Student Information, select Student Admission
- From the list of students, click Edit next to the student you want to update
- Make the necessary changes
- Click Update & Continue if you want to further update information under other headings
- Click Update & Exit if you want to exit
To update the information of multiple students in bulk,
- Go to: Student
- Under Student Information, select Student Admission
- Click Import Students
- Select the respective program semester
- Download the already saved data by clicking Click Here To Download
- Make necessary changes
- Upload the excel file with new information by clicking Choose
- Click Get Excel data
- Tick the checkbox next to the student from the list whose information you want to insert or update
- Click Upload
Student Bulk Photo Info
The Bulk Photo Uploader allows you to upload photographs for multiple students simultaneously. Each photo requires less than 240 KB in pixel size.
- Go to: Student
- Under Student Information, select Bulk Student Photo
- Select the respective class, section or even student
- Click Search
- Click Choose File next to each student to select their respective photo
- Click Upload All to upload the photo of all students at once
- Click Upload to upload the photo of respective student next to them to upload individual photo

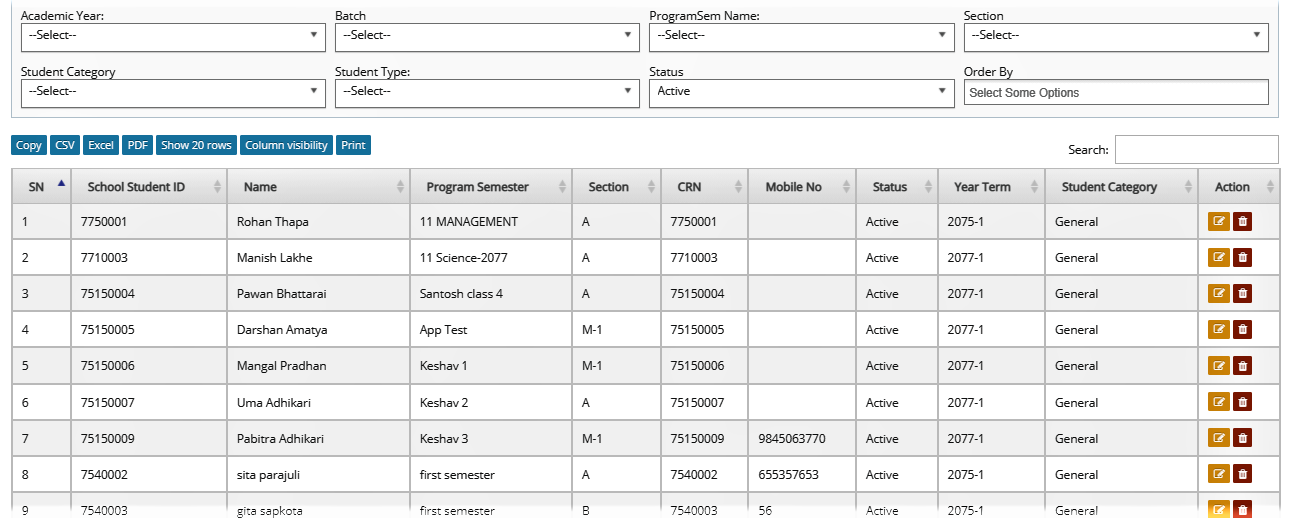
Student Attendance
Under this, student reports regarding their attendance can be generated and viewed. Student Attendance includes:
- Student Daily Attendance
- Attendance Report
Student Daily Attendance
Students' absence and late requests are automatically collected through the software. Employees and Students receive their notification in mobile apps.
- Go to Student
- Under Student Attendance, select Student Daily Attendance School
- Click New
- Select the respective program semester and section
- Select the frequency of your attendance i.e if you want to make daily/ weekly or particular attendance
- Click Load Attendance
- Tick the first checkbox next to the student from the list if the student is present
- If the student is absent and the absenteeism reason is informed, untick the first checkbox and tick the last checkbox with popup that says 'Is informed?'
- Click the second icon that pops up 'Absenteeism Reason'
- Mention the reason and click Save Reason
- After you are done with attendance for all the students, click Save Attendance
Note: If you have selected Weekly attendance and the list of days includes the holidays, click 'Mark as holiday' in the each date to save the date as holiday in the system.
Attendance Report
In Students daily report calculates ‘Whole Day and Half Day’ attendance based on the number of minutes defined in the grade level and the calendar. The result displays for each day, for each student along with a summary of daily attendance report show the present days, working days, absent days and attendance percentage.
- Go to Student
- Under Student Information, select Attendance Report School
- Select respective program semester, section, date range and report option
- Click Generate Report

If you want to print or export this to excel,
- Click Print/Export To Excel
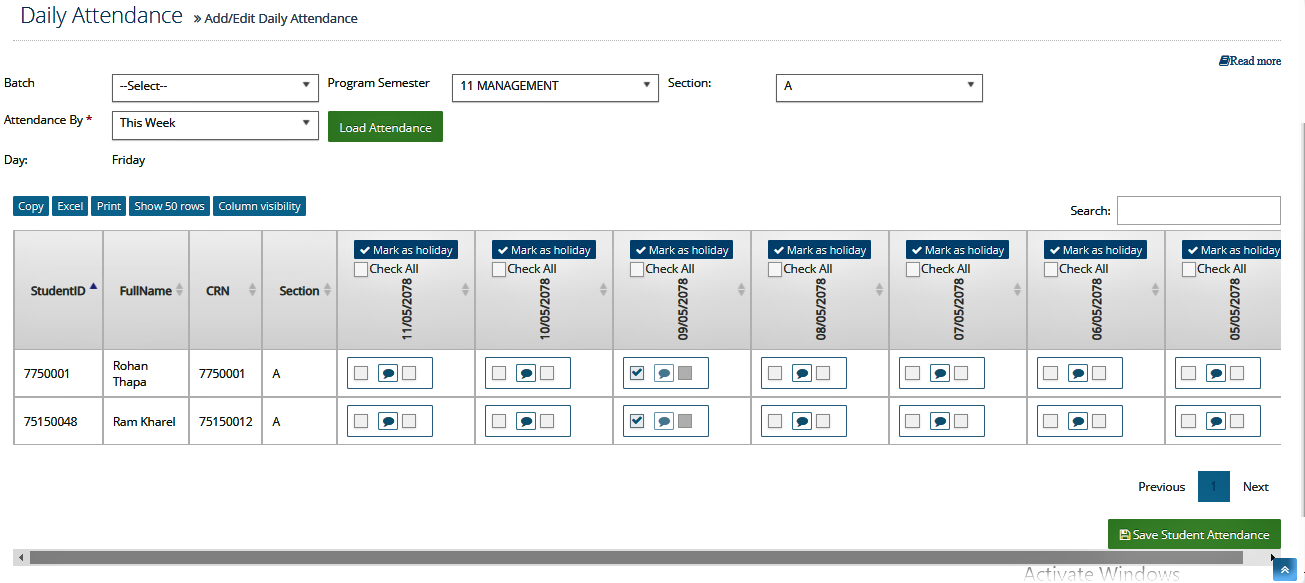
Reports
Under this, various reports of students can be obtained such as:
- Student General Reports
Student General Reports
Student general report is the performance sheet of a student when in class or a school activity. A report is only used for students or academic purposes
- Go to Student
- Under Reports, select Student General Report
- Select respective program semester, section and report option
- Click Generate Report
If you want to print or export this to excel,
- Click Print/Export To Excel
Attendance Module
In staff attendance, You must follow the process in order to get report. The report contains:
- Set employees office time. (i.e.; from _ _:_ _ to _ _:_ _ in 24 hrs. format)
- Enter employee attendance into software i.e.; a) Automatic (Biometric Device), or b) Manually through software
- View Different kind of Reports. (Monthly/ Yearly reports and Absent/ Present reports)
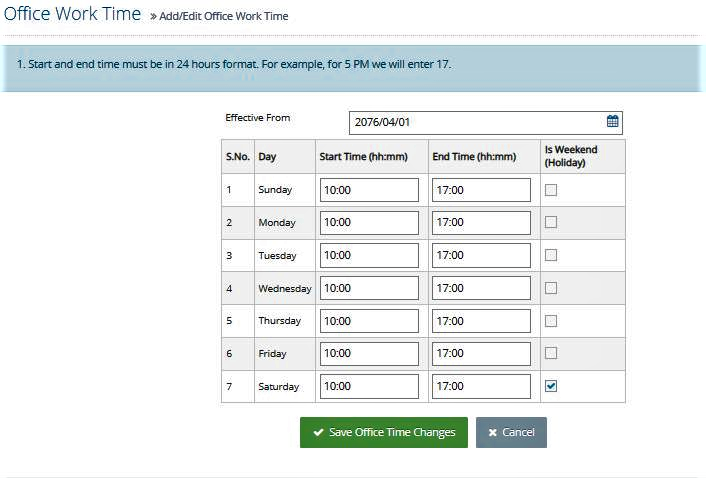
Step 1: Office Time: (24 hour’s format)
There are two ways to set employees office time and they are discussed below:
- Office time
- Employee Office Time
Office Time
It is used to set office time for whole organization. For example: If Organization opens at 10:00 am and closes at 18:00 pm every day for every employee then you can set office time as follows:
- Go to Attendance-> Office Time-> Office Time
- Click on (+New)
- Enter the office time
- Click on Save Office Time Changes
Employee wise Office Time
Here, You can set individual office time to individual staff. If A comes at 10:10 am and B comes at 10:20 you can set them individually. You can also set all staff office time at once from above menu: - office time, then set individual employee wise office time and replace the previous office time for individual.
- Go to Attendance-> Office Time-> Employee wise Office Time
- Click on (+New)
- Enter the office time
- Click on Save
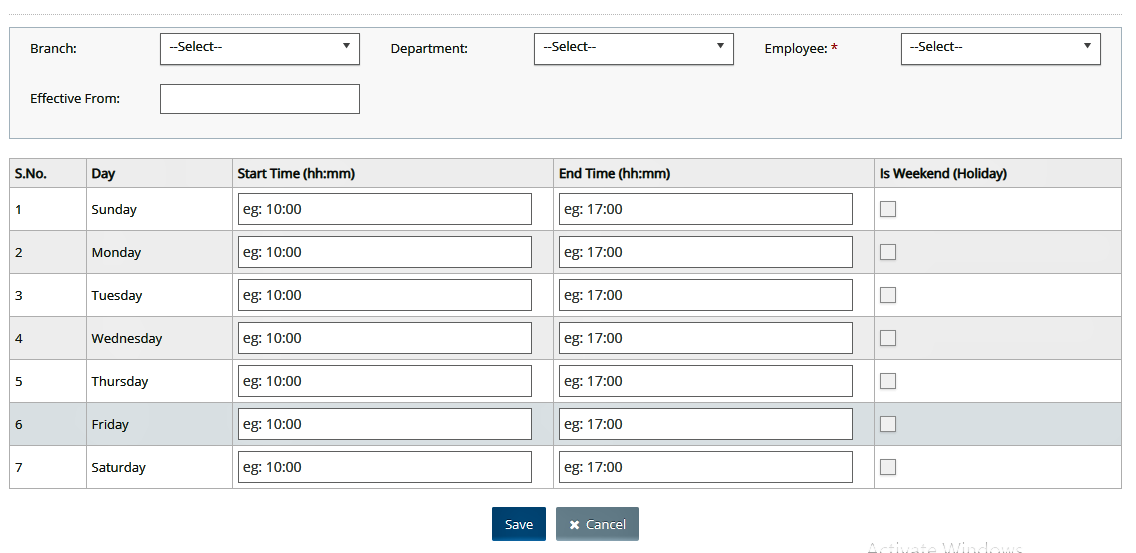
Note: You can set office time and replace it with individual office time afterwards.
Step 2: Attendance Activities
There are two ways to enter daily attendance of staff which are discussed below:
- Automatic (Biometric Device)
- Manual Entry
Automatic (Biometric Device)
It is a foolproof technology to ensure the accuracy of attendance and is useful to the ones who deal with large number of employees. After connecting biometric device to eZone software, setup will automatically fetch data into software.
Manual Entry
You can also enter daily staff attendance manually as follows:
- Go to Attendance
- Select Activity
- Select List Employee Attendance
- Click (+New)
- Select Employee, Date, Intime, Out Time
- Click Save
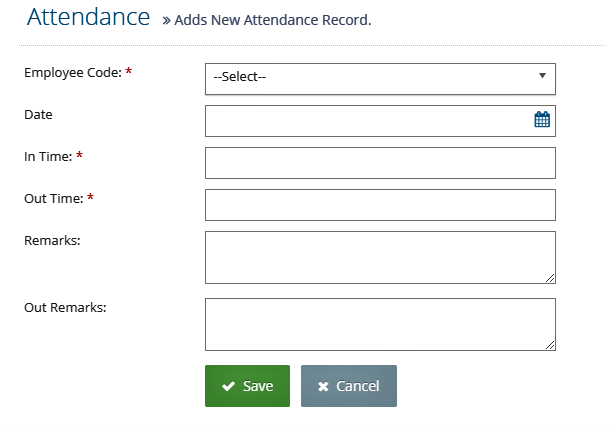
Note: You can enter daily attendance from entering daily here or select date and enter whenever you want.
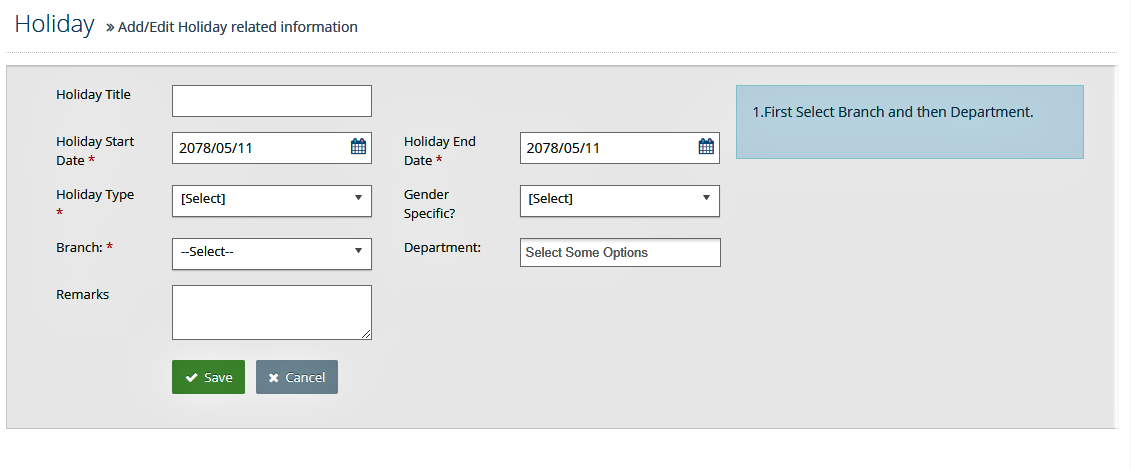
Step 3: Holiday Setup
Here you can add multi day holidays too from one’s time period to another, (E.g.: Dashain). You can set Holidays as per the schedule of school. You can provide holiday only for selected department too.
- Go to Attendance
- Select Holiday
- Select Holiday Setup
- Click (+New Multi Days)
- Enter Holiday title, Date or any other specific details
- Click Save
Step 4: Leave Management
In order to manage the leave of employees, we must follow the process which are listed and discussed below:
- Leave year
- Leave Master
- Assign yearly leave
- Initial leave balance
- Leave request
- Approve Leave
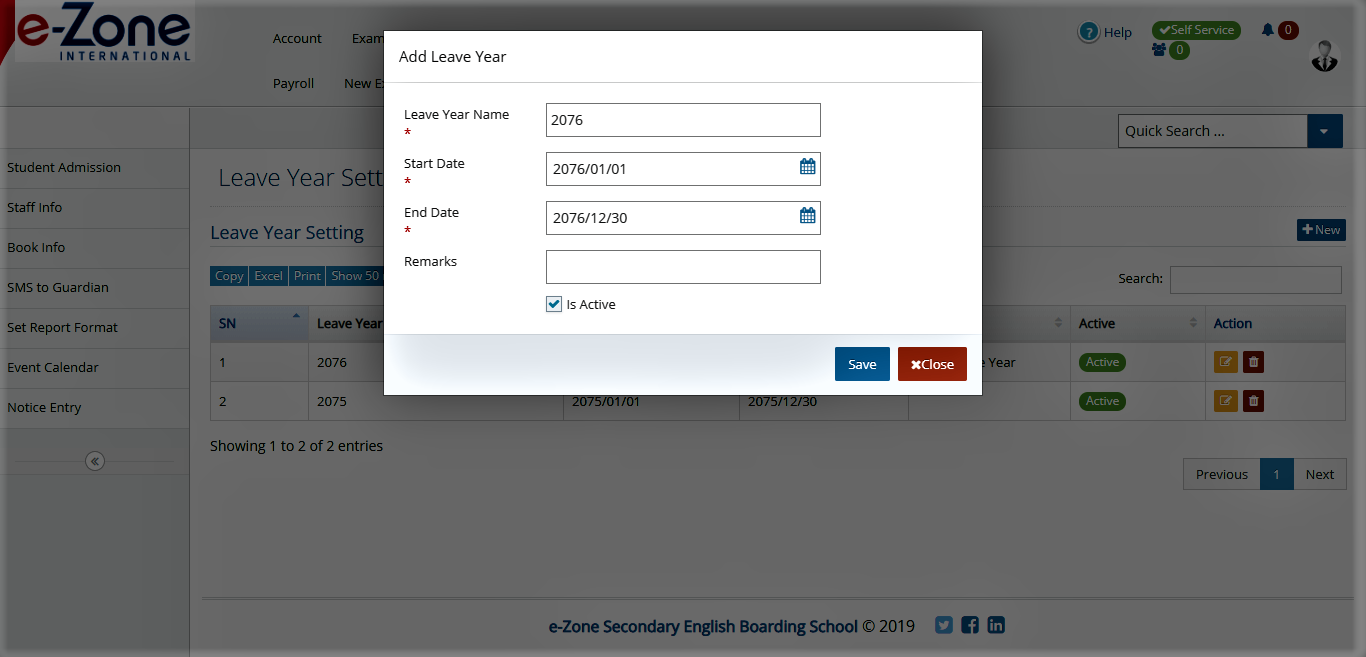
Leave Year
Normally fiscal year and academic year are leave year. You can enter Start date and End date of leave year. I.e.; if you follow academic rule then Baisakh 1 will be start date and Chaitra 29 will be end date.
- Go to Attendance
- Select Leave Management
- Select Leave Year
- Click New
- Enter all the necessasry details
- Click Save
Leave Master
Leave master defines organization leave policy so it differs from one organization to other. You can add types of leave and its no. of times a person can take throughout his/her working period which is an optional case. You can also assign status of leave i.e.; paid or unpaid leave.
- Go to Attendance
- Select Leave Management
- Select Leave Master
- Click New
- Enter all the necessasry details
- Click Save
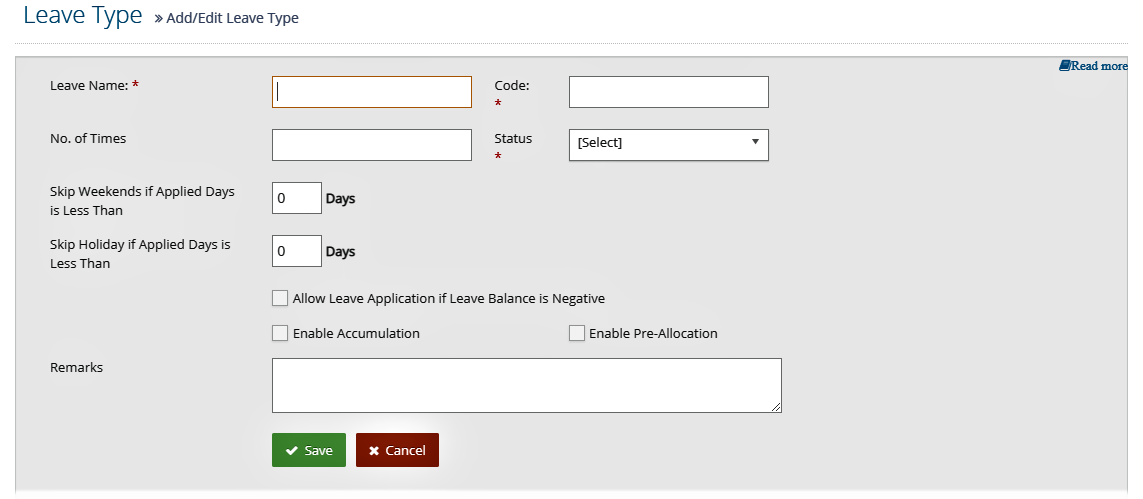
Note: You can skip weekend if leave is less than entered days above. Same applies for skipping holidays too. You can tick in allow leave application if leave balance is negative in order to allow more leave days in a year than entered. If leave is pre-define then you can tick in enable pre allocation and vice-versa. For exam if home leave is for 12 days a year then you can tick in pre-allocation. You can enable accumulation if the leave i.e. no. of leave days remained can be carry forwarded in next leave year and vice-versa.
Assign Yearly Leave
After setup of leave year and leave master, you can now assign leave days to those leave types in a particular leave year. You can assign leave as per employee category, then you can select leave type which you made in leave master.
- Go to Attendance
- Select Leave Management
- Select Assign Yearly Leave
- Click New
- Enter all the necessasry details
- Click Save
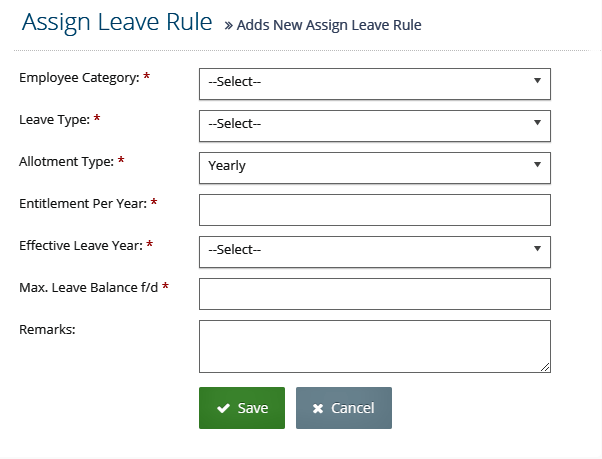
Note: Allotment type can be monthly or yearly as per leave requirement. Entitlement per year is total leave days of that allotment. (E.g.; entitlement can be 18 days in a year, allotment can be monthly. In that case you can take 18/12 i.e.; 1 and a half days in a month). Then you can select the leave year in which leave is assigned. Max leave fwd. balance decides how many max days of leave can be forwarded in next leave year.
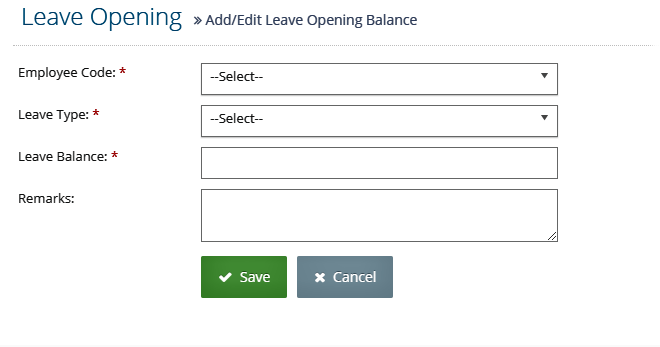
Initial Leave Balance
If you start leave setting in the middle of leave year then you need to set opening leave balance. You can select individual name, leave type, leave balance as you discussed above.
- Go to Attendance
- Select Leave Management
- Select Initial Leave Balance
- Click New
- Enter all the necessasry details
- Click Save
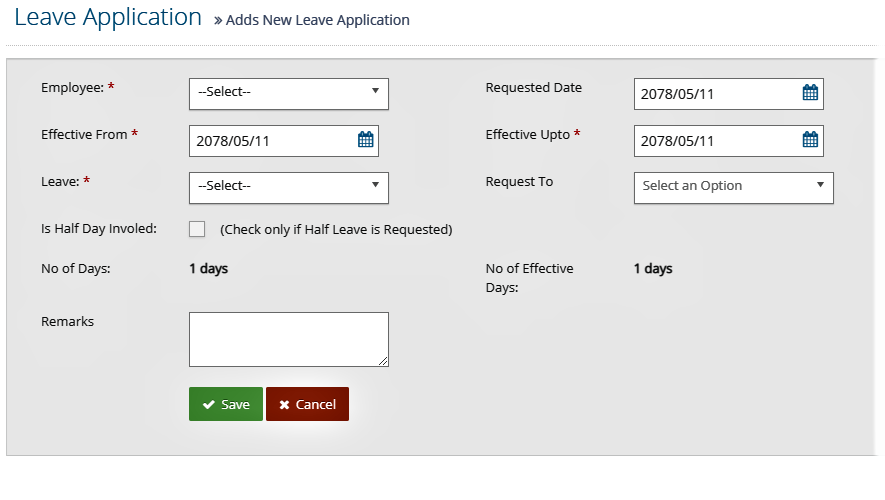
Leave Request
Employees can request leave here, it is also available in mobile app. Here employees name and requested date is automatically selected from the id they login.
- Go to Attendance
- Select Leave Management
- Select Leave Request
- Click New
- Enter all the necessasry details
- Click Save
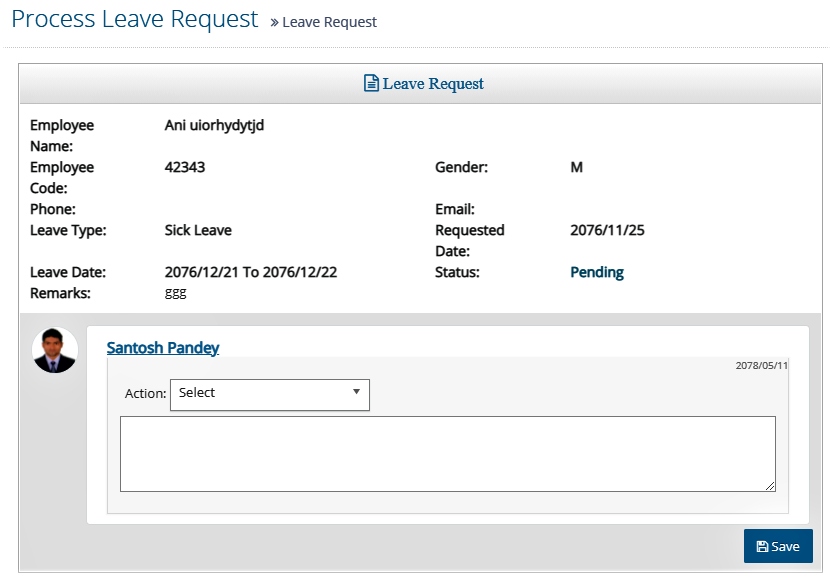
Approve Leave
One’s with authority is only be able to approve the request of leave. i.e. leave approver. Leave approver can search by leave year and the status of person i.e. pending, approved, rejected, or all.
- Go to Attendance
- Select Leave Management
- Select Aprove Leave
- Select the leave year and leave status
- Click Search Employee
- Select the action and add remarks
- Click Save
Step 5: Leave Reports
Leave reports consists of Employee Leave detail.
- Go to Attendance
- Under Attendance Reports, select Aprove Leave
- Select the employee, leave year
- Click Generate Report

If you want to print or export the report to excel,
- Click Print / Export to Excel
Step 6: Reports
Reports consists of
- Monthly/Yearly Reports
- Present/ Absent Reports
Monthly/Yearly Reports
You can generate monthly as well as yearly reports of employee attendance.
To generate monthly report,
- Go to Attendance
- Under Monthly/Yearly Reports, select Monthly Attendance Summary
- Select the employee, search option and other details
- Click Generate Report
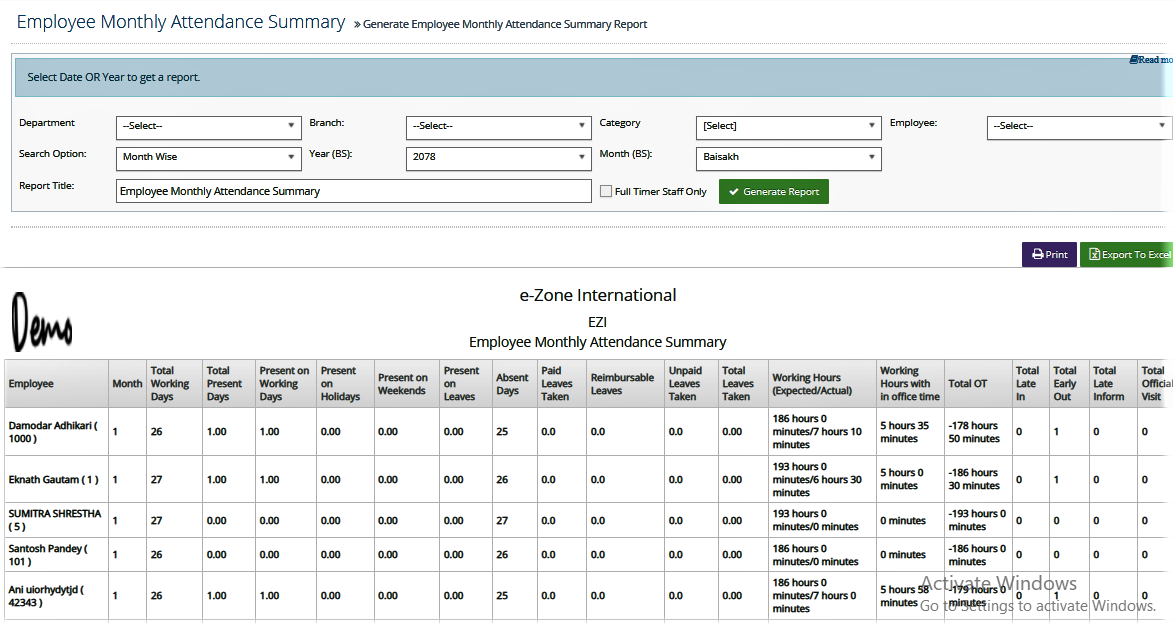
If you want to print or export the report to excel,
- Click Print / Export to Excel
To generate yearly report,
- Go to Attendance
- Under Monthly/Yearly Reports, select Yearly Empwise Report
- Select the employee, year and other details
- Click Generate Report
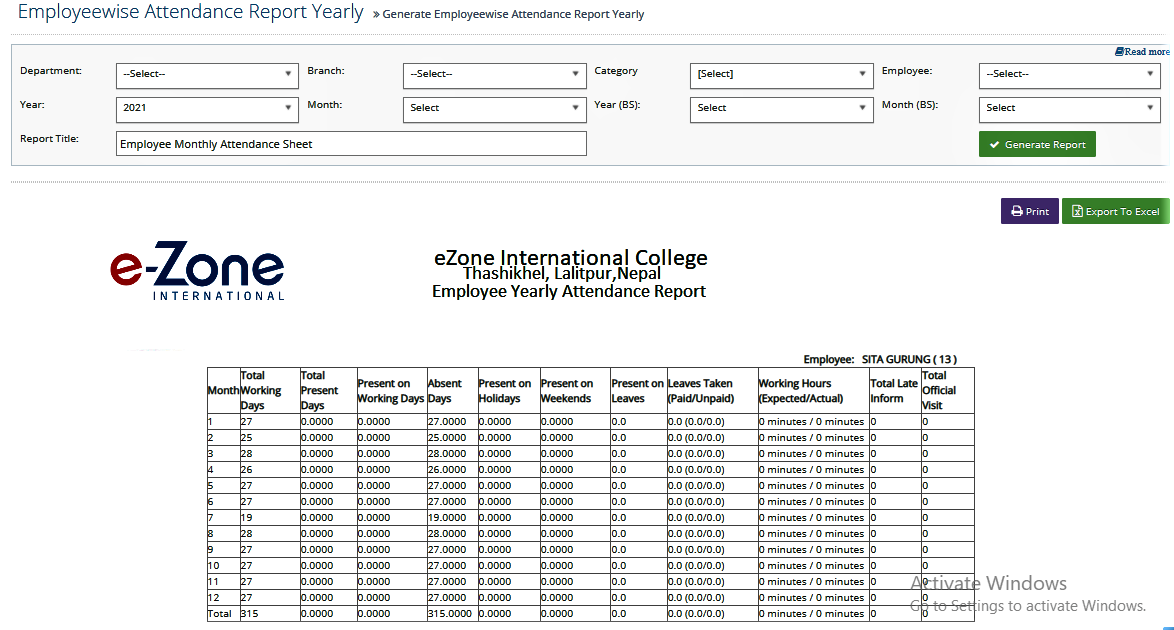
If you want to print or export the report to excel,
- Click Print / Export to Excel
Absent/Present Reports
You can get the daily attendance report of employee using this report.
- Go to Attendance
- Under Monthly/Yearly Reports, select Employee Absent/Present Report
- Select the employee, date range and othernecessary details
- Click Generate Report
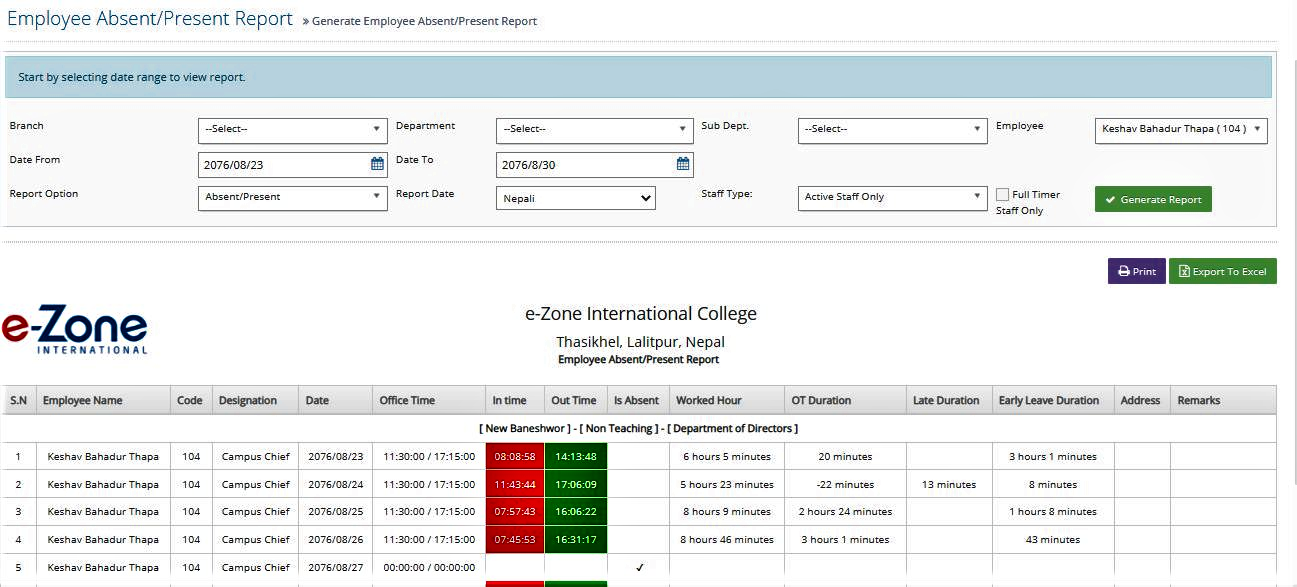
If you want to print or export the report to excel,
- Click Print / Export to Excel
Note: If the box color is green, then the person in and Out time is acceptable and if the color is red vice- versa.
Payroll Module
Payroll Module is used to the record the salary details of total employee of the company. This system manage the payroll like, basic salary, Grade, Allowances, Provident Fund, Leave Deduction, Upadan, CIT, Social Security Tax, Income Tax etc.
This system is developed based on the Nepal Government Tax calculation framework. When you generate Payroll of the employee, it will generate a report to send salary in bank Account also. This is integrated with accounting module.
Preliminary Requirements
Before getting familiar to Payroll Module, following preliminary requirements are to be considered:
- Payroll Setting
- Government Rules
- Employee/Staff Info
Payroll Setting
To use payroll module, First of all, you have to set Payroll Setting like, Payroll Related Information (company PF %, Employee PF %, TDS %), Ledger Details (Salary Account, Advance Salary Account) etc. from Company Setting.
Note: To learn how to do payroll setting, read the help document here.
Government Rules
To generate payroll 10% of Basic +Grade Salary will be deducted from employee salary & 10% will be added by organization. Total PF of 20% will be forwarded to Provident Fund. CIT can be set as per official rules. TDS is 15%. You can set this from Payroll setting under Company setting.
Note: To learn how to do payroll setting, read the help document here.
Employee/Staff Info
You should entry the information of the employee to generate payroll. While filling the information of employee, select All Employee Salary Based on either Employee-Wise or Designation-wise.
Note: To learn how to do payroll setting, read the help document here.
Settings
Under Settiing, various settings can be set to the system. The features under Settings are:
- Bank
- Tax Slab (TDS)
- Month
Step I: Bank
You can set Bank Account in Software for Payroll Send in Bank Account.
- Go to Payroll
- Under Setting, select Bank
- Click New
- Enter bank name, bank code and remarks
- Click Save
If you want to edit or delete the bank,
- Go to Payroll
- Under Setting, select Bank
- From the list, click Edit/ Delete next to the bank you want to edit or delete
- If you clicked edit, make necessary changes and click Update
- If you clicked delete, click Ok
Step II: Tax Slab (TDS)
You can set TDS in Software for Payroll to deduct TDS of employee.
- Go to Payroll
- Under Setting, select Tax Slab
- Click New
- Enter TDS code, marrital status, lower limit, upper limit, percentage and remarks
- Click Save
If you want to edit or delete the tax slab,
- Go to Payroll
- Under Setting, select Tax Slab
- From the list, click Edit/ Delete next to the tax you want to edit or delete
- If you clicked edit, make necessary changes and click Update
- If you clicked delete, click Ok
Step III: Month
- Go to Payroll
- Under Setting, select Month
- Click New
- Enter all the necessary details
- Click Save
If you want to edit or delete the month,
- Go to Payroll
- Under Setting, select Month
- From the list, click Edit/ Delete next to the month you want to edit or delete
- If you clicked edit, make necessary changes and click Update
- If you clicked delete, click Ok
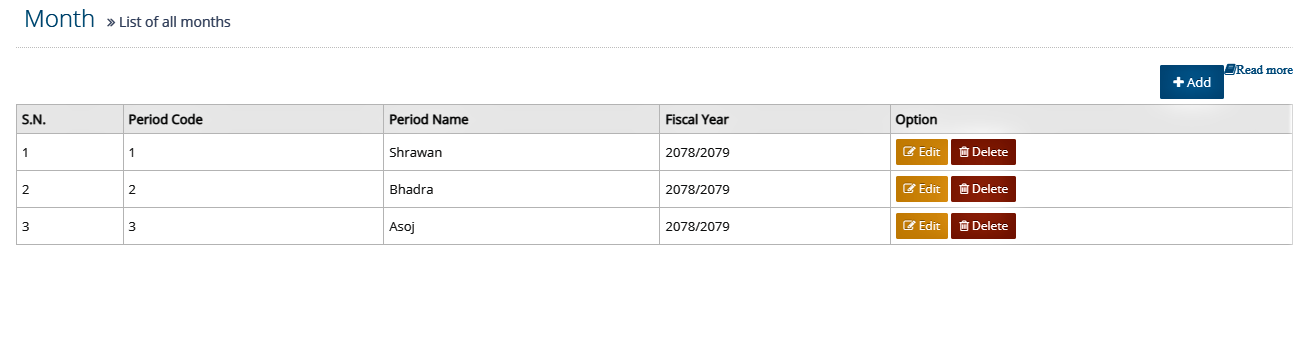
Allowance and Benefits
Under Allowancea and Benefits, following features are included:
- Allowance
- Allowance Category
- Employee wise Allowance
- Extra Benefits
Step I: Allowance
Here you can create individual allowance head of the company for employee.
- Go to Payroll
- Under Allowance and Benefits, select Allowance
- Click New
- Enter all the required details
- Click Save
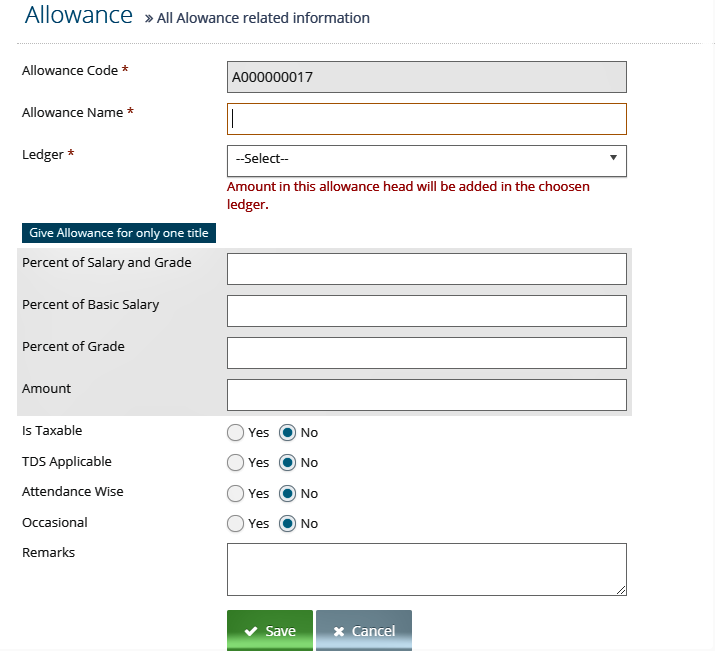
If you want to edit or delete the allowance,
- Go to Payroll
- Under Allowance and Benefits, select Allowance
- From the list, click Edit/ Delete next to the allowance you want to edit or delete
- If you clicked edit, make necessary changes and click Update
- If you clicked delete, click Ok
Step II: Allowance category
Here you can categorise the allowance head as per designantion of employee. This feature used to implement designation wise employee salary system.
- Go to Payroll
- Under Allowance and Benefits, select Allowance Category
- Click New
- Enter all the required details
- Click Save
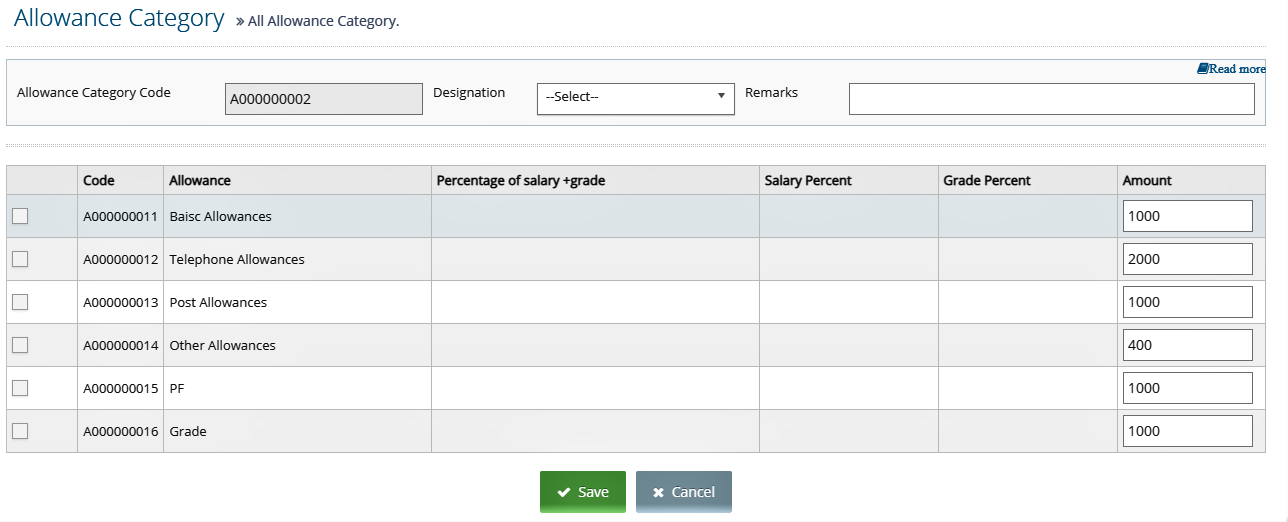
If you want to edit or delete the tax slab,
- Go to Payroll
- Under Allowance and Benefits, select Allowance Category
- From the list, click Edit/ Delete next to the allowance category you want to edit or delete
- If you clicked edit, make necessary changes and click Update
- If you clicked delete, click Ok
Step III: Employee wise Allowance
This employee-wise allowance is used to calculate in monthly basis for invidual employee.
- Go to Payroll
- Under Allowance and Benefits, select Employeewise Allowance
- Search Employee
- Click Set Allowance next to respective employee from the list
- Tick the necessary allowance heads
- Click Save
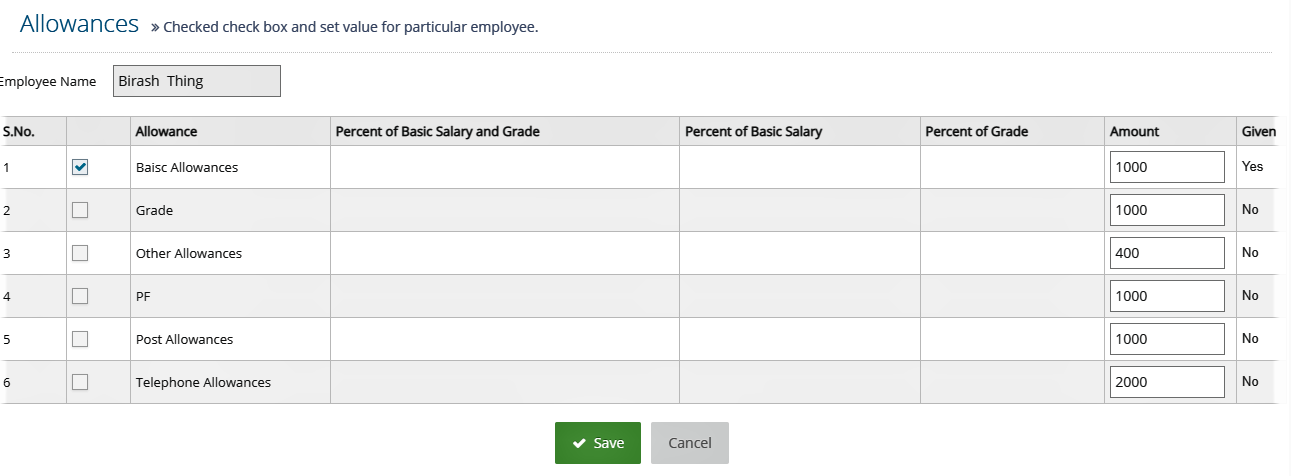
Step IV: Extra Benefits
Extra Benefits is used to set occasional benefits like Dashain Allowance, Maternity Allowances, Tution Allowance etc. You can choose this allowance for the required months only at the time of payroll generation of that month.
- Go to Payroll
- Under Allowance and Benefits, select Extra Benefit
- Search Employee and Extra Benefit
- If you want to set this to all employee, enter amount and click Set Amount
- If you want to set this to only specific employee, tick the respective employee and enter amount
- Click Generate
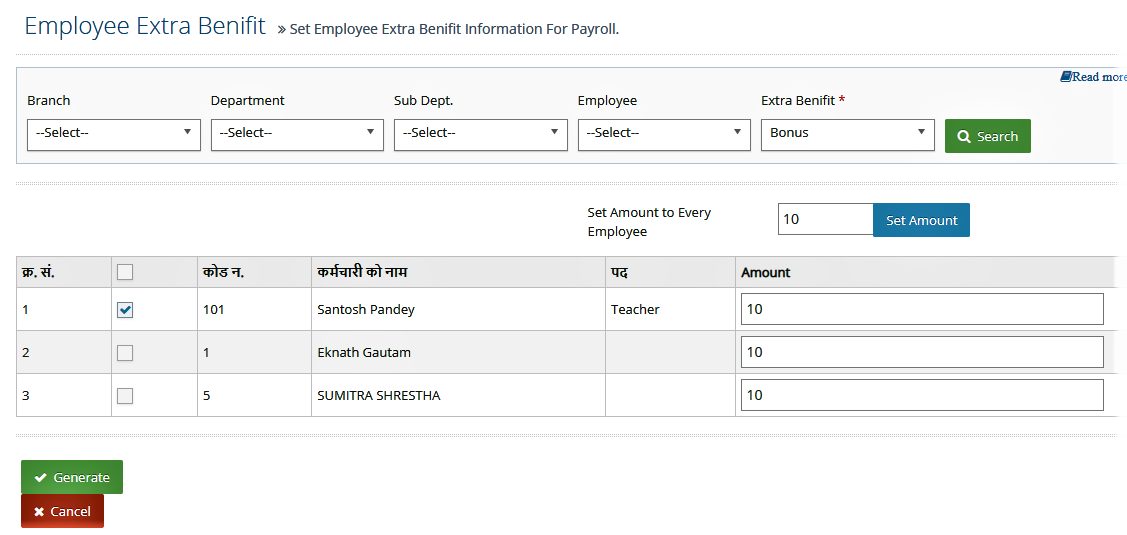
Deduction
Under Deduction, following features are included:
- Deduction
- Deduction Category
- Employeewise Deduction
Step I: Deduction
This is used to set deduction head and related amount in salary. If a company rule is not as per government rules in % basis like incase of Provident Fund (PF) and calculated in amount basis, you have to use this features to deduct PF.
- Go to Payroll
- Under Deduction, select Deduction
- Click New
- Enter all the required details
- Click Save
If you want to edit or delete the tax slab,
- Go to Payroll
- Under Deduction, select Deduction
- From the list, click Edit/ Delete next to the deduction you want to edit or delete
- If you clicked edit, make necessary changes and click Update
- If you clicked delete, click Ok
Step II: Deduction category
Deduction Category is used to categorise the deduction as per the designation of emloyee. To categorise the deduction follow following instruction:
- Go to Payroll
- Under Deduction, select Deduction Category
- Click New
- Enter all the required details
- Click Save
Step III: Employeewise Deduction
Employee-wise Deduction assigns the deduction for individual employee. To implement this, follow following steps:
- Go to Payroll
- Under Deduction, select Employeewise Deduction
- Search Employee
- Click Set next to respective employee from the list
- Tick the necessary deduction heads
- Click Save
Payroll Activity
Under Advance and Other, following features are included:
- Advance
- Salary Setting
- PF Loan Deduction Request
- Payroll Generation
- List PaySlip
Step I: Advance
You can set advance taken salary of any employee. When you generate payroll, advance taken amount will be deducted automatically.
- Go to Payroll
- Under Payroll Activity, select Advance
- Click New
- Enter all the required details
- Click Save

Step II: Salary Settings
For implementing the Salary Setting feature, follow the instructiuons below:
- Go to Payroll
- Under Payroll Activity, select Salary Setting
- Search the employee
- Click Edit next to respective employee
- Click Salary settings tab
- Enter necessary settings
- Click Save and Continue or Save and Exit
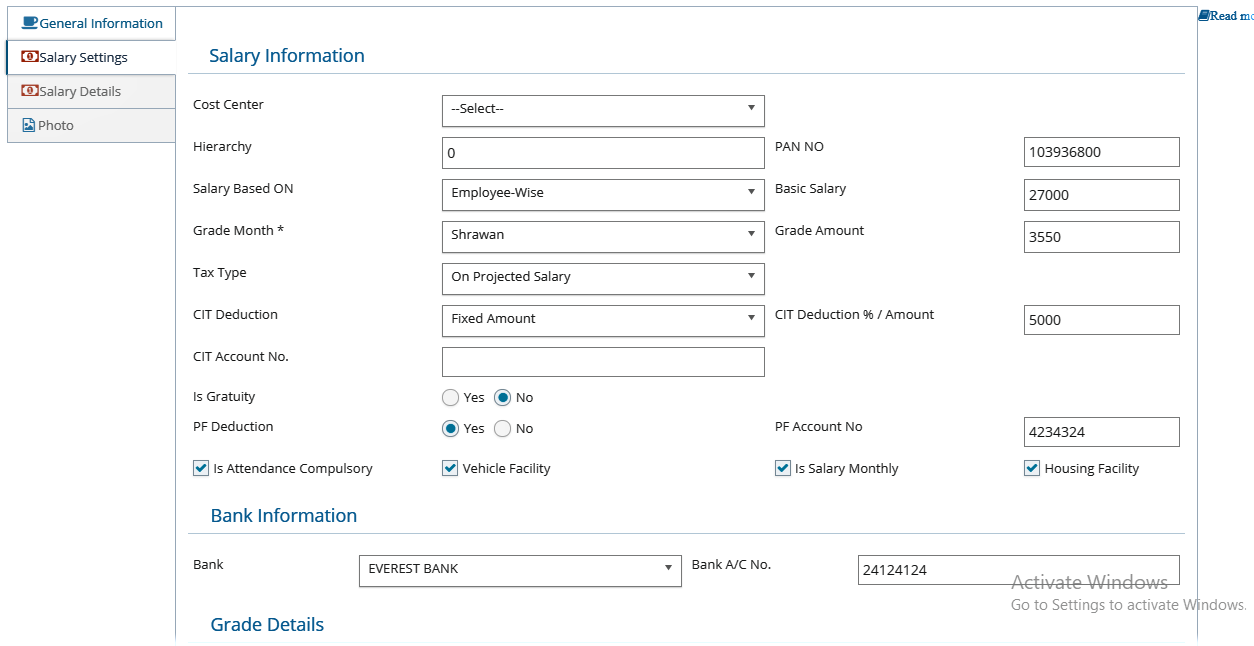
Step III: PF Loan Deduction Request
If any employee is taking Provident Fund Loan in advance and paying partially in monthly basis from his salary, you can set here. This data will reflect in monthly payroll sheet.
- Go to Payroll
- Under Payroll Activity, select PF Loan Deduction Request
- Click New
- Enter all the required details
- Click Save
Step IV: Payroll Generation
After setting all master setting related data of payroll, now you can generate payroll of all staff in monthly basis. All above setting will reflect in Pay slip at the time of payroll generation.
- Go to Payroll
- Under Payroll Activity, select Payroll Generation
- Select month, payslip date, employee
- Click Search
- Enter all the required details
- Click Generate
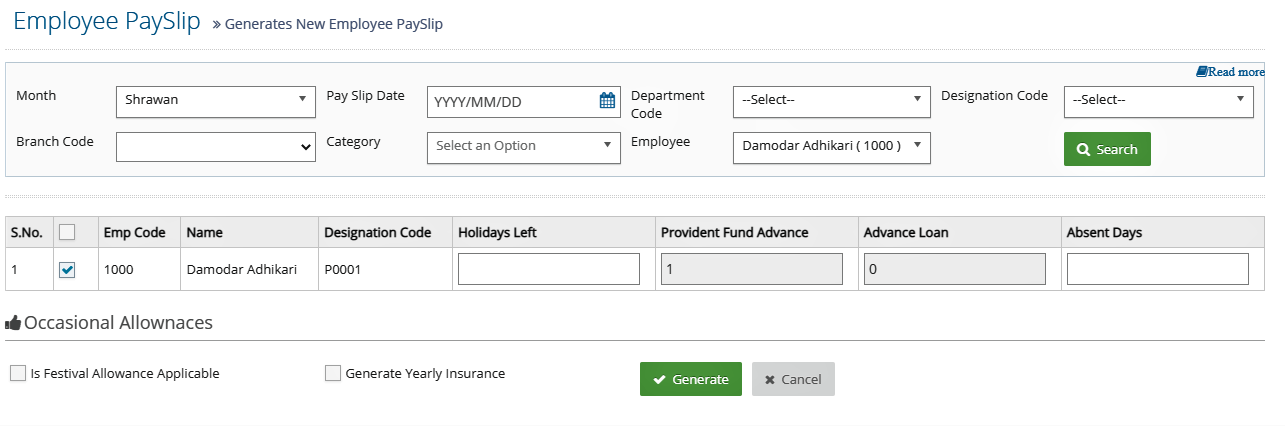
Step V: List Payslip
Here you can view the payroll details of each selected month after payroll generation. If any mistake forwarded in the generated payroll, you can delete from here individually or in bulk by selecting related employees.
- Go to Payroll
- Under Payroll Activity, select List Payslip
- Select required employee and paryoll
If you want to delete payslip,
- Tick the checkbox next to the employee payslip list
- Click Delete
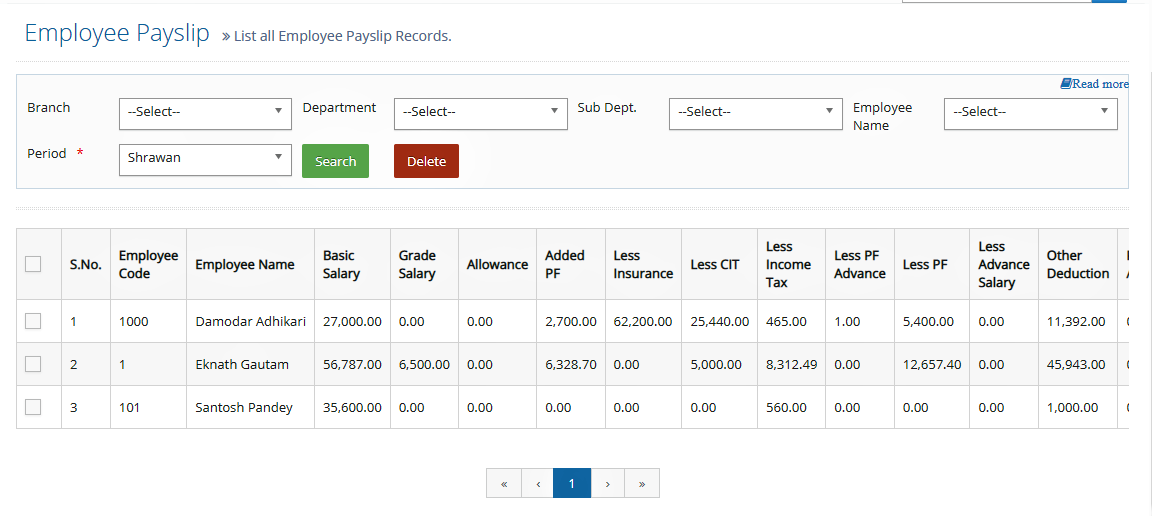
Part-Time Salary
You can set part-time salary for part-time working employee as per their working status, company salary terms in Software for Payroll generation.
- Go to Payroll
- Under Parttime Salary, select Set Parttime Salary
- Click Add New
- Enter required details
- Click Save
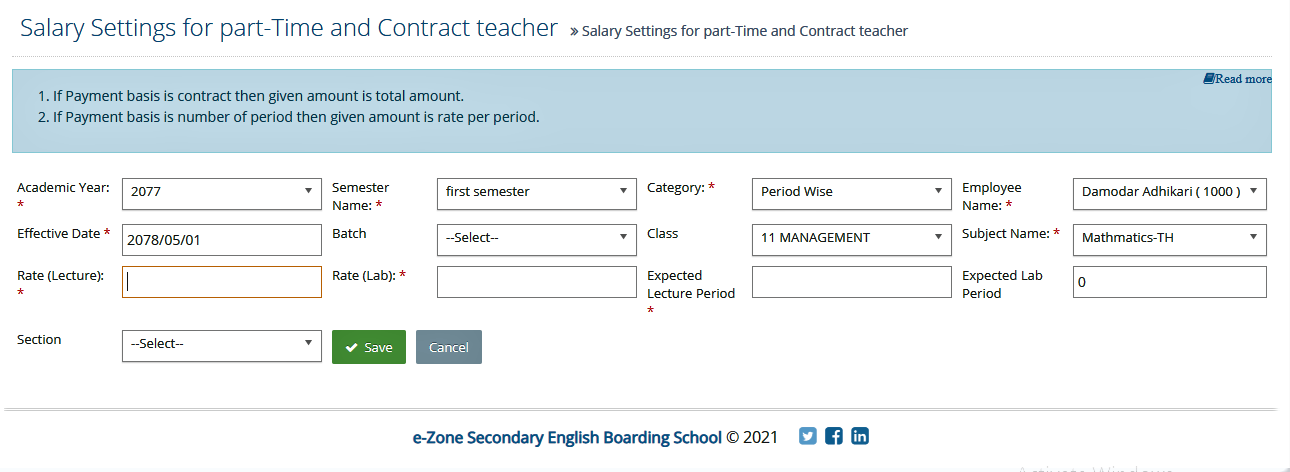
Examination Module
In exam module, yiou can do all the exam related activity of the student of the school. Here, you can set exam name, exam weightage (%), entry full/pass marks, generate marks ledger, generate mark sheets class wise etc. Here are the some steps to operate exam module.
- Manage Subject
- Manage Exam
- Exam Weightage
- Evaluation Parameter
- Marks Entry
- Quality Measure
- Marks Ledger
- Mark sheet
Step 1: Manage Subject
Under this, you can create a compulsory subject as well as elective subject and associate them to respective program. This can be done under following steps:
- Enter subject
- Associate program and subject
- Enter elective subject
Subject
Here, you can manage all the subject records in e-School Cloud software. For individual data insertion:
- Go to: Examination
- Select Manage Subject
- Select Subject
- Click New
- Enter all the details
- Click Save
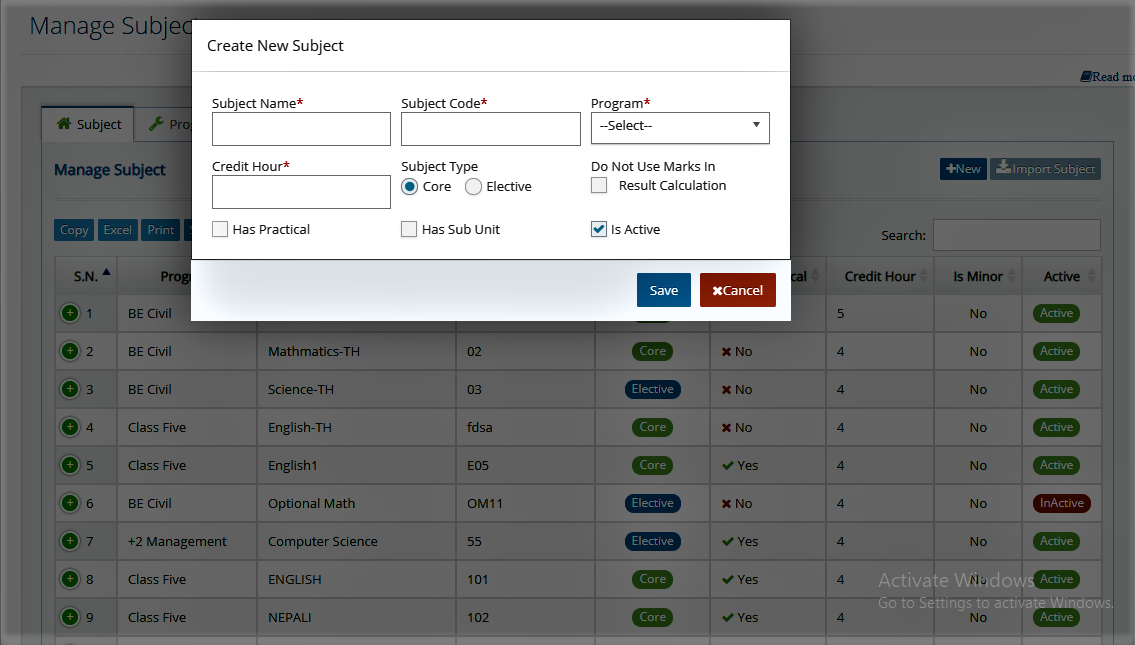
Note: The blank space before and after period is not allowed in the system and there must be unique subject code. If subject type is core and elective, it means compulsory and optional subjects respectively.
Program Subject Association
For individual data insertion
- Go to: Examination
- Select Manage Subject
- Select Program Subject Association
- Select the required program and program semester
- Add the subjects from list on your left to right
- Click Save
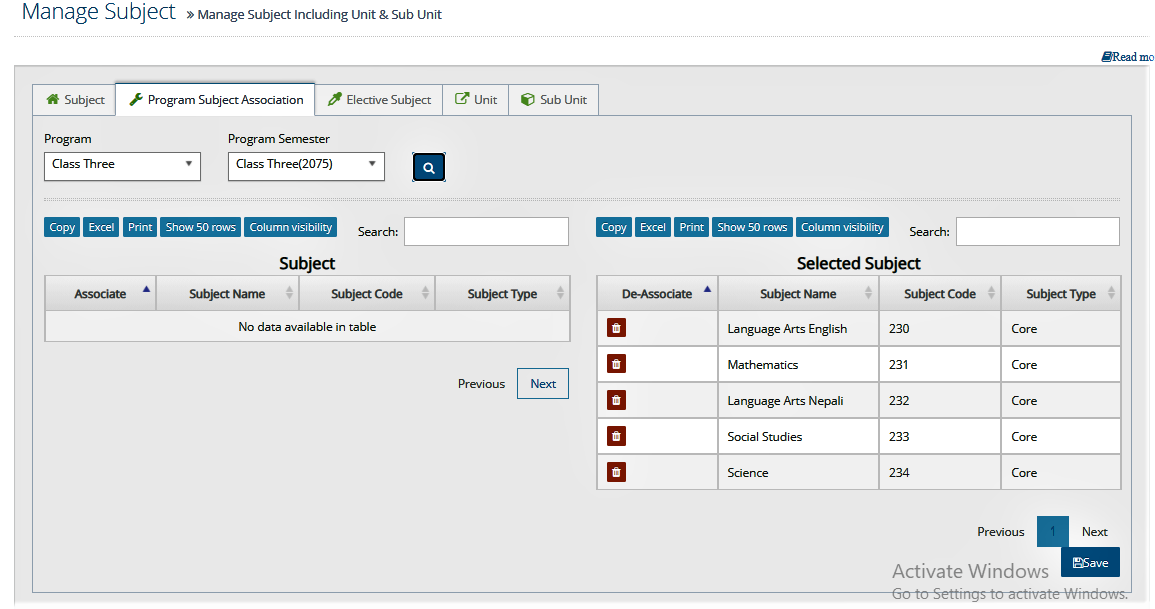
Elective Subject
Here you can set elective subject for each program semesters.
- Go to: Examination
- Select Manage Subject
- Select Elective Subject
- Select the required program and program semester
- Click Search
- Check the checkbox on each subject from list
- Click Save
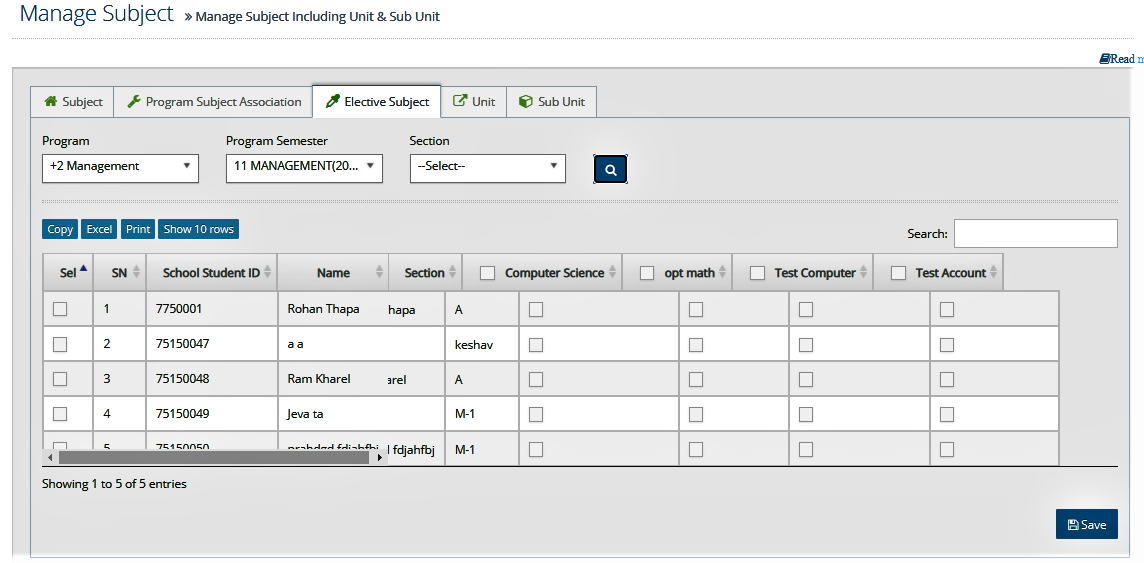
Step 2: Manage Exam
Under this, you can control the activities such as creating assessment category and grading period, conducting exam, publishing exam. These activities can be studied under:
- Assessment category
- Grading period
- Assessment info
- Exam Conduct
- Exam Schedule
- Publish Exam
Assesment Category
For individual data insertion
- Go to: Examination
- Select Manage Exam
- Select Assessment Category
- Click New
- Enter category name and catergory code
- Click Save
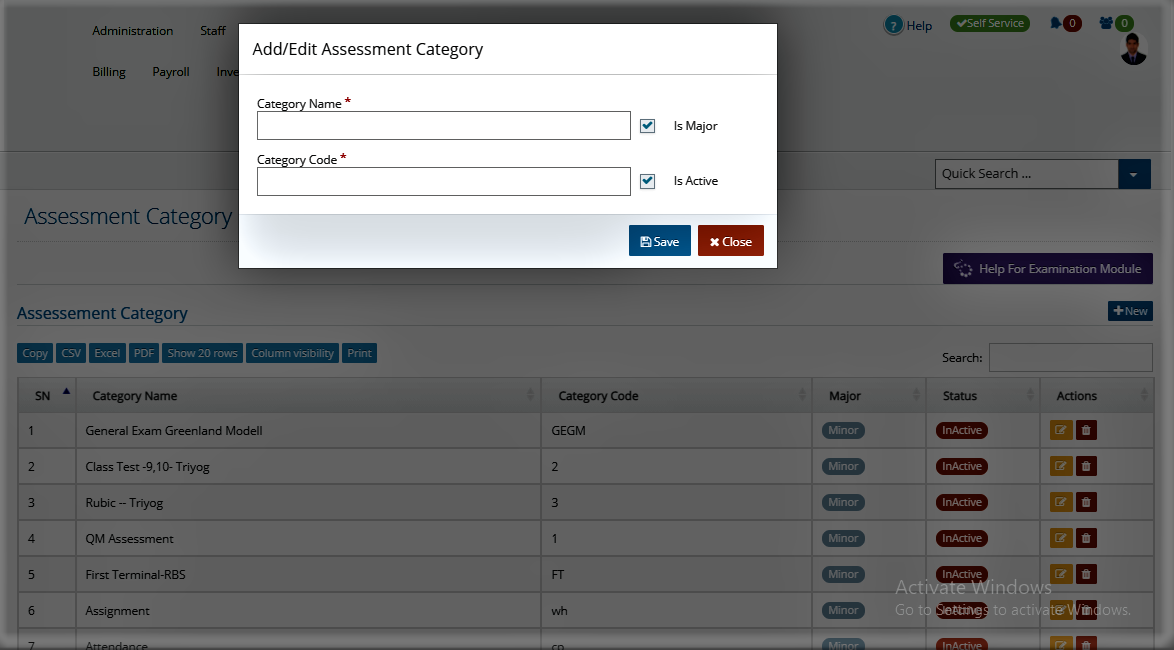
If you want to edit the assessment category,
- Select the desired assessment category from the list
- Click on edit button
- Enter the changes
- Click Save
Grade Period
For individual data insertion
- Go to: Examination
- Select Manage Exam
- Select Grade Period
- Click New
- Select Program semestera and enter period name and period code
- Click Save
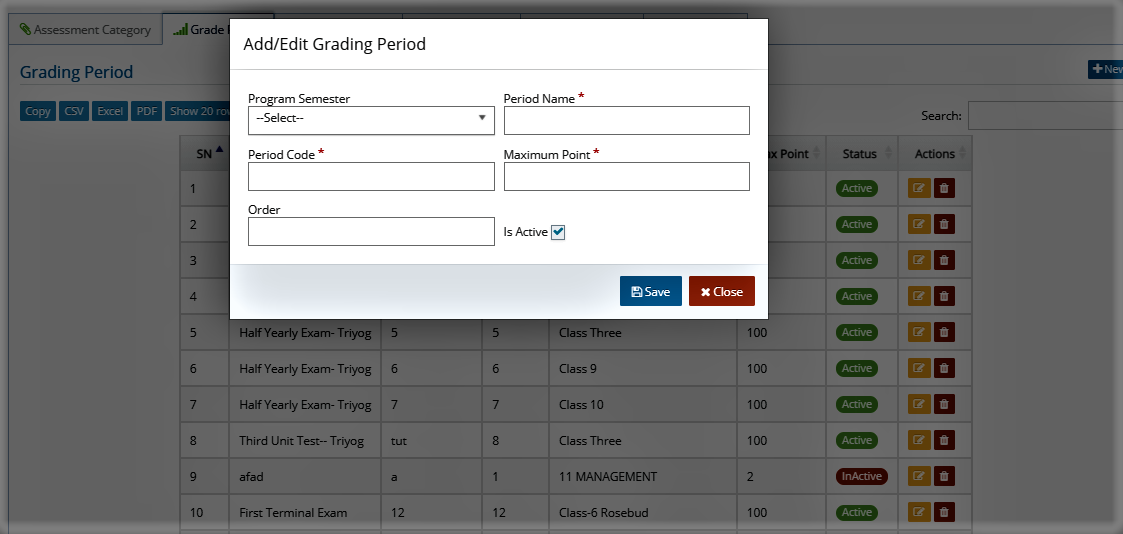
If you want to edit the grade period,
- Select the desired grade period from the list
- Click on edit button
- Enter the changes
- Click Save
Note: If there is 100 marks exam conduct you must have to enter 100 in grade period in exam weightage.
Assessment Information(Info)
After evaluation parameters, you must have to access assessment information.
- Go to: Examination
- Select Manage Exam
- Select Assessment info
- Click New
- Select Assessment Category, Program Semester, Grade Period
- Enter Assessment Name, assessment code, score type and grade type
- Click Save
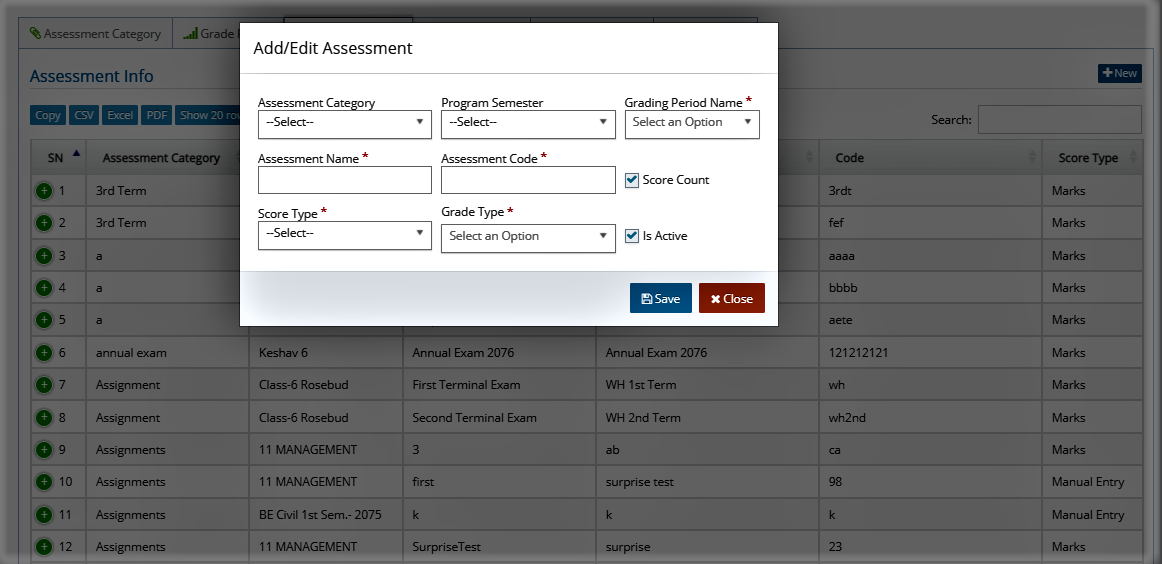
If you want to edit the assessment info,
- Select the desired assessment from the list
- Click on edit button
- Enter the changes
- Click Save
Exam Conduct
Examinations are conducted according to the Assessment Rule.
- Go to: Examination
- Select Manage Exam
- Select Exam Conduct
- Click New
- Select Program Semester and Assessment name
- Enter the theory as well as practical marks for each subject
- Click Save
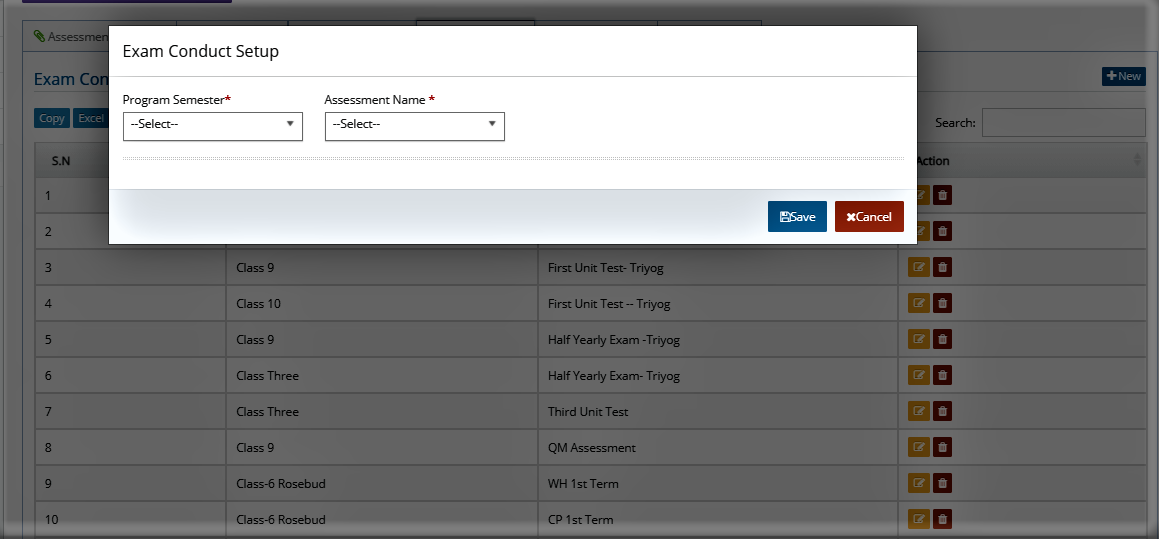
If you want to edit the exam conduct info,
- Select the desired exam from the list
- Click on edit button
- Enter the changes
- Click Save
Exam Schedule
You can create a exam schedule for each exam.
- Go to: Examination
- Select Manage Exam
- Select Exam Schedule
- Click New
- Select Program Semester and Grading Period
- Enter the date and time for each subject
- Click Save
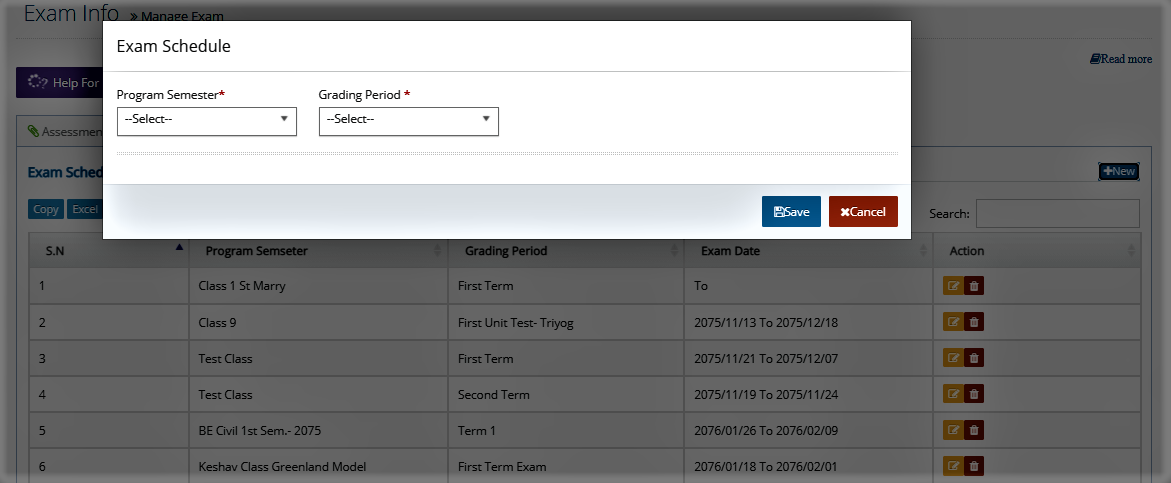
If you want to edit the exam conduct info,
- Select the desired exam schedule from the list
- Click on edit button
- Enter the changes
- Click Update
Publish Exam
When you publish the results, you must have set the current date period.
- Go to: Examination
- Select Manage Exam
- Select Publish Info
- Click New
- Select Program Semester ,Grading Period and Grade Name
- Enter the publish date and public publish date
- Click Save
Note: You must have to set current time before you generate marks ledger and markseet.

If you want to edit the exam conduct info,
- Select the desired publish info from the list
- Click on edit button
- Enter the changes
- Click Update
Step 3: Exam Weightage
When you create the exam weightage, you must have set the format of UT and term exam ‘Score Type’
- Go to: Examination
- Under Weightage, select Exam Weightage
- Select Assessment Category Weightage
- Select required Program semester and click Search
- Enter the weightage for each assessment category
- Click Save
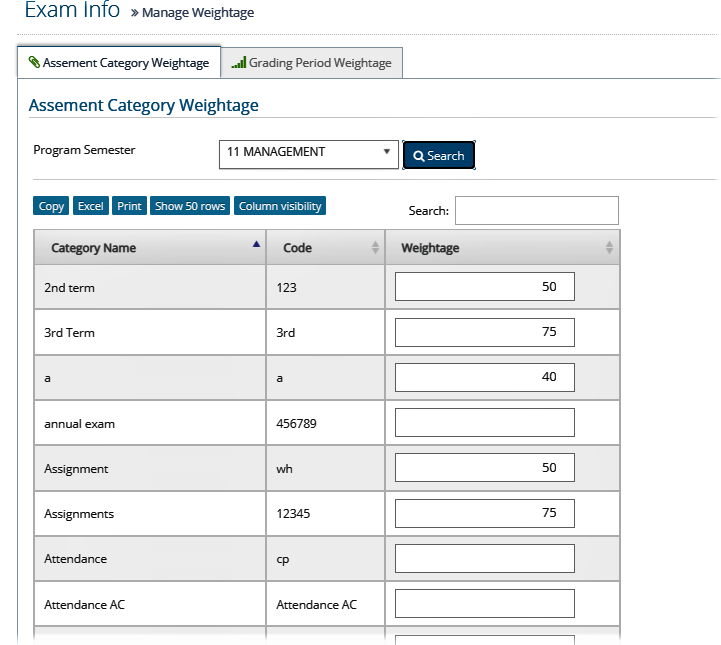
Note: If there is only conducted term exam result without UT you’ve enter 100 in category name otherwise you must have set UT marks and Term Exam 20 and 80 respectively.
To enter the weightage for grading period:
- Go to: Examination
- Under Weightage, select Exam Weightage
- Select Grading Period Weightage
- Select required Program semester, grade period and click Search
- Enter the weightage for each grade period
- Click Save
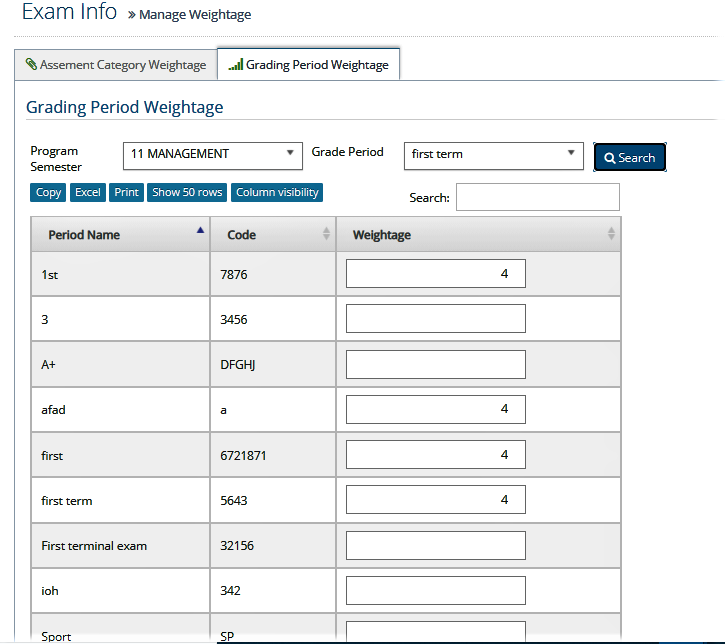
Step 4: Evaluation Parameter
Before assessment information (info), you must have to set your grading and percentage setup for entering score type and grade type (SEE GPA).For individual data insertion,
- Go to: Examination
- Under Manage Evaluation Parameter, select Evaluation Parameter
- Select Grade Setup
- Click New
- Enter the grade name, grade code, minimum percentage , maximum percentage, grade value and description under this grade
- If you want to add more rows, click +
- Click Save
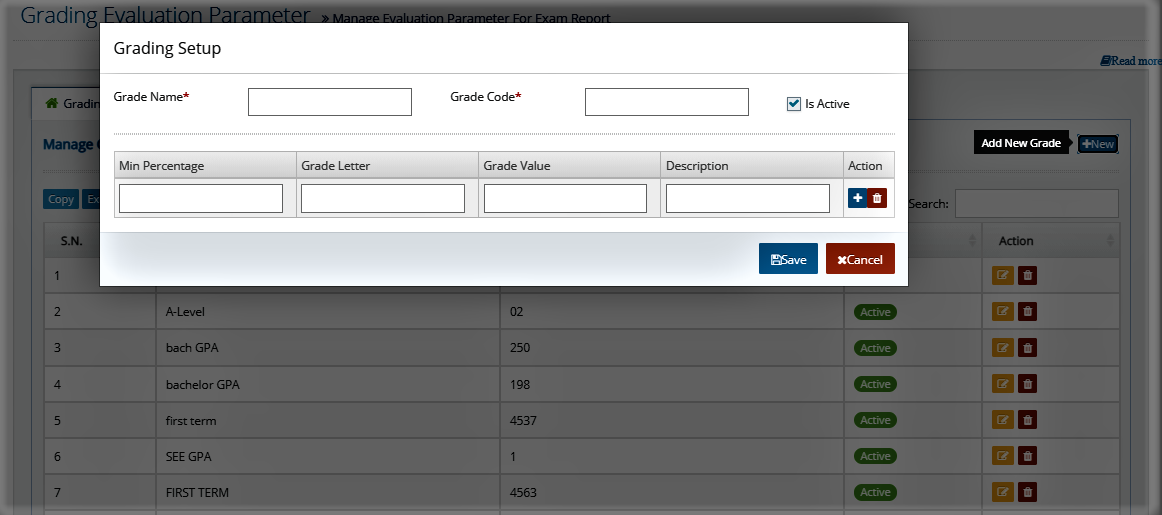
To insert data for percentage setup,
- Go to: Examination
- Under Manage Evaluation Parameter, select Evaluation Parameter
- Select Percentage Setup
- Click New
- Enter the program, percentage name, percentage code, minimum percentage, remarks and description under this percentage
- If you want to add more rows, click +
- Click Save
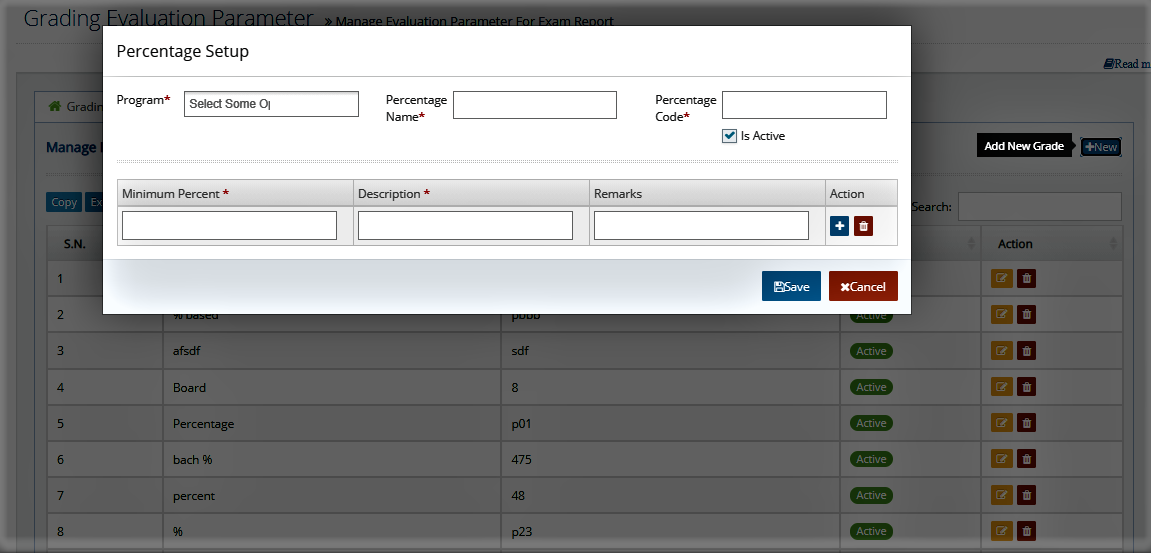
Step 5: Marks Entry
Academic staffs play the role in marks entry.
- Go to: Examination
- Undrer Marks Entry, select Marks Entry
- Select Program semester, section, grading period, assessmena and subject
- Clic on Search
- Enter the marks for each student under each assessment heading for both theory and practical
- Check the checkbox if the student is absent
- You can alse enter the absenteeism reason
- Click Save
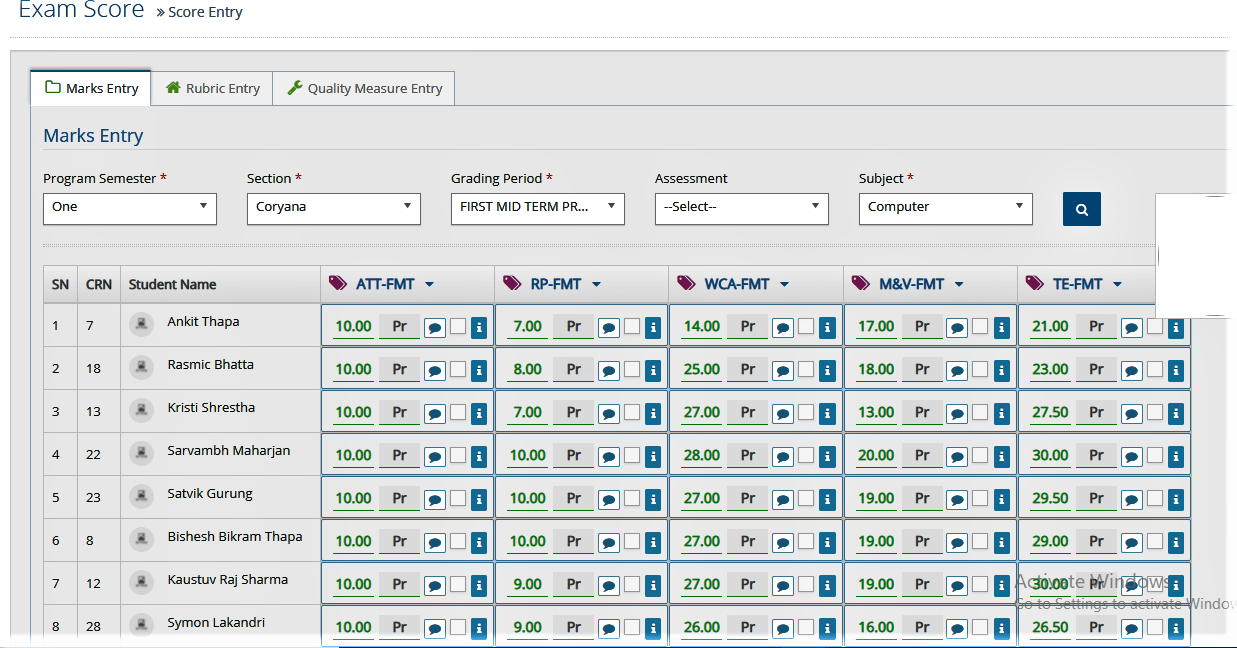
Step 6: Quality Measure
Before quality measure entry, you must have to set the quality measures (extra activities) in examination module.
- Go to: Examination
- Undrer Manage Quality Measure, select Quality Measure
- Select Quality Measure Group
- Click New
- Enter the group name and group code
- Click Save
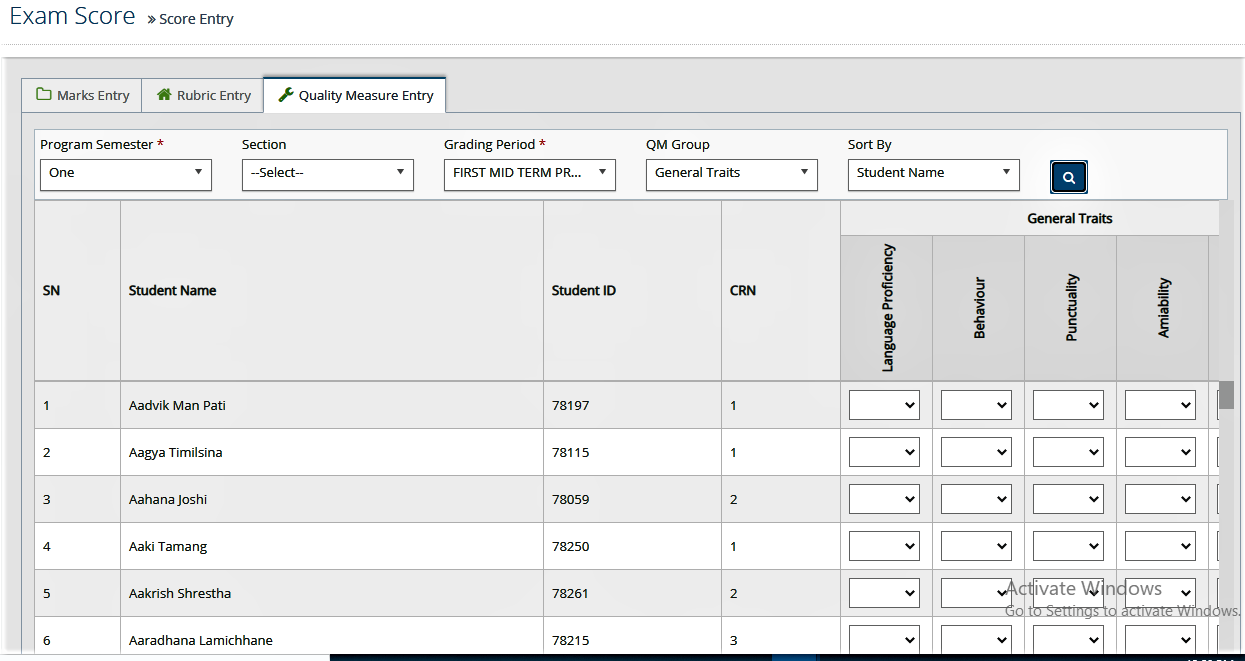
If you want to edit the quality measure group,
- Select the desired quality measure from the list
- Click on edit button
- Enter the changes
- Click Update
You can also set the quality mesure parameters. To set the quality measure parameters,
- Go to: Examination
- Undrer Manage Quality Measure, select Quality Measure
- Select Quality Measure Parameters
- Click New
- Select Program and Quality Measure Group
- Enter Quality measure name and quality measure code
- Click Save
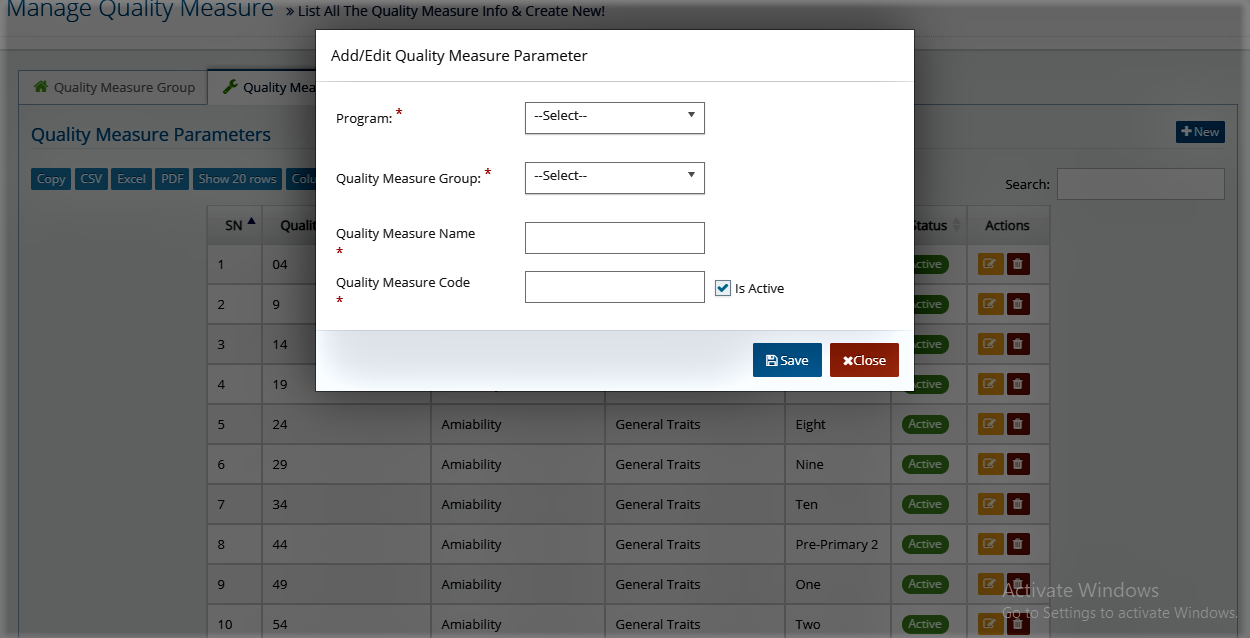
If you want to edit the quality measure parameters,
- Select the desired quality measure parameters from the list
- Click on edit button
- Enter the changes
- Click Update
Step 7: Marks Ledger
The check marks in the exam results indicate that a particular transaction has been illustrated below.
- Go to: Examination
- Undrer Exam reports, select Marks Ledger
- Select your desired search parameters
- Click Get Report
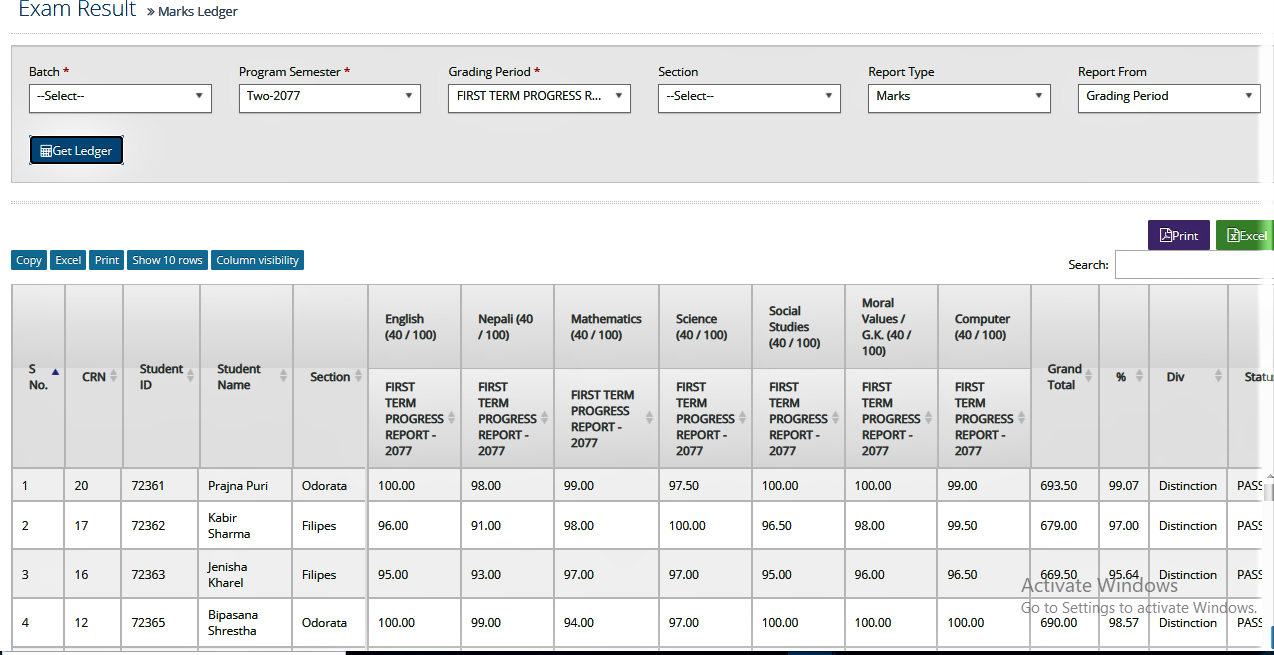
If you want to print or export the ledger to excel, click on Print or Excel respectively.
Step 8: Marksheet
In mark-sheet, what you obtain after your examinations reflects your performance for the same. The number of years your course spread over and an explanation of the grading system followed by your school/college. Before generating mark sheet, you must have to set report format.
- Go to: Examination
- Undrer Exam reports, select Marks Sheet
- Select your desired search parameters
- Click Get Report

Library Module
Library management admin/member can easily search for books by book author, Title and Publication name. Keep in record of different categories like; Books, Journals, Newspapers, Magazines, etc. System provides an easy way to know the status of a book. Librarian can keep complete information of a book like; Book name, Author name, Publisher’s name, Date/ Year of publication & Cost of the book, etc.
- Setting
- Compartment and Racks
- Book Entry
- Book Classification Number
- Book Accession Number
- Register Member
- Barcode Print
- Book Transaction
- Book Aggregate Status
Step 1: Settings
Setting consists of
- Book Category
- Book Genre
- Book Group
- Book Sub-Group
- Issue Rule
Book Category
Books contain lending and reference books. Lending books are those books which are associated on course based book such as colleges/ schools textbook like physics, biology, English etc. Reference books are those books which are denoted as non- course books such novels, history, story books, dictionary etc.
- Go to: Library
- Select Setting
- Select Book Category
- Click New
- Enter Book Category Name and Book Category Details
- Click Save
If you want to edit the book category,
- Select the desired book category from the list
- Click on edit button
- Enter the changes
- Click Save
Book Genre
This is a category for different genres of books, as distinct and separate from the category book by type.
- Go to: Library
- Select Setting
- Select Book Genre
- Click New
- Enter Genre Name and Genre Details
- Click Save
Book Group
Here you can set book group for each book that you will enter later.
- Go to: Library
- Select Setting
- Select Book Group
- Click New
- Enter Group Name and Group Details
- Click Save
If you want to edit the book group,
- Select the desired book group from the list
- Click on edit button
- Enter the changes
- Click Save
Book Sub-Group
Here you can set book sub-group for each group that you have already saved.
- Go to: Library
- Select Setting
- Select Book Sub Group
- Click New
- Enter Group Name, Sub Group Name and, Sub Group Details
- Click Save
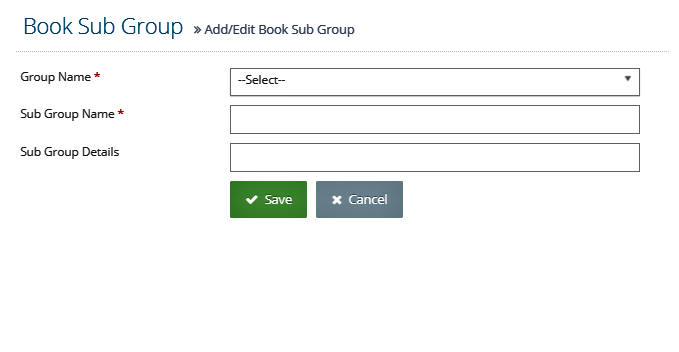
Issue Rules
All faculty, staff, scholars and students of the institute are entitled to become library members. Users are divided into the following categories - their entitlements, maximum number of books, number of days for renew, fine per extra day and number of days of issue is proposed in the given below:
- Go to: Library
- Select Setting
- Select Issue Rules
- Click New
- Enter Member Type, Program, Semester, Book Category, Number of Book Allowed, Number of Renews, Number of Day for Renew and Fine Per Extra Day
- Click Save
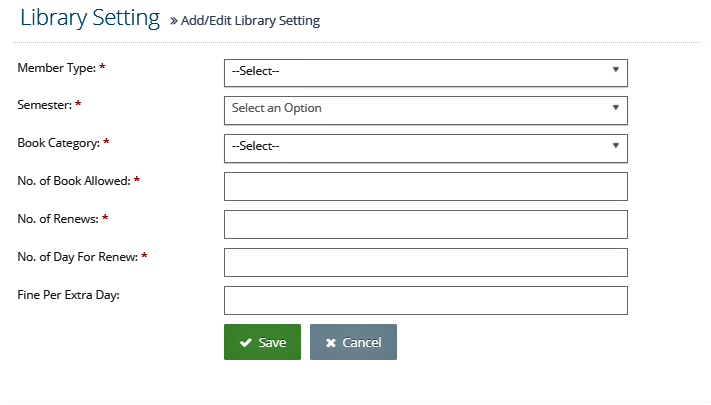
If you want to edit the issue rules,
- Select the desired issue rules from the list
- Click on edit button
- Enter the changes
- Click Save
Step 2: Compartment and Racks
Compartment and Racks contains details for compartment and their racks.
- Compartment
- Racks
Compartment
Compartment divide (something) into separate parts or sections.
- Go to: Library
- Select Compartment and Racks
- Select Compartment
- Click New
- Enter Compartment Name and Compartment Details
- Click Save
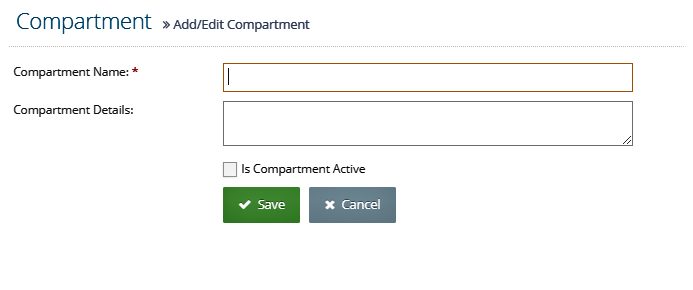
If you want to edit the compartment,
- Select the desired compartment from the list
- Click on edit button
- Enter the changes
- Click Save
Racks
In racks, books are stored in vertically or horizontally way.
- Go to: Library
- Select Compartment and Racks
- Select Racks
- Click New
- Select Compartment Name
- Enter Rack Name and Rack Details under the Compartment
- Click Save
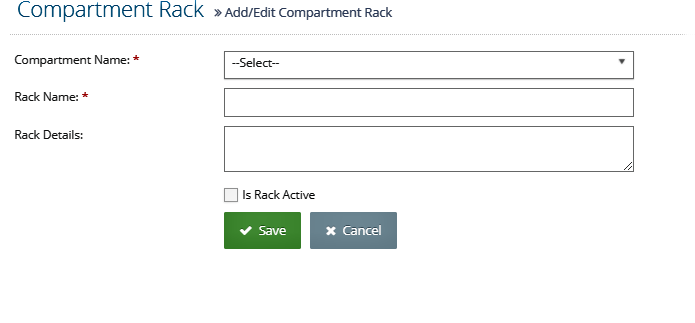
If you want to edit the rack,
- Select the desired compartment from the list
- Click on edit button
- Enter the changes
- Click Save
Step 3: Book Entry
A library within colleges where students, staff, and often public or private school have access to a variety of resources. Staffs can entry the categorized of books based on course and non- course books. The process of book entry has ben categorised into
- Book Classification Number
- Book Accession Number
Book Classification Number
A library assigns a classification number that unambiguously locates a particular volume in a position relative to other books in the library, on the basis of its subject. The number makes it possible to find any book and to return it to its proper place on the library shelves.
- Go to: Library
- Under Book Info, select Book Info
- Select Book Classification Number
- Click New
- Enter the details of the book you want to entry
- Click Add Book Name
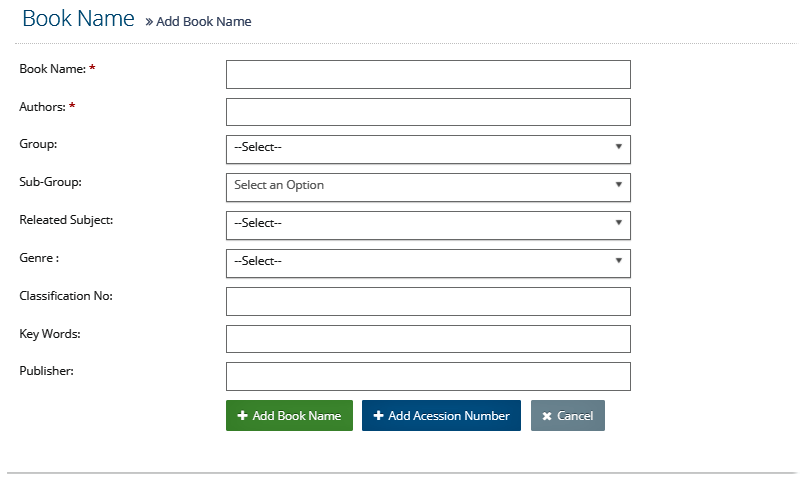
If you want to edit the book,
- Go to: Library
- Under Book Info, select Book Info
- Select Book Classification Number
- Check the desired book from the list
- Click on edit button
- Enter the changes
- Click Update
Book Accession Number
Accession number mentions total number of books in library by example last book allotted by 25354. Total number of books available in recording in database.
- Go to: Library
- Under Book Info, select Book Info
- Select Book Accession Number
- Click New
- Select the Book Name
- Enter the accession details
- Click Add Book
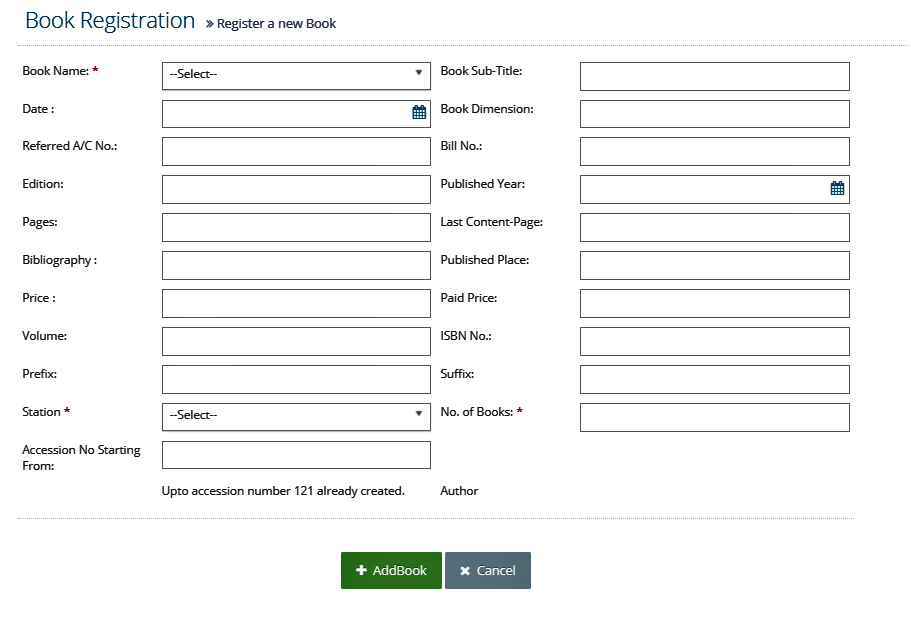
If you want to edit the accession,
- Go to: Library
- Under Book Info, select Book Info
- Select Book Accession Number
- Check the desired accession from the list
- Click on edit button
- Enter the changes
- Click Update
Step 4: Register Member
Schools/Colleges, there began to be membership cards, which it became necessary to register users who are permitted to borrow illustration of book card and description of use.
- Go to: Library
- Under Library Membership, select Register Member
- If you want to register student, select Student's Library Register Info
- Select Academic Year and Program Semester
- Click Show Students
- Enter the Memberahip No and check Is member checkbox
- If you want to register staff, select Staff's Library Register Info
- Select Designation and Department
- Click Show Staff
- Enter the Memberahip No and check Is member checkbox
- Click Save

Step 5: Barcode Print
In barcode, we have accession number which are added in book entry. It generates the code of books and looks exactly the same as the given below, except that it does not have the first digit”0″ in the number below the bars which are identify with different unique digits.
- Go to: Library
- Undrer Barcode Generate, select Print Accession Barcode
- Enter Accession No From and Accession No To
- Clic on Get Accession
- Check the checkbox of the accession that you want to print bar code for
- Click Print Accession
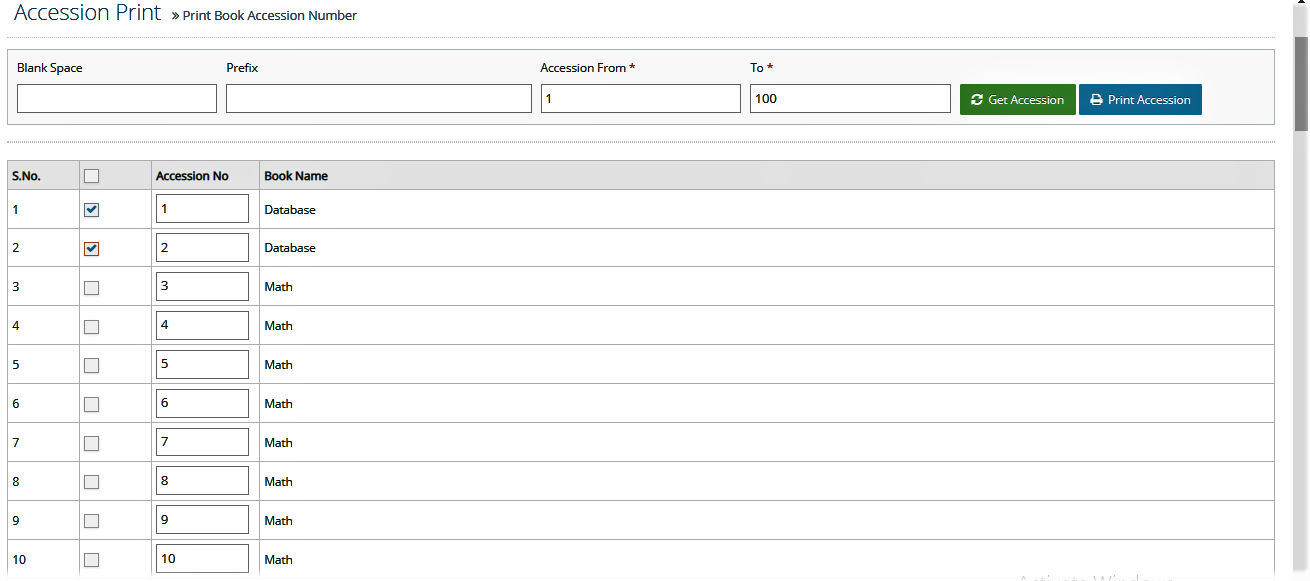
Note: You need to set the report format before you print the barcode.
Step 6: Book Transaction
Staffs can record the book transactions which are shown in below.
- Go to: Library
- Undrer Library Activity, select Book Issue
- Select either By Member or By Accession No or By Membrship No based on which you want to issue the book
- If you select By Member, enter Member ID
- If you select By Accession No, enter Accessio No
- If you select By Membership No, enter Membership No
- As you enter any one of them, the details about book, member info and transaction history will get load
- Check the status of book and the menber whom you are going to issue the book to
- Enter Renew After and New Renew Date
- Check Issue Book
If you want to return or renew the book
- Under the Already Issued Books, click Renew or Return
Similarly, if the book is lost,
- Under the Already Issued Books, click Lost
Step 7: Book Aggregate Status
Book Aggregate status shows the present status of books such as the total quantity of books, total issued total damaged and remaining quality on the Book model. A list of the aggregate functions that are available can be found in the set reference and lending books.
- Go to: Library
- Undrer Reports, select Book Aggregate Status
- Enter the details of the book to search the aggregate status
- Click Search
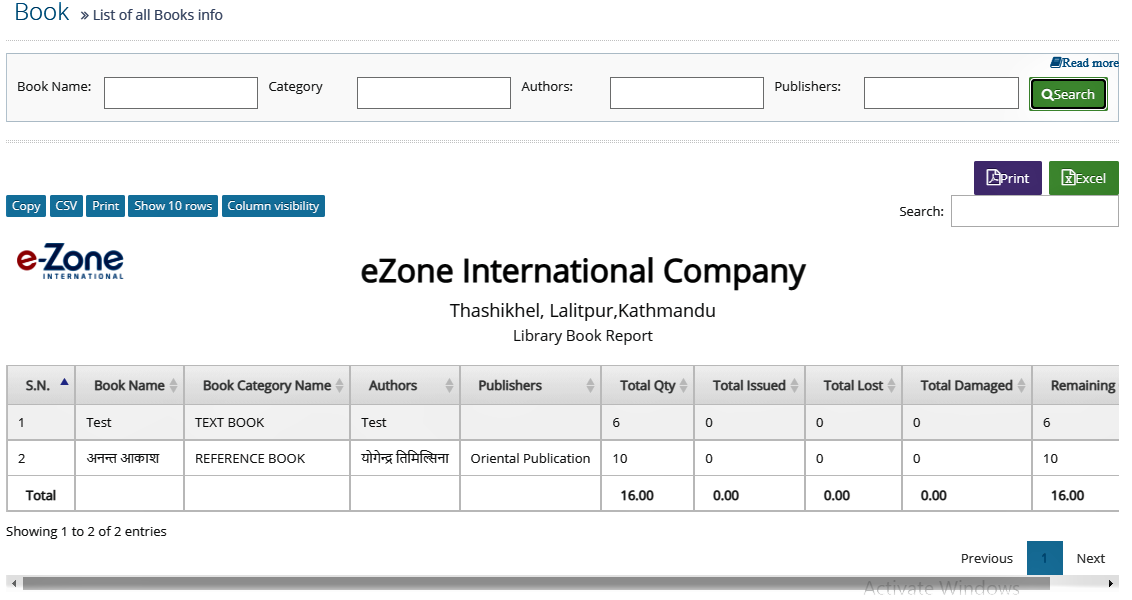
If you want to print or export the ledger to excel, click on Print or Excel respectively.
Login As Mobile App
Student can see their own library details books through mobile app.
Online Class
The preliminary requirement of using online class in eschool is to own either a zoom or a google account. If you already have any of these accounts, the other requirements are:
- Create Class
- Associate Students to Class
Note: Please read LMS Module to understand how to create class and associate students to class.
Creating Online Class
If you have already created class and associated students, follow these instructions:
Step I: Go to dashboard and click Online Class
Step II: Click Meeting Portal
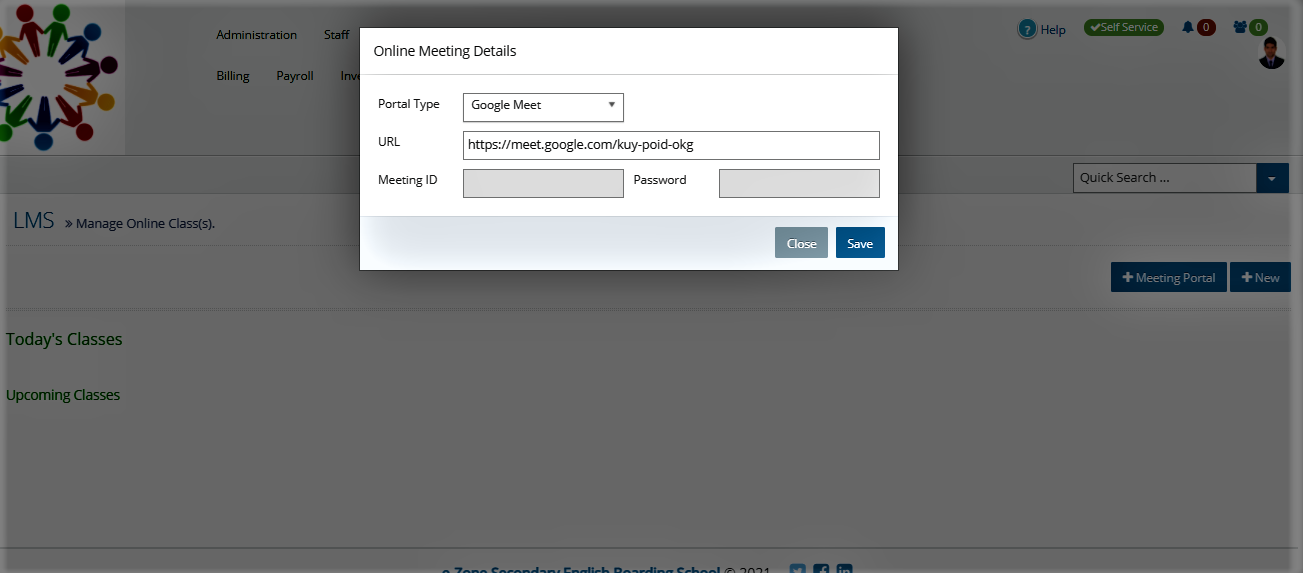
Step III: Fill the required details.
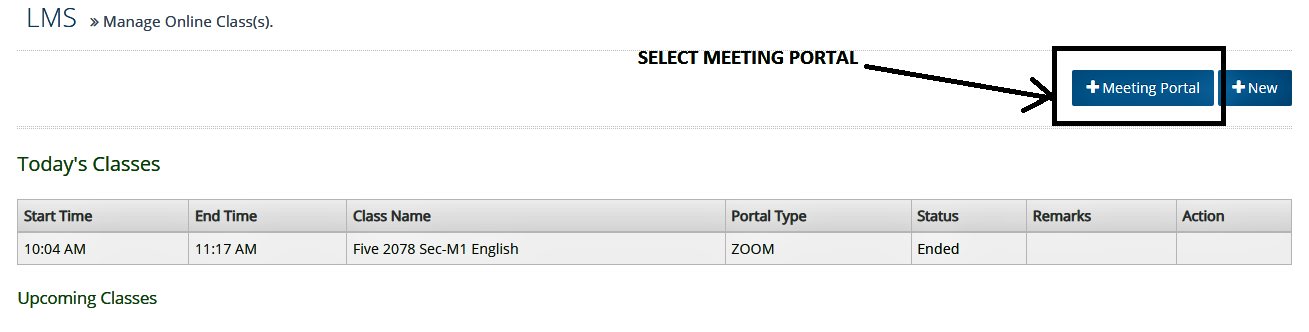
Note: Here, Portal Type refers to the platform such as Zoom or Google Meet that you wish to use to conduct your online class. URL refers to URL link that you copy from your zoom or google meet under meeting information. For example; this is how you copy URL from Zoom Meeting.
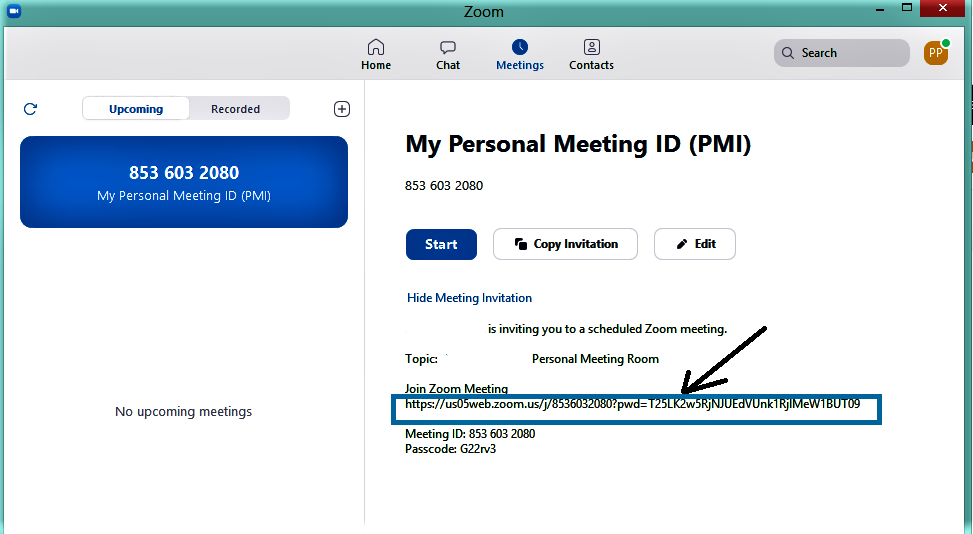
Step IV: Click New to create online class.
Select the respective class. Input date, start time, end time and remarks and click Save.
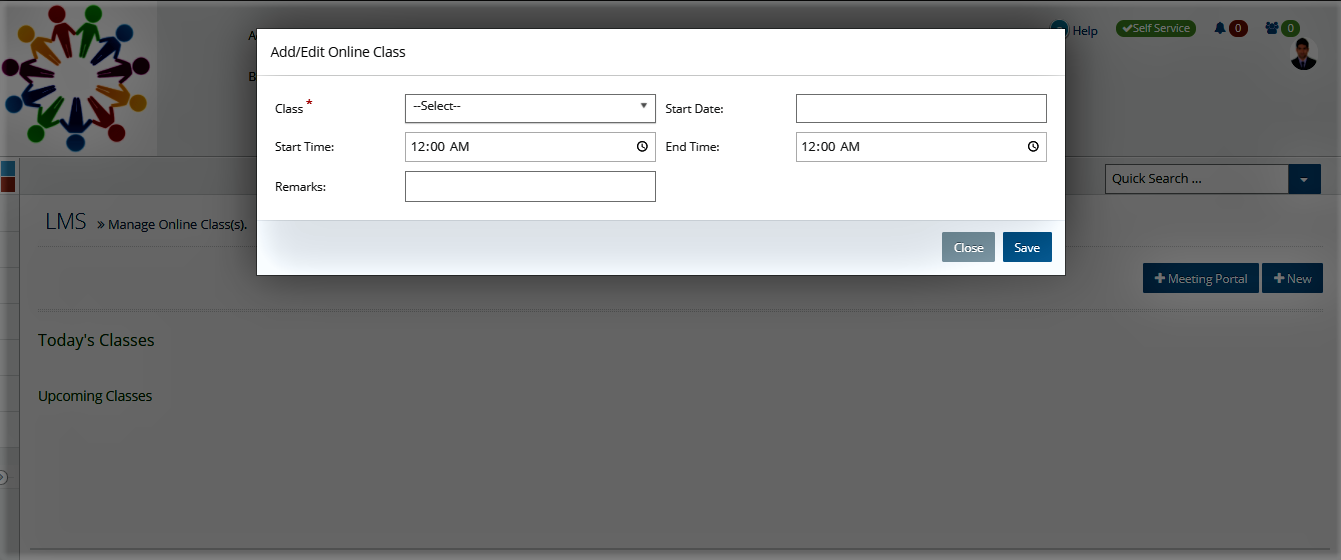
Note: Teachers can set their online class schedule today and upcoming classes in early days.
Step V: Once Class is created, click Start to start class.
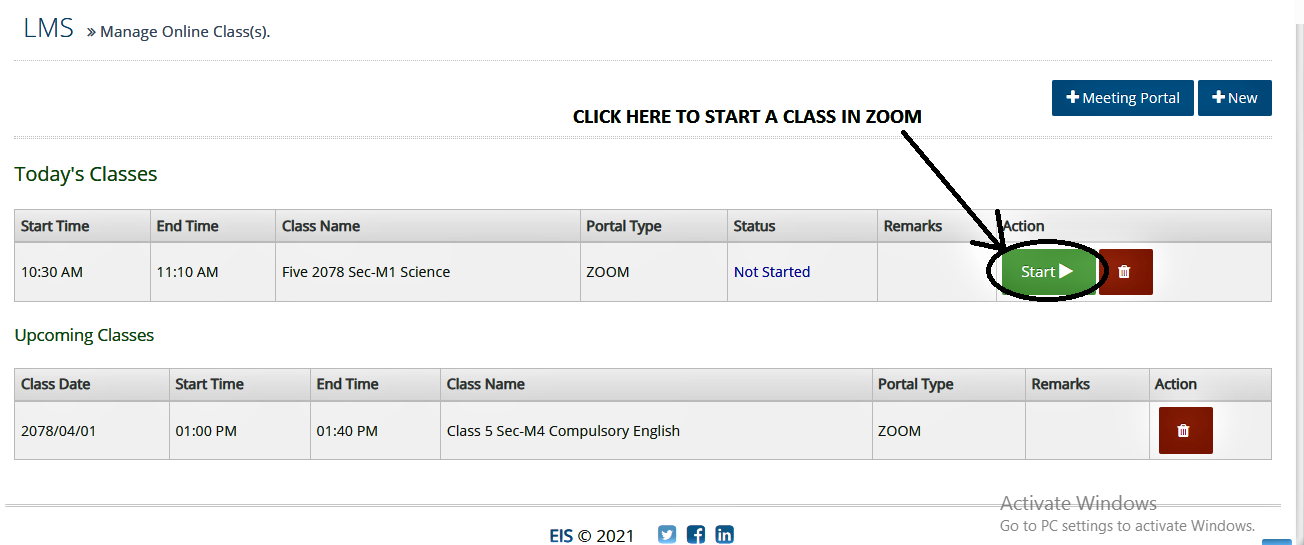
Note: Once the teacher creates the online class, students get notified about the class through mobile app.
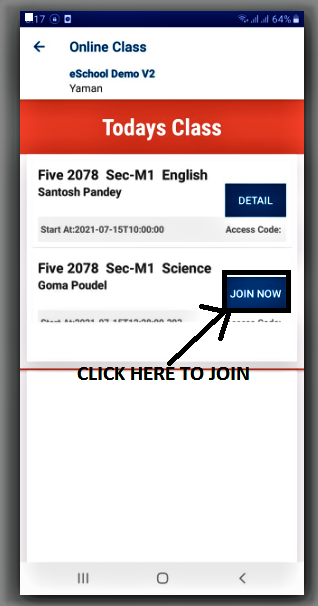
Online Class Attendance Reports
If you have logged into the system as an admin, you can genrate the report on students' online class attendance.
- Go to: LMS
- Under Manage Attendance, select Online Class Student Attendance Report
- Select respective class and date
- Click Search
If you want to print or export this report to excel,
- Click Print / Export to Excel
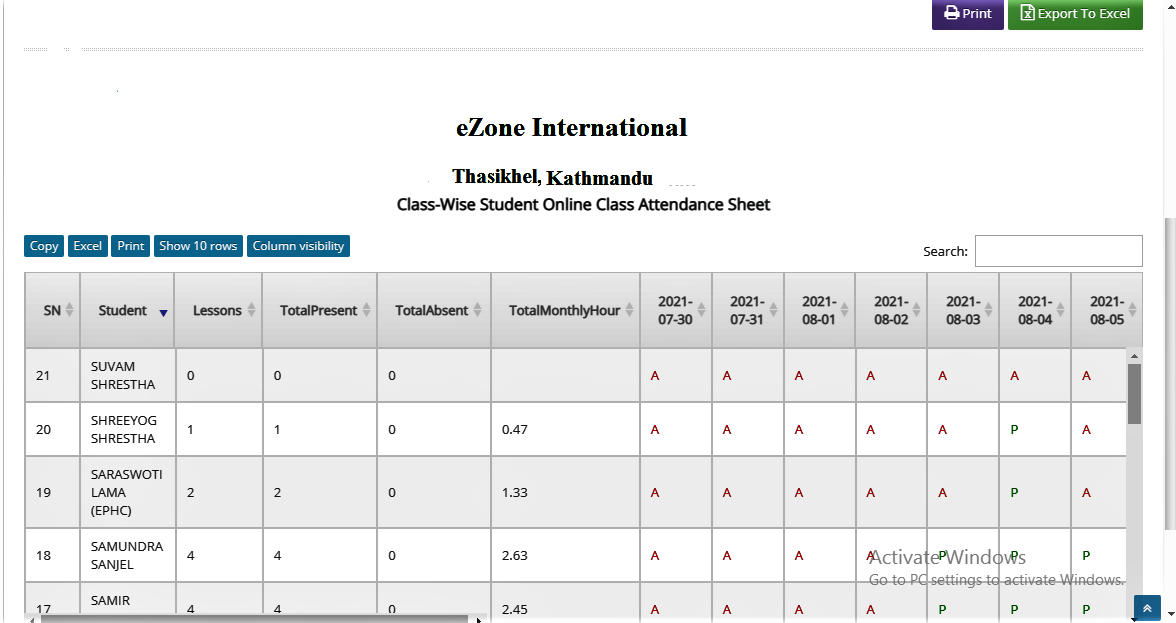
Join Online Class
If you have logged in as a student, you can join online clas as;
- Go to dashboard and click Online Class
- From the list of classes, click Join next to respective class to join online class